


‘Tis the season to be gifting! So what if you can’t find the perfect gift for that special someone? Wrap up a gift card in this totally fun gift card holder and let them choose a gift they’ll really love!
Here’s what you’ll need to create it:
- Cardstock – red, white, black and yellow
- Border Maker with Diamond Scroll Cartridge
- Shape Maker with Circle Cartridge
- Paper Trimmer
- Scissors
- Tape Runner
- Black Pen
- Optional: Circle Tag Cartridge (for Shape Maker, if you decide to add a tag)
- Optional: Twine
Step 1: Cut a piece of red cardstock to measure 4″ x 10″.
Step 2: Remove blade from paper trimmer, then insert red strip into trimmer and close arm. Using Multi-Purpose Tool, score red strip at 2″ and 6.75″. NOTE: score by lightly dragging tool along blade guide as shown here:

Step 3: Fold along both score lines.
Step 4: Using Shape Maker with Circle Cartridge (flipped upside down), punch small piece away from 2″ section.

Step 5: Apply Tape Runner along each edge of “notched” flap:

Step 6: Fold flap over and press where adhesive was applied to seal. Go ahead and give it a whirl – insert the card! :)

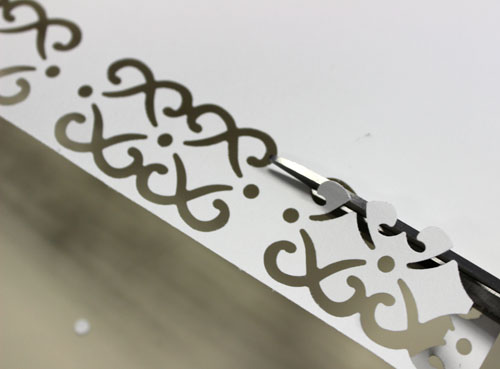
Step 7: Now we’ll create the white faux fur for the bottom and center of the coat. Begin by punching along entire 12″ edge of white cardstock with Border Maker and Diamond Scroll cartridge. With scissors, trim away the “center” portion of the punched area:

Step 8: After the center portion of the punched area has been trimmed out, we’ll adhere it down the center of the top flap first. Only adhere to top flap, but let the excess hang over:

Step 9: Trim excess away, then adhere the trimmed portion to the notched pocket, then trim away any excess:

Step 10: Adhere remaining trimmed portion across bottom of card. NOTE: Begin by lining up the single hole in design as shown here:

Step 11: Trim away excess border hanging off edges for a nice, tidy finish:

Step 12: Time to create Santa’s belt! First, cut a strip of black cardstock to measure 3/4″ x 10″. Wrap around the card and adhere overlap of strip in front of card:

Step 13: Cut a square from yellow cardstock to measure 1.25″, and a piece of black cardstock to measure 3/4″ square. Adhere black square to yellow square, then layered squares to center of belt.
Optionally, add tag by punching one white and one black circle tag shape using Shape Maker with Circle Tag Cartridge. Trim away center portion of white tag and adhere to center of black tag. Add “To:” and “From:”, then tie a small chunk of twine on to tag. Adhere to card to finish.

Really cute idea – but a pic of the final product would be helpful for those last bit of instructions…Thanks!! Sue v.
There’s one right up at the top! ;)
There is a photo of the finished product at the very top of the blog where you can see the circle punch tag. I’m definitely making this – really cute and looks so easy. Sue O
I love how you’ve created a whole new Border Maker from the Diamond Scroll! It looks awesome.
Did it, love it, using it!!!
I also did it and am using it. Love these blog ideas and illustrated instructions. I used the retired frame chain border cartridge and it worked to create the same effect.