February 19, 2024
Take A Creative Spin On This Rainbow Scrapbook Layout

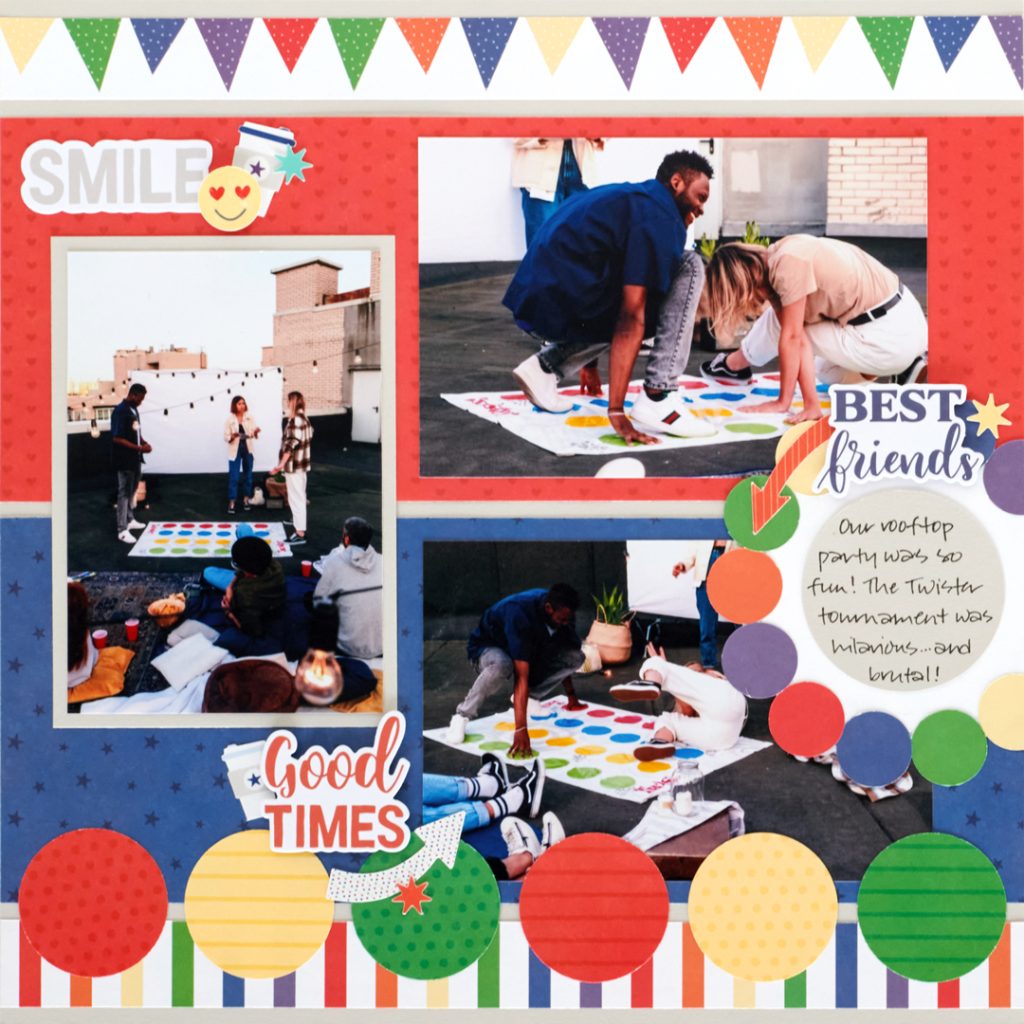
Add a punch of vibrance to your memories with the This Life Paper Pack and Tone-on-Tone Paper Pack, which provide an array of shades to beautify your projects, like the one below! To create this layout, you’ll play with the Circle Custom Cutting Systems Patterns. Did you know that by using this 3/pk of patterns with our three Custom Cutting System Blade Cartridges, you’ll be able to create 18 (yes, 18!) different sized circles?! Well, get your tools in shape and get ready to create your own twist on this rainbow scrapbook layout!
To create this layout you will need:
- This Life Paper Pack or (Shop Canada | Shop Australia)
- This Life Tone-on-Tone Paper Pack or (Shop Canada | Shop Australia)
- This Life Word Embellishments or (Shop Canada | Shop Australia)
- This Life Stickers or (Shop Canada | Shop Australia)
- White & Beige Solid Cardstock or (Shop Canada | Shop Australia)
- Custom Cutting System with Circle Patterns or (Shop Canada | Shop Australia)
- Circle Punch or (Shop Canada | Shop Australia)
- 12-inch Trimmer or (Shop Canada | Shop Australia)
- Tape Runner or (Shop Canada | Shop Australia)
- Repositionable Tape Runner or (Shop Canada | Shop Australia)
- Foam Squares Variety Pack or (Shop Canada | Shop Australia)
- Black Dual-Tip Pen or (Shop Canada | Shop Australia)


Step 1: Use a piece of Beige Solid Cardstock as the base for this layout.
Step 2: Cut a 12” x 1” strip with banners paper and adhere to the top of the layout 3/16” from the top edge. Cut a 12” x 4-1/2” piece with red hearts paper and adhere 3/16” from the banner strip. Cut a 12” x 4-1/2” piece with blue starry nights paper and adhere 3/16” from the red piece. Cut a 12” x 1” strip with stripes paper and adhere 3/16” from the bottom edge.
Step 3: Crop a photo to 3-8/16” x 5-7/16” and mat on a 4” x 5-3/4” piece of Beige Solid Cardstock. Adhere on the left side of the layout. Mound two 6” x 4” photos on the right side of the layout as shown.
Step 4: Using the Circle Punch, punch two circles each with red, canary and kelly green tone-on-tone papers. Adhere along the bottom of the border as shown.
Step 5: Using the outside edge of the smallest Circle Custom Cutting System Pattern and the Red Blade, cut a circle with White Solid Cardstock. Using the inside edge of the smallest Circle Custom Cutting System Pattern and the Blue Blade, cut circles from the insides of the dots paper. Adhere side by side around the outside of the white circle. Adhere on the layout trimming the edge that extends past the right edge of the layout. Using the inside edge of the medium Circle Custom Cutting System Pattern and the Red Blade, cut a circle with Beige Solid Cardstock. Adhere in the middle of the white circle. Journal as desired.
Step 6: Add stickers and embellishments, popping some up with Foam Squares for dimension.
Now it’s your turn! What moments in your life will you be adding some vibrancy to with this rainbow scrapbook layout?
P.S. Are YOU a member of the Virtual Crop Facebook Group? It’s your go-to place for MONTHLY Virtual Crops, MONTHLY Completed Album Challenges, WEEKLY LIVE STREAMING of Fast & Fun Projects with Noreen, LIVE QUARTERLY Secret Box Openings with project tutorials and so much more! We hope you’ll join our community of more than 38,000 fellow memory-keeping enthusiasts — you’ll feel right at home!

Very nice. Love this