April 15, 2024
Dive Into This Lake Scrapbook Layout!
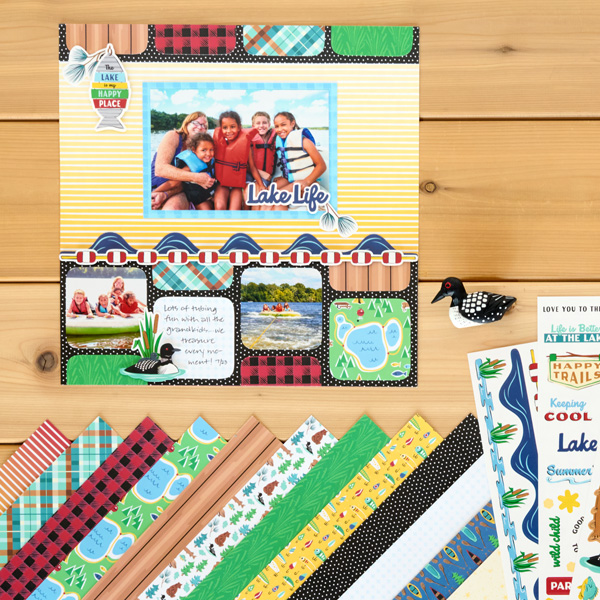
You’ll have a swimmingly good time making this layout using materials from the Life at the Lake collection! While you can use the Custom Cutting System Patterns to cut shapes from the papers, you can also use it to crop your photos to a variety of sizes. We’re sure whatever shapes you choose will make a splash!

To create this layout you will need:
- Life at the Lake Paper Pack or (Shop Canada | Shop Australia)
- Life at the Lake Mat Pack or (Shop Canada | Shop Australia)
- Life at the Lake Stickers or (Shop Canada | Shop Australia)
- Custom Cutting System with Rectangle Patterns or (Shop Canada | Shop Australia)
- 12-inch Trimmer or (Shop Canada | Shop Australia)
- Tape Runner or (Shop Canada | Shop Australia)
- Repositionable Tape Runner or (Shop Canada | Shop Australia)
- Foam Squares Variety Pack or (Shop Canada | Shop Australia)
- Black Dual-Tip Pen or (Shop Canada | Shop Australia)


Step 1: Use a sheet of ombre paper as the base for this layout. Cut a 12? x 1-1/4? strip with black polka dots paper and adhere on the top of the layout. Cut a 12? x 4-1/4? strip with black polka dots paper and adhere to the bottom of the layout.
Step 2: Using the inside edge of the square Rectangle Custom Cutting System Pattern and the Green Blade, cut squares from a variety of papers (cabin, buffalo check, plaid, reeds, map and diamonds). Crop two photos using the same pattern and blade. Cut the cabin, buffalo check, plaid and reeds squares in half. Adhere one half of each along the top black polka dots strip as shown. Adhere the other halves and remaining squares and photos along the bottom black polka dot section, using the layout above as a guide for placement.
Step 3: Mount a 6? x 4? photo on a sky blue plaid variety mat and adhere on the layout.
Step 4: Adhere border stickers and additional stickers as shown, popping some up with Foam Squares for dimension.
Step 5: Journal as desired.
How did using the Custom Cutting System Patterns work for you?
P.S. Are YOU a member of the Virtual Crop Facebook Group? It’s your go-to place for MONTHLY Virtual Crops, MONTHLY Completed Album Challenges, WEEKLY LIVE STREAMING of Fast & Fun Projects with Noreen, LIVE QUARTERLY Secret Box Openings with project tutorials and so much more! We hope you’ll join our community of more than 39,000 fellow memory-keeping enthusiasts — you’ll feel right at home!

I’m sorry if I’m asking at wrong site. I just purchased a new creative memories album. Putting the album together (I watched video). When do I put the page protectors on?. Please help.
Congratulations on your new album! Page protectors go on after you complete the page or are wanting to protect the page and what you have gotten done up to point of wanting to protect your efforts. Slip them on so the sealed sides are on the top and bottom. The open ends – one goes all the way to the inside edge of the jeeping (that reinforced part of the page that runs vertically on both inside/outside edges) and the other open side sits against the outer jeeping edge. Now some folks will sometimes not ‘pull’ the protector all the way to the inside edges of the jeeping if they still have something left to put on the page. Like writing, journaling details, more embellishments, whatever… My advisor years ago referred to slipping on page protectors as putting pillowcases on your pillows. Gotta sometimes go back ‘n forth to get the case over the whole pillow. And the case protects the pillow from sneezes, lipstick, hair oils – all that lovely stuff :) Some folks will take a piece of wax paper and fold it so it lays over the outer edge of album page to make it easier to slip it on at first. I learned a technique that involved saving a page protector to use a ‘slide-it-on’ guide: snip one of sealed edges open, then lay this snipped protector over the album page so it is over the page you see and the other part of the protector is over the album page on other side. The remaining sealed edge is along the outer edge of page, the snipped edge is along the inside, and the normal open sides are top and bottom. Then take a regular page protector to slip on. It will slide on as the other snipped ‘slide-it-on’ guide one prevents the regular page protector from catching on any paper or photos, etc. Same thing that the wax paper does. If you ‘sacrifice’ a protector to use this way, stick a post-it note on it so you know, You could probably keep it in one of those plastic bags that 6 or 12 sheet paper packs come in. I hope this helps! If not, reach out to your advisor. If have more questions about what I wrote – happy to try to write more clearly.