November 19, 2024
Wrap Up Your Memories in This Christmas Layout
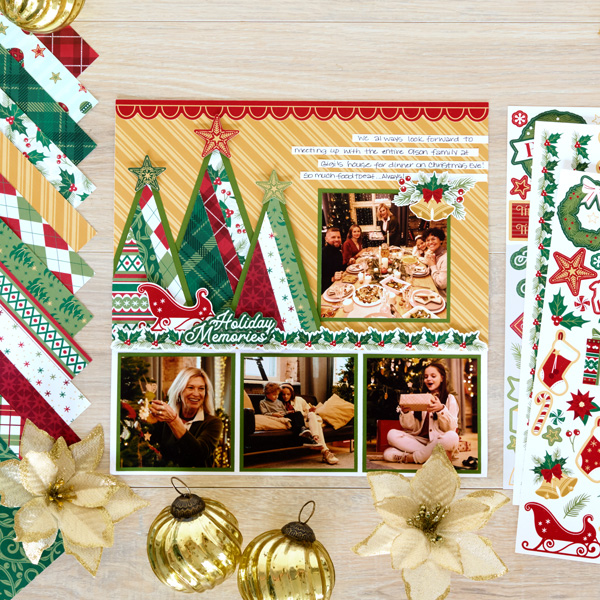
Tis the season to be scrappy! With golden tones and beautiful trees, this layout adds a warm touch to your memories. By using the designer papers from the Christmas Charm collection, you can create cutomized trees you’ll find absolutely dashing.

To create this layout you will need:
- Christmas Charm Paper Pack or (Shop Canada | Shop Australia)
- Christmas Charm Stickers or (Shop Canada | Shop Australia)
- Avocado & Bright White Solid Cardstock or (Shop Canada | Shop Australia)
- Write On! Stickers or (Shop Canada | Shop Australia)
- 12-inch Trimmer or (Shop Canada | Shop Australia)
- Tape Runner or (Shop Canada | Shop Australia)
- Repositionable Tape Runner or (Shop Canada | Shop Australia)
- Foam Squares Variety Pack or (Shop Canada | Shop Australia)
- Black Dual-Tip Pen or (Shop Canada | Shop Australia)

Step 1: Use a piece of Bright White Cardstock for the base of the layout.
Step 2: Cut a piece of yellow stripes paper to measure 12” x 8”. Adhere to the top portion of the layout.
Step 3: Create the left tree:
- Cut a piece from argyle paper to measure 3-1/2” x 5-1/2”. On one end of the piece mark with a pencil at 1-3/4”. Cut from the outside corners to the pencil mark to create the triangle. This will be the base paper for this tree.
- Cut a piece from floral filigree paper to measure 3-1/2” x 5-1/2”. On one end of the piece mark with a pencil at 1-3/4”. Cut from the outside corner to the pencil mark to create a triangle. Then, cut off ½” from one side of the triangle. Adhere to the base triangle.
- Cut a piece from ornamental stripes paper to measure 3-1/2” x 5-1/2”. On one end of the piece mark with a pencil at 1-3/4”. Cut from the outside corners to the pencil mark to create a triangle. Then, cut off 1” from one side of the triangle. Adhere to the previous triangle piece.
- Adhere this whole “tree” to a piece of Avocado Cardstock, then trim around the edges with the trimmer, leaving ¼” around the tree.
Step 4: Create the center tree:
- Cut a piece from holly +pine paper to measure 4” x 6”. On one end mark with a pencil at 2”. Cut from the outer corner to the pencil mark to create the triangle for the base of the tree.
- Cut a piece from red plaid paper to measure 4” x 6”. On one end mark with a pencil at 2”. Cut from the outer corners to the pencil mark to create the triangle. Then, cut ½” off from one edge of the triangle. Adhere to the tree base.
- Cut a piece from green plaid paper to measure 4” x 6”. On one end mark with a pencil at 2”. Cut from the outer corners to the pencil mark to create a triangle. Then, cut 1” off from one edge of the triangle. Adhere to the previous triangle piece.
- Adhere this whole tree to a piece of Avocado Cardstock, then trim around the edges with the trimmer, leaving ¼” around the tree.
Step 5: Create the right tree:
- Cut a piece from trees paper to measure 3” x 5”. On one end mark with a pencil at 1-1/2”. Cut from the outer corners to the pencil mark to create a triangle for the base of the tree.
- Cut a piece from the sparkles paper to measure 3” x 5”. On one end mark with a pencil at 1-1/2”. Cut from the outer corners to the pencil mark to create a triangle. Then, Cut ½” from one side of the triangle. Adhere to the base tree piece.
- Cut a piece from the red tonal stars paper to measure 3” x 5”. On one end mark with a pencil at 1-1/2”. Cut the outer corners to the pencil mark to create a triangle. Cut 1” from one side of the triangle. Adhere to the previous triangle.
- Adhere this tree to a piece of Avocado Cardstock, then trim around the edges with the trimmer, leaving ¼” around the tree.
Step 6: Adhere all three trees to the layout along the bottom left side of the yellow stripes paper, placing one of the trees using Foam Squares or Foam Tape.
Step 7: Cut photo mats from Avocado Cardstock to measure: (3) 3-3/4” x 3-3/4” and (1) 4-1/4” x 4-1/4”. Adhere to the layout.
Step 8: Cut photos to measure: (3) 3-1/2” x 3-1/2” and (1) 4” x 4”. Adhere to the photo mats.
Step 9: Adhere border stickers along the top edge of the layout, and along the bottom edge of the trees/yellow stripes paper.
Step 10: Adhere the remaining stickers as desired.
Step 11: Adhere Write On Sticker strips for journaling.
Step 12: Journal as desired.
Did you have fun making your own trees?!
P.S. Are YOU a member of the Virtual Crop Facebook Group? It’s your go-to place for MONTHLY Virtual Crops, MONTHLY Completed Album Challenges, QUARTERLY Secret Box Openings with project tutorials and so much more! We hope you’ll join our community of more than 40,000 fellow memory-keeping enthusiasts — you’ll feel right at home!
