January 7, 2025
Celebrate Every Day With This Layout

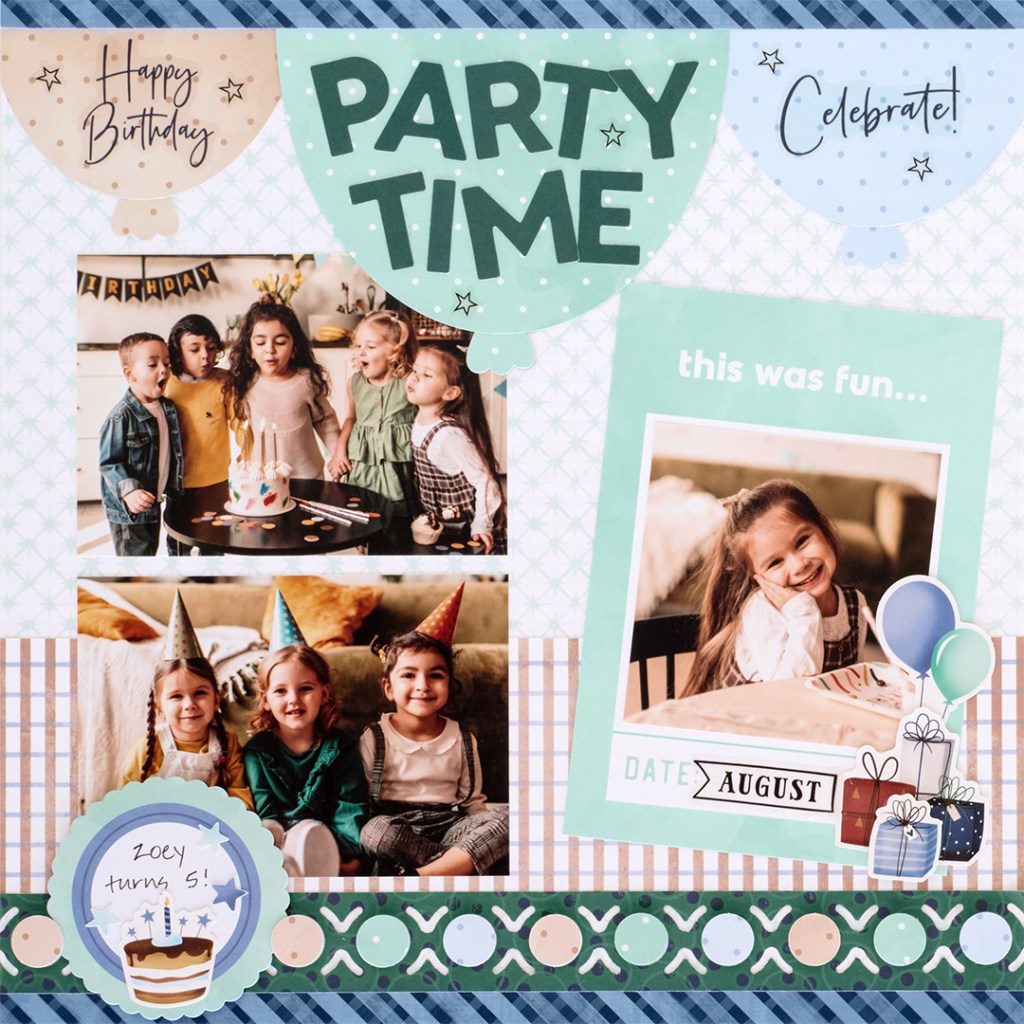
Count the days and make them count! With the Noteworthy Days collection, you can celebrate every moment — including, of course, birthdays! Plus, you can add some extra cheer to your layouts by using the Custom Cutting System with Oval Patterns to make balloons. Keep reading to see how you can recreate this birthday layout.
To create this layout you will need:
- Noteworthy Days Designer Paper Pack or (Shop Canada | Shop Australia)
- Noteworthy Days Tone-on-Tone Paper Pack or (Shop Canada | Shop Australia)
- Noteworthy Days Variety Mat Pack or (Shop Canada | Shop Australia)
- Noteworthy Days Embellishments or (Shop Canada | Shop Australia)
- Green ABC/123 Embellishments
- Noteworthy Days Title Stickers or (Shop Canada | Shop Australia) — returning in January
- Noteworthy Days Stickers or (Shop Canada | Shop Australia)
- Original Border Maker System with Cyclic Circles BMC or (Shop Canada | Shop Australia) — Cyclic Circles BMC returning in May
- Custom Cutting System with Oval Patterns or (Shop Canada | Shop Australia)
- Piece by Piece Mini Trio Punch Set or (Shop Canada | Shop Australia)
- 12-inch Trimmer or (Shop Canada | Shop Australia)
- Photo Trimmer or (Shop Canada | Shop Australia)
- Micro-Tip Scissors or (Shop Canada | Shop Australia)
- Tape Runner or (Shop Canada | Shop Australia)
- Repositionable Tape Runner or (Shop Canada | Shop Australia)
- Foam Squares Variety Pack or (Shop Canada | Shop Australia)
- Black Dual-Tip Pen or (Shop Canada | Shop Australia)

Step 1: Use a mint stars designer paper as the base for this layout. Cut two 12” x 3/8” strips with distressed plaid designer paper and adhere on the top and bottom of the layout.
Step 2: Using the Original Border Maker System with the Cyclic Circles BMC, punch a border with green circled designer paper. Trim to 12” x 1-1/8” and adhere just above the bottom strip. Punch borders with umber, light blue and mint polka dots tone-on-tone papers. Adhere the punched-out circles on the border using Foam Squares, alternating colors. Cut a 12” x 3” strip with plaid designer paper and adhere above the punched border.
Step 3: Make the balloons. Using the outside of the second smallest oval pattern and the Blue Blade, cut half an oval with umber polka dots tone-on-tone paper. Using the outside of the second largest oval pattern and the Blue Blade, cut a half oval with light blue polka dots tone-on-tone paper. Using the outside of the largest oval pattern and the Blue Blade, cut a half oval with mint polka dot tone-on-tone paper. Adhere the oval shapes at the top of the layout, trimming as necessary. Punch the balloon ties using the tulip-shaped punch from the Piece By Piece Trio Punch Set. Tuck and adhere on the balloon bottoms. Adhere a title on the large balloon using green ABC embellishments.
Step 4: Crop two photos to 5” x 3-1/2” and adhere on the left side of the layout. Adhere the variety mat shown on the right side of the layout. Crop a photo to 3-3/8” x 3-1/2” and mount on top.
Step 5: Journal on a round scalloped embellishment and adhere on the border using Foam Squares. Add stickers and title stickers, popping some up with Foam Squares for dimension.
Will you use balloons in your other layouts?
P.S. Are YOU a member of the Virtual Crop Facebook Group? It’s your go-to place for MONTHLY Virtual Crops, MONTHLY Completed Album Challenges, QUARTERLY Secret Box Openings with project tutorials and so much more! We hope you’ll join our community of more than 40,000 fellow memory-keeping enthusiasts — you’ll feel right at home!
