January 13, 2025
A Celebratory Birthday Layout
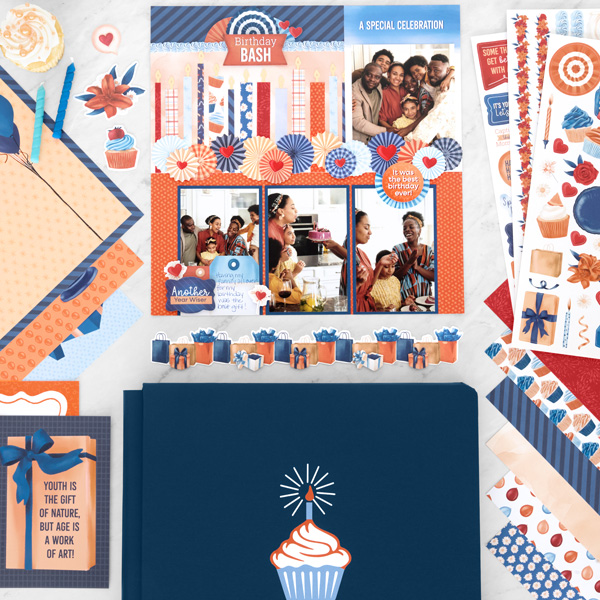
Make it a birthday you’ll remember forever with this layout created with the Birthday Jubilee collection! By using the designer papers and Celebration Cake Punch, you can make your own paper candles to accompany the layout. Give yourself the gift of creativity and keep reading to see how to recreate this birthday layout.

Ingredients:
- Birthday Jubilee Designer Paper Pack or (Shop Canada | Shop Australia)
- Birthday Jubilee Stickers or (Shop Canada | Shop Australia)
- Birthday Jubilee Layered Borders or (Shop Canada | Shop Australia)
- Birthday Jubilee Embossed Embellishments or (Shop Canada | Shop Australia)
- Birthday Jubilee Variety Mat Pack or (Shop Canada | Shop Australia)
- Blue and Canary Solid Cardstock or (Shop Canada | Shop Australia)
- Celebration Cake Punch or (Shop Canada | Shop Australia)
- 12-inch Trimmer or (Shop Canada | Shop Australia)
- Tape Runner or (Shop Canada | Shop Australia)
- Repositionable Tape Runner or (Shop Canada | Shop Australia)
- Precision Point Adhesive Pen or (Shop Canada | Shop Australia)
- Foam Squares Variety Pack or (Shop Canada | Shop Australia)
- All-Purpose Scissors or (Shop Canada | Shop Australia)

Step 1: Use the dots paper for the base of the layout.
Step 2: Adhere the “special celebration” variety mat in the upper right-hand corner of the layout.
Step 3: Cut a piece of stripes paper to measure 7-1/2” x 1-1/2”. Adhere to the top edge of the layout next to the mat.
Step 4: Cut a piece of orange watercolor paper to measure 7-1/2” x 5”. Adhere to the left of the mat, below the stripes paper.
Step 5: Cut a variety of sizes and patterns of paper for the candles. (1/4”, 3/8” and ½” by 3-1/2”, 3-3/4”, 4” and 4-1/4”) Adhere to the bottom edge of the orange watercolor paper leaving approximately ¼” in between each “candle.”
Step 6: Using the Celebration Cake Punch with Canary Solid Cardstock, punch several cakes, then use some scissors to cut off the “flames.” Adhere the flames to the top of each candle using Precision Point Adhesive.
Step 7: Cut photo mats from Blue Solid Cardstock to measure 3-1/4” x 5”. Adhere to the bottom edge of the layout.
Step 8: Adhere photos to the mats that measure (3) 3” x 4-3/4” and (1) 4” x 4-1/2”.
Step 9: Adhere layered border, stickers and embellishments to the layout, using Foam Squares on some for added dimension.
Step 10: Journal as desired.
How did your candles turn out?
P.S. Are YOU a member of the Virtual Crop Facebook Group? It’s your go-to place for MONTHLY Virtual Crops, MONTHLY Completed Album Challenges, QUARTERLY Secret Box Openings with project tutorials and so much more! We hope you’ll join our community of more than 40,000 fellow memory-keeping enthusiasts — you’ll feel right at home!
