February 3, 2025
Watch Them Grow With This Coming of Age Project Recipe

As your children grow up, you see millions of little firsts — they can be hard to keep track of! This layout by Nicole Norris was the inspiration for the Growing Up collection’s Project Recipe, and will help you relish in the moments and keep them alive for years to come. Using materials from the Growing Up collection, easily document everything from their first steps to their first day of school to their first best friend.


Layout by Nicole Norris — CM Independent Advisor


Ingredients:
- Growing Up Designer Papers (x2) or (Shop Canada | Shop Australia)
- Canary Solid Cardstock (x1) or (Shop Canada | Shop Australia)
- Black Solid Cardstock (x1) or (Shop Canada | Shop Australia)
- Bright White Solid Cardstock (x2) or (Shop Canada | Shop Australia)
- 12-inch Trimmer or (Shop Canada | Shop Australia)
- Playground Border Punch or (Shop Canada | Shop Australia)
- Tape Runner or (Shop Canada | Shop Australia)
- Repositionable Tape Runner or (Shop Canada | Shop Australia)
- Custom Cutting System with Circle Patterns, Blue Blade and Mat or (Shop Canada | Shop Australia)
Optional Add-ons:
- Growing Up Stickers or (Shop Canada | Shop Australia)
- Many Firsts Embellishments or (Shop Canada | Shop Australia)
- Black Dual-Tip Pen or (Shop Canada | Shop Australia)
- Foam Squares Variety Pack or (Shop Canada | Shop Australia)


Step 1: Use two sheets of White Solid Cardstock for your base.
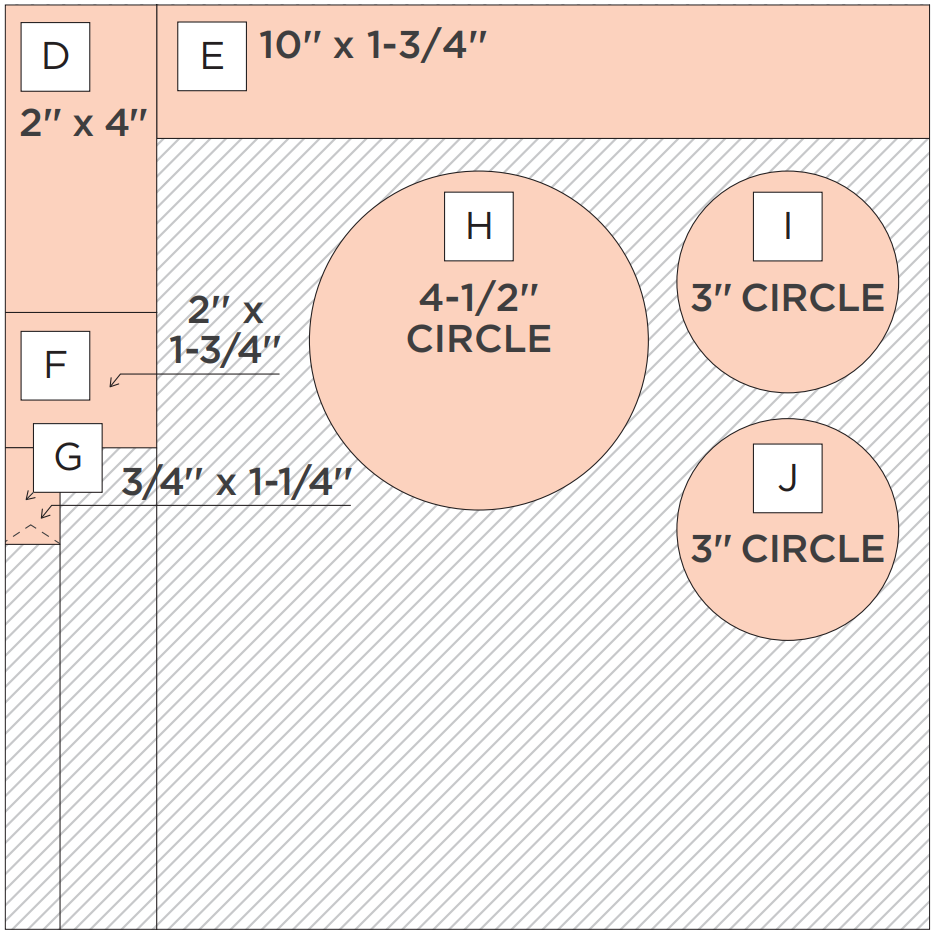
Step 2: Using the Playground Border Punch, punch one border from Black Solid Cardstock. Use the 12-inch Trimmer to trim at 2” to make two border pieces.
Step 3: Use the 12-inch Trimmer to finish following the Cutting Guide with designer papers and Canary Solid Cardstock. Be sure to pay attention to the direction of the paper pattern before cutting.
Step 4: For circle piece H, use the outside of the smallest Circle CCS Pattern with the Blue Blade. For circle pieces I and J, use the inside of the largest Circle CCS Pattern with the Blue Blade.
Step 5: Trim pieces C, G and N into banners as shown.
Step 6: Use the Tape Runner to adhere piece K on the left page and L on the right page 1-1/4” from the top. Adhere D below K along the left edge of the left page.
Step 7: Adhere pieces A and B 3-1/4” up from the bottom of each page. Adhere F below A and E below B as shown, and then adhere M next to E.
Step 8: Use the Repositionable Tape Runner to adhere the 2” section of border piece O on top of F and the 10” section on top of E.
Step 9: Finish adhering all remaining pieces as shown. Adhere banner pieces C, N and G in the top left hand corner of a photo or mat.
Step 10: Adhere photos and journal as desired.
Optional: Apply stickers or embellishments using Foam Squares to add dimension
P.S. Are YOU a member of the Virtual Crop Facebook Group? It’s your go-to place for MONTHLY Virtual Crops, MONTHLY Completed Album Challenges, QUARTERLY Secret Box Openings with project tutorials and so much more! We hope you’ll join our community of more than 43,000 fellow memory-keeping enthusiasts — you’ll feel right at home!
