March 10, 2025
Document Health Journeys With This Recovery Layout
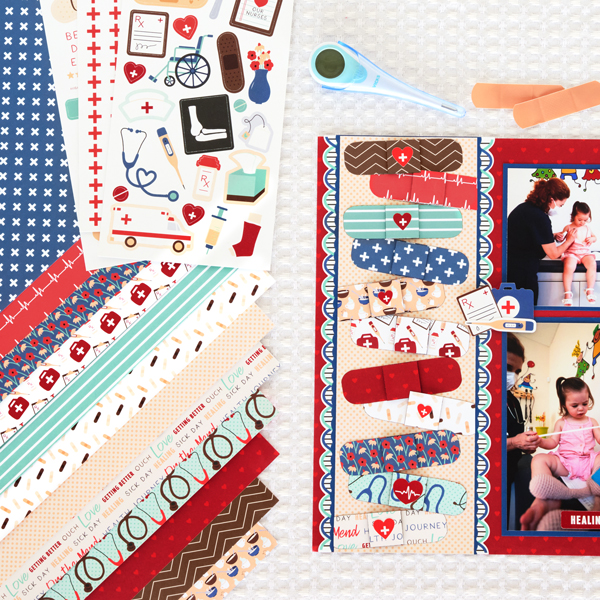
Celebrate each step forward in you or your loved one’s healing journey with this recovery layout! Did you know that you can make paper bandages with the On the Mend papers and Foam Squares? They’re the perfect way to patch up your layouts. See how it’s done below!

To create this layout you will need:
- On the Mend Designer Paper Pack or (Shop Canada | Shop Australia)
- On the Mend Stickers or (Shop Canada | Shop Australia)
- Blue Solid Cardstock or (Shop Canada | Shop Australia)
- 2-Way Corner Rounder or (Shop Canada | Shop Australia)
- 12-inch Trimmer with Scallop Blade or (Shop Canada | Shop Australia)
- Tape Runner or (Shop Canada | Shop Australia)
- Repositionable Tape Runner or (Shop Canada | Shop Australia)
- Foam Squares Variety Pack or (Shop Canada | Shop Australia)
- Black Dual-Tip Pen or (Shop Canada | Shop Australia)

Step 1: Use red hearts paper as the base for the layout.
Step 2: Cut a piece of Blue Solid Cardstock to measure 4-1/4” x 12” using the Scallop Blade on the 12-inch Trimmer. Adhere the stickers borders behind each edge. Adhere this piece to the left side of the layout.
Step 3: Cut a piece of orange dots paper to measure 4” x 12”.
Step 4: From the following papers, cut a piece that measures 3-1/2” x 1” and 1” x 1”: brown chevron, heartbeats, teal stripes, blue crosses, soup and tea, medical supplies, red hearts, bandages, flowers, stethoscopes and words.
Step 5: Using the 2-Way Corner Rounder, round the corners of all of the 3-1/2” x 1” pieces.
Step 6: Using the bold tip on the Black Dual-Tip Pen, rub along the edges of all the 3-1/2” x 1” and 1” x 1” pieces.
Step 7: Adhere the 3-1/2” x 1” pieces to the top of the orange dots piece, so that they are at slight angles, with a couple hanging off the edges of the orange dots paper. Adhere the 1” x 1” pieces to the centers of the 3-1/2” x 1” strips using a Foam Square.
Step 8: Use scissors to cut any excess hanging of the edges of the orange dots piece.
Step 9: Adhere orange dots piece to the center of the scalloped blue cardstock piece.
Step 10: Cut photo mats from blue cardstock to measure: (1) 4-1/4” x 6-1/4” and (2) 3-1/4” x 4-1/4”. Adhere photos that measure: (1) 4” x 6” and (2) 3” x 4”. Adhere to the layout.
Step 11: Using the 12-inch Trimmer with the Scallop Blade, cut a piece of blue cardstock measuring 2-1/8” x 4”. Adhere next to the large photo on the lower right side.
Step 12: Cut a piece of orange dots paper to measure 2” x 4”. Adhere to the top of the previous piece, leaving the scalloped edge showing.
Step 13: Cut a piece of the red plus border to measure 4” and adhere along the seam of the photo and the orange dots paper.
Step 14: Adhere additional stickers to the layout as desired, using Foam Squares on some for added dimension.
Step 15: Journal as desired.
What did you think of the scrapbook bandages? ?
P.S. Are YOU a member of the Virtual Crop Facebook Group? It’s your go-to place for MONTHLY Virtual Crops, MONTHLY Completed Album Challenges, QUARTERLY Secret Box Openings with project tutorials and so much more! We hope you’ll join our community of more than 44,000 fellow memory-keeping enthusiasts — you’ll feel right at home!

Cute layout but I would have done the bandaid as one piece with the pop up squares under the center to create a slight bulge.