December 23, 2025
The Icing on the Page: Three Gingerbread Fun Borders!
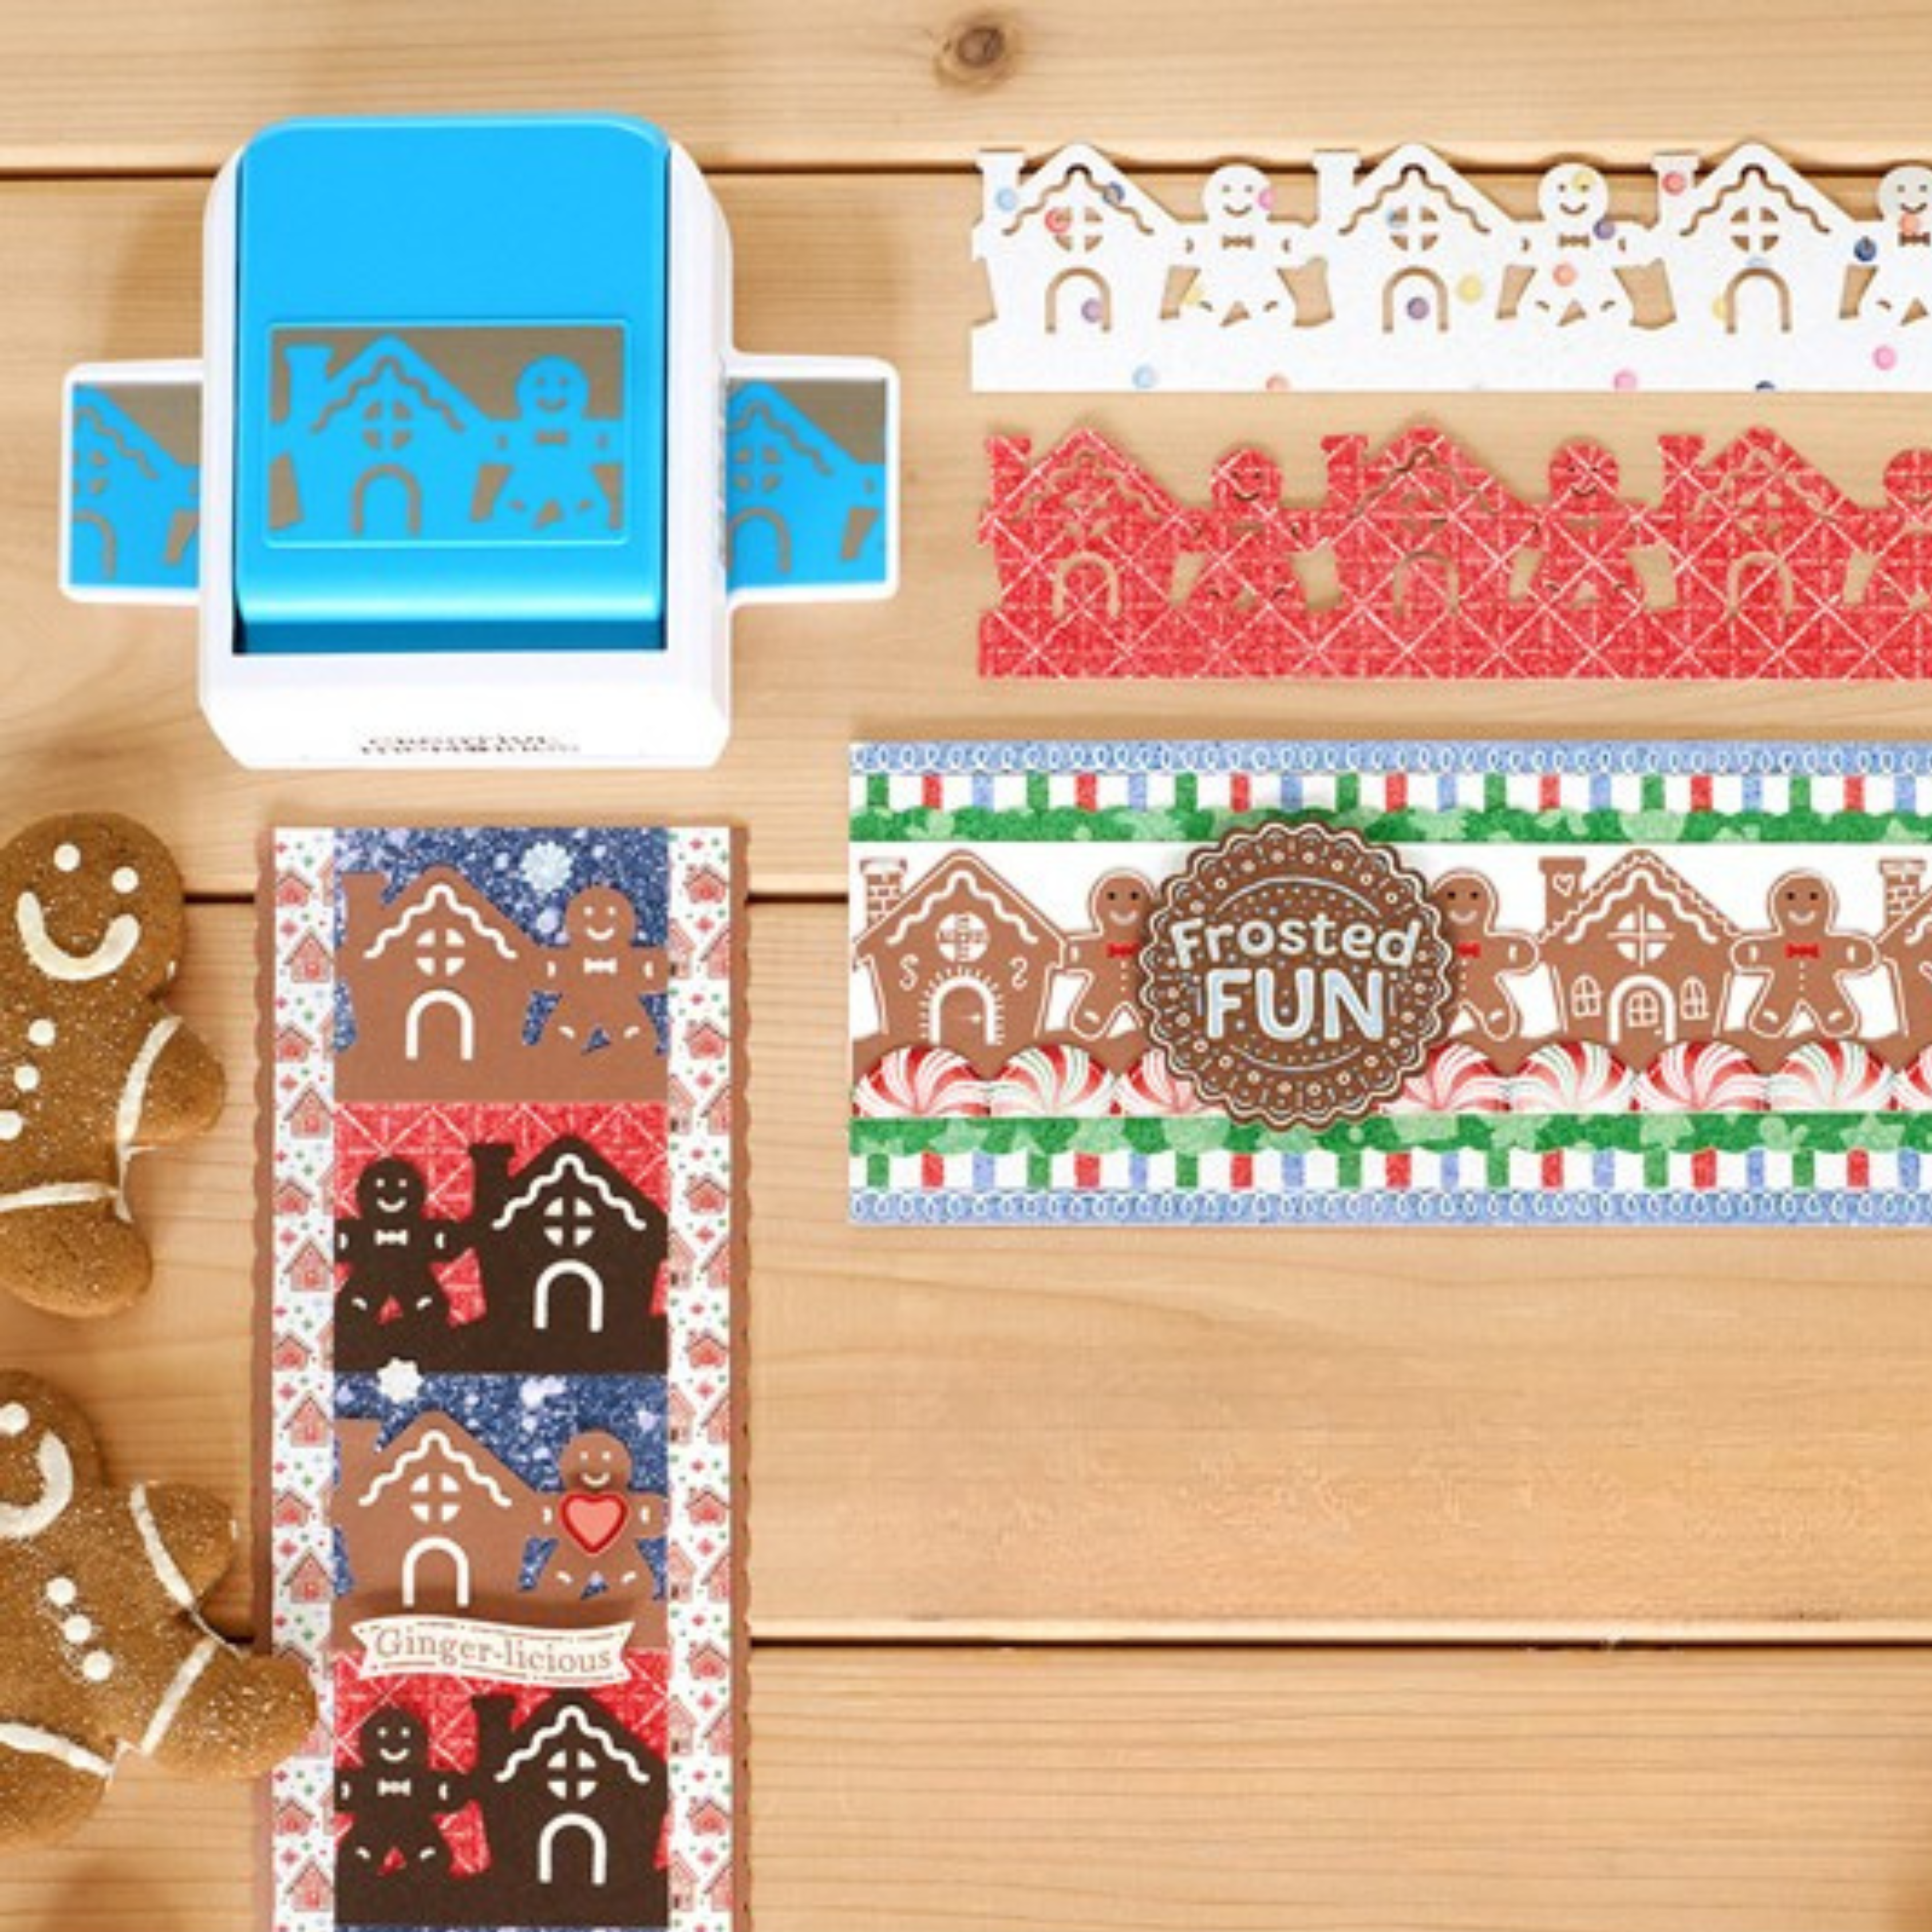
The Gingerbread Fun Collection is full of sweet holiday details, but these scrapbook borders really steal the show. Each one features the Gingerbread Border Punch, adding a beautifully detailed, festive touch that instantly elevates your pages. They’re ideal for capturing cozy baking memories, holiday traditions, and all those little moments that make the season feel special. With just a few punches and layers, these borders add that extra something that truly brings your holiday layouts to life!
To create these borders, you will need these general products:
- Gingerbread Fun Paper Pack (Shop Canada | Shop Australia)
- Gingerbread Fun Embellishments (Shop Canada | Shop Australia)
- Gingerbread Fun Stickers (Shop Canada | Shop Australia)
- Caramel Solid Cardstock (Shop Canada | Shop Australia)
- Stardust White Solid Cardstock (Shop Canada | Shop Australia)
- Black Solid Cardstock (Shop Canada | Shop Australia)
- Gingerbread Border Punch (Shop Canada | Shop Australia)
- 12-inch Trimmer (Shop Canada | Shop Australia)
- 12-inch Trimmer Straight Blade (Shop Canada | Shop Australia)
- 12-inch Trimmer Scallop Blade (Shop Canada | Shop Australia)
- Micro-Tip Scissors (Shop Canada | Shop Australia)
- Repositionable Tape Runner (Shop Canada | Shop Australia)
- Foam Squares Variety Pack (Shop Canada | Shop Australia)


Ingredients:
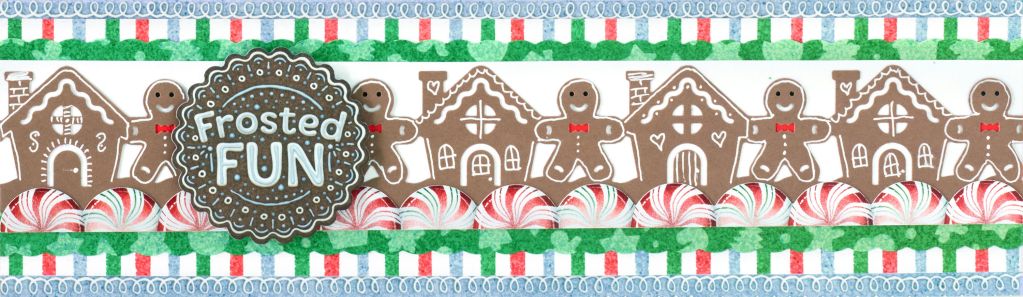
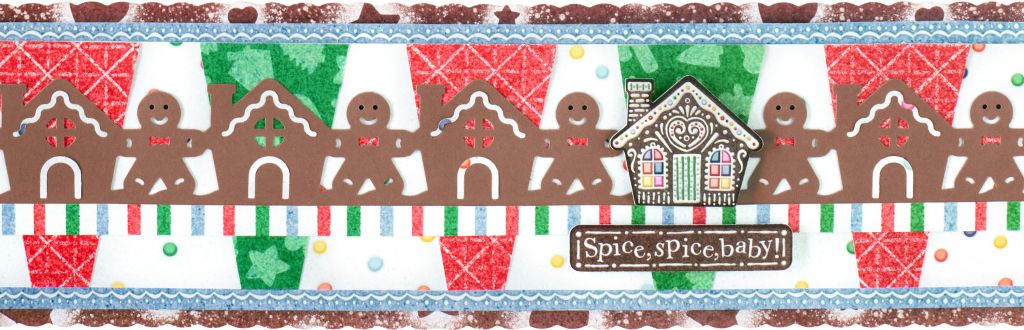
Step 1: Cut a 12″ x 3-1/2″ strip from the blue frosted stripes designer paper for the base. Cut a 12″ x 3″ strip from the stripes designer paper and adhere it to the base. Using the scallop blade, cut a 12″ x 2-1/2″ strip from the green cookies tonal paper and mount to the striped piece of paper. Finally, cut a 12″ x 2″ strip from the Stardust White Solid Cardstock and mount it on the top layer.
Step 2: Using the Gingerbread Border Punch, punch a border using the Caramel Solid Cardstock. Trim the border out to 12″ x 1-3/4″. Cut small pieces using the Black Solid Cardstock to adhere behind the eyes and Red Solid Cardstock to adhere behind the bowties. Adhere the border on the white strip.
Step 3: Using the White Gelly Roll Pen, doodle icing onto the gingerbread border.
Step 4: Adhere the peppermints border sticker on the bottom edge of the Caramel Solid Cardstock piece of paper. Adhere the ‘Frosted Fun’ embellishment using foam squares.
Ingredients:
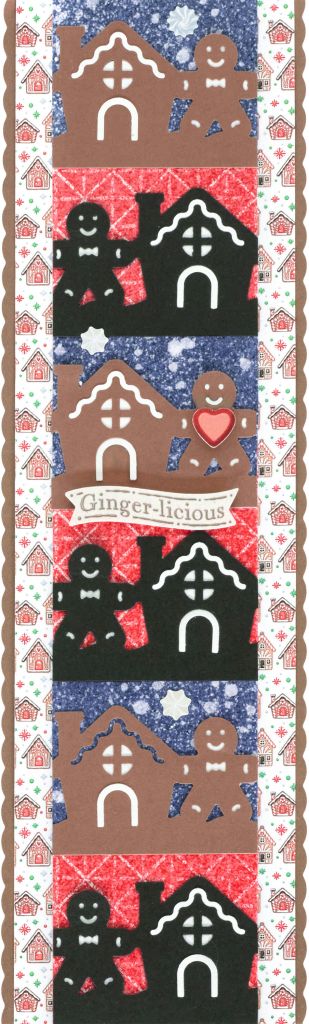
Step 1: Using the 12-inch Trimmer with the scallop blade, cut a 12″ x 3-3/4″ strip from the brown cookies designer paper. Using the straight blade, cut a 12″ x 3-3/8″ strip from the blue frosted stripes designer paper and adhere it to the base.
Step 2: Using the Gingerbread Border Punch, punch a border using the Caramel Solid Cardstock. Trim the punched section to to 12″ x 1-7/8″. Cut a 12″ x 3/8″ strip from the stripes designer paper and adhere it to the bottom of the border. Cut small pieces of Black Solid Cardstock to adhere behind the eyes and red grid tonal paper to adhere behind the bowties.
Step 3: Cut a 12″ x 3″ strip from the white candy dots designer paper. Place the gingerbread border on the center of the strip. Using a ruler and pencil, draw light lines above and below the border that follow the angle of the gingerbread houses. Measure and cut pieces of red grid tonal paper and green cookies tonal paper to fit behind the houses (the pieces will be 3″ tall and approximately 1-1/4″ wide on top and 5/8″ wide on the bottom). Adhere the pieces. Mount the white candy dots strip on the border.
Step 4: Adhere stickers, popping them up with foam squares for added dimension.
Ingredients:
Step 1: Using the 12-inch Trimmer with the scallop blade, cut a 3-1/2″ x 12″ strip from the Caramel Solid Cardstock for the base. Using the straight blade, cut a 3-1/4″ x 12″ strip from the gingerbread house designer paper and adhere it onto the base.
Step 2: Cut a 2-3/8″ x 12″ strip from the blue gingerbread star designer paper (the sky). Cut three 2-3/8″ x 2″ pieces from the red grid tonal paper and adhere them at regular intervals onto the sky strip as shown.
Step 3: Using the Gingerbread Border Punch, punch a border with both Caramel and Hot Fudge Solid Cardstocks. Trim the borders to 12″ x 1-3/4″. Cut the Caramel Solid Cardstock border into 2-3/8″ sections, with the houses on the left side. Cut the Hot Fudge Solid Cardstock border into 2-3/8″ sections, with the houses on the right side. Cut small pieces from the Stardust White Solid Cardstock and adhere them behind the gingerbread for the ‘icing’.
Step 4: Adhere the sections as shown on the sky/red strip. Mount the strip onto the base. Adhere the stickers using foam squares for added dimension.
These gingerbread borders are the kind of detail that makes a page feel just right — simple, festive, and full of holiday charm. Think of them as the icing on your scrapbook cookie!
P.S. Are YOU a member of the Virtual Crop Group? It’s your go-to place for MONTHLY Virtual Crops, MONTHLY Completed Album Challenges, QUARTERLY Secret Box Openings with project tutorials and so much more! We hope you’ll join our community of more than 49,000 fellow memory-keeping enthusiasts — you’ll feel right at home!

