December 31, 2025
Winter Bliss Borders That Bring Cozy Winter Pages to Life!

The Winter Bliss Collection brings a soft, seasonal feel to scrapbook pages, making it a favorite for documenting winter memories. With the Winter Boots Border Maker Cartridge and the Dancing Snowflakes Border Punch included in the collection, it’s easy to carry those winter details across the layout. These border ideas show how those pieces can add a playful, seasonal touch that helps pull everything together as you document your winter memories.
Winter Boots BMC Borders:
To create these borders, you will need these general products:
- Winter Bliss Paper Pack (Shop Canada | Shop Australia)
- Winter Bliss Stickers (Shop Canada | Shop Australia)
- Winter Bliss Embellishments (Shop Canada | Shop Australia)
- 12-inch Trimmer (Shop Canada | Shop Australia)
- Original Border Maker System (Shop Canada | Shop Australia)
- Winter Boots Border Maker Cartridge (Shop Canada | Shop Australia)
- The Tape Runner (Shop Canada | Shop Australia)
Dancing Snowflakes Border Punch Borders:
To create these borders, you will need these general products:
- Winter Bliss Paper Pack (Shop Canada | Shop Australia)
- Winter Bliss Stickers (Shop Canada | Shop Australia)
- Winter Bliss Embellishments (Shop Canada | Shop Australia)
- Baby Blue Solid Cardstock (Shop Canada | Shop Australia)
- Songbird Solid Cardstock (Shop Canada | Shop Australia)
- 12-inch Trimmer (Shop Canada | Shop Australia)
- Dancing Snowflakes Border Punch (Shop Canada | Shop Australia)
- The Tape Runner (Shop Canada | Shop Australia)


Ingredients:
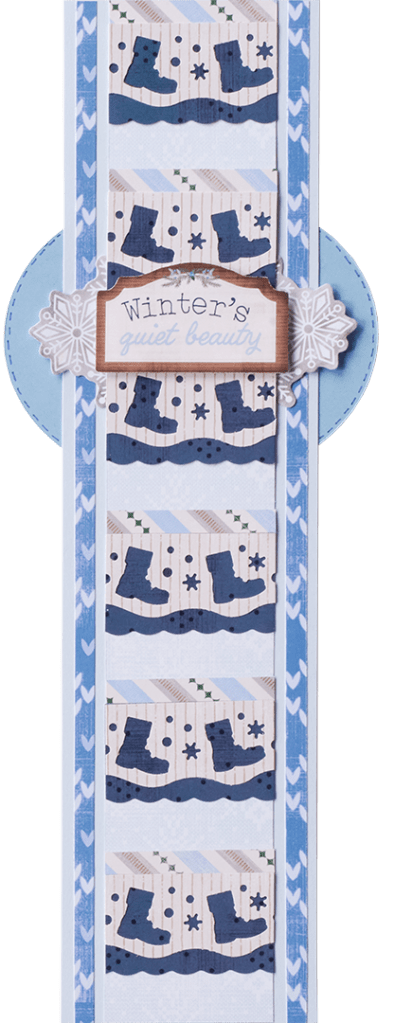
Step 1: Cut a piece of the Songbird Solid Cardstock to measure 12″ x 2″ for the base of the border.
Step 2: Using the Winter Boots BMC/BMS, punch a border using the navy designer paper.
Step 3: Using the Winter Boots BMC/BMS, punch a border using the Bright White Solid Cardstock. Adhere it offset behind the navy designer paper border. Adhere this layered border along the bottom edge of the cardstock, so the Songbird Solid Cardstock does not show.
Step 4: Using the Winter Boots BMC/BMS, punch a border using the tan striped designer paper. Adhere the punched-out boot pieces to the boot areas on the border using the Precision Point Adhesive Pen.
Step 5: Using the Winter Boots BMC/BMS, punch a border using the Songbird Solid Cardstock. Adhere the punched-out snowflake pieces to the border using the Precision Point Adhesive Pen.
Step 6: Cut a strip from the gray snowflake designer paper to measure 12″ x 7/8″. Adhere it along the top of the border.
Step 7: Adhere stickers and embellishments to the border using Foam Squares.

Ingredients:
- CCS Bundle (Shop Canada | Shop Australia)
- Oval Custom Cutting System Patterns (Shop Canada | Shop Australia)
- Navy Dual-Tip Pen (Shop Canada | Shop Australia)
- 12-inch Trimmer Scallop Blade (Shop Canada | Shop Australia)
- Baby Blue Solid Cardstock (Shop Canada | Shop Australia)
Step 1: Cut a piece of the Baby Blue Solid Cardstock to measure 3″ x 12″ for the base of the border.
Step 2: Cut a piece of the light blue snowflake designer paper to measure 2″ x 12″. Adhere the piece to the center of the base of the border.
Step 3: Cut a piece of navy designer paper to measure 12″ x 1-1/4″, using the 12-inch Trimmer Scallop Blade on the bottom edge of the piece.
Step 4: Punch a border from the light tan striped designer paper using the Winter Boots BMC/BMS. Adhere this piece to the top edge of the navy designer paper. Cut this border (Navy/Tan) into 2″ segments. Adhere these segments so the top edge is along 1-3/4″, 3-3/4″, 5-3/4″, 7-3/4″, 9-3/4″ and 11-3/4″.
Step 5: Cut six strips that measure 2″ x 1/4″ from the angled striped designer paper. Adhere them along the top edges of the previous pieces.
Step 6: Cut two pieces from the blue sweater designer paper to measure 1/4″ x 12″. Adhere them along the right and left sides of the base of the border.
Step 7: Using the smallest Oval CCS Pattern on the outside with the blue blade, cut an oval using the Songbird Solid Cardstock. Adhere it from the back side of the border.
Step 8: Adhere stickers and embellishments to the border, using Foam Squares on some for added dimension.
Step 9: Use the Navy Dual-Tip Pen to draw “faux” stitches along the outer edges of the oval.
Ingredients:
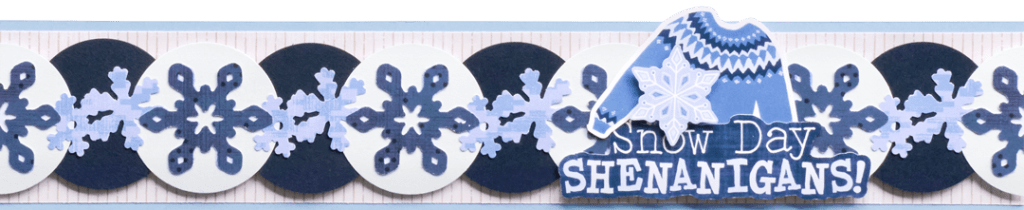
Step 1: Cut a piece of the Songbird Solid Cardstock to measure 12″ x 2-1/4″ for the base of the border.
Step 2: Cut a piece of the tan striped designer paper to measure 12″ x 2″. Adhere it to the base.
Step 3: Using the Dancing Snowflakes Border Punch, punch a border from the navy designer paper and the blue jacquard designer paper.
Step 4: Using the Circle Punch, punch 5 circles using Baby Blue Solid Cardstock. Cut one of the circles in half. Adhere these circles behind the large snowflakes on the blue jacquard border.
Step 5: Using the Micro-Tip Scissors, cut out the large snowflakes from the navy border. Adhere them to the tops of the large circles.
Step 6: Using the Navy Solid Cardstock, punch out 5 circles using the Circle Punch. Adhere them behind the punched border in between the previous Baby Blue Solid Cardstock circles.
Step 7: Adhere the circles/border to the top of the base of the border using Foam Squares.
Step 8: Adhere stickers and embellishments to the border using Foam Squares for added dimension.


Ingredients:
Step 1: Cut a piece of the navy designer paper to measure 3-3/4″ x 12″ for the base of the border.
Step 2: Cut a piece of the Songbird Solid Cardstock using the 12-inch Trimmer Scallop Blade to measure 3-1/2″ x 12″. Adhere it to the top of the navy designer paper.
Step 3: Cut a piece from the light blue snowflake designer paper to measure 3-3/8″. Adhere it to the cardstock.
Step 4: Using Baby Blue Solid Cardstock and the Dancing Snowflakes Border Punch, punch three borders. Adhere the borders to the border, overlapping the tips of the large snowflakes.
Step 5: Adhere stickers and embellishments using Foam Squares for added dimension.
Borders are the perfect finishing touch on a winter page. A little trim here and there can really snow off your photos and tie everything together. ❄️
P.S. Are YOU a member of the Virtual Crop Group? It’s your go-to place for MONTHLY Virtual Crops, MONTHLY Completed Album Challenges, QUARTERLY Secret Box Openings with project tutorials and so much more! We hope you’ll join our community of more than 49,000 fellow memory-keeping enthusiasts — you’ll feel right at home!


Melissa, these are beautiful! Now I have to order some Winter Bliss stuff!!!
Thank you for bringing back border ideas. I have missed them, and I hope they will be created and shared by your talented advisors in the future, too!