January 21, 2026
Borders to Brighten Your Pages Your Own Way!
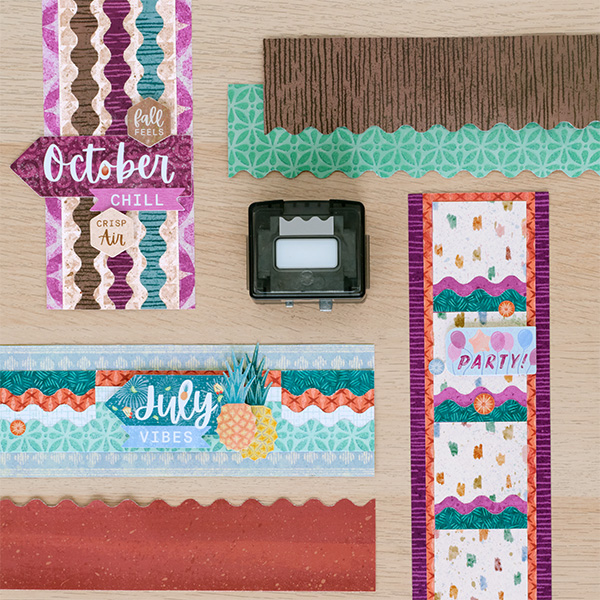
The Your Own Way collection is full of cheerful patterns and monthly titles, and these scrapbook borders really make your pages pop. Using the papers from the collection, you can create borders that add movement or separate months. They’re a fun way to bring color and personality to your layouts and highlight the moments that matter most. With each border you add, your pages feel more finished and connected, giving your memories a little extra sparkle along the way!
To create these borders, you will need these general products:
- Your Own Way Paper Pack (Shop Canada | Shop Australia)
- Your Own Way Tone-on-Tone Paper (Shop Canada | Shop Australia)
- Your Own Way Stickers (Shop Canada | Shop Australia)
- Original Border Maker System (Shop Canada | Shop Australia)
- Decorative Waves Border Maker Cartridge (Shop Canada | Shop Australia)
- 12-inch Trimmer (Shop Canada | Shop Australia)
- Micro-Tip Scissors (Shop Canada | Shop Australia)
- Repositionable Tape Runner (Shop Canada | Shop Australia)
- Foam Squares (Shop Canada | Shop Australia)


Step 1: Cut a 12″ x 2-3/4″ strip from the light blue crest stripes designer paper for the base of the border. Cut a 12″ x 1-3/4″ strip from the green crosshatch designer paper and adhere it onto the base.
Step 2: Using the Decorative Waves BMC, punch a border from the orange x-dash designer paper, but omit punching the second and third “stops”. Trim the border out to 12″ x 1″ and cut off the “tails” that remain at the top. Repeat with the sketch grid designer paper and fresh mint tile tonal paper. Layer the borders and adhere them to the base.
Step 3: Adhere stickers, popping some up with foam squares for added dimension.

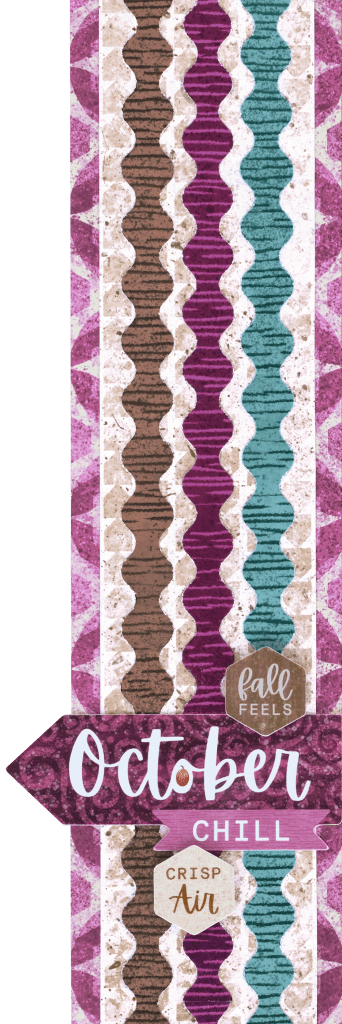
Step 1: Cut a 3-1/4″ x 12″ strip from the diamond hex block designer paper for the base. Cut a 2-1/2″ x 12″ strip from the beige tag stripes designer paper and adhere it onto the base.
Step 2: Using the Decorative Waves BMC, punch a border with caramel/hot fudge stripes tonal paper. Trim the border to measure 12″ x 1″ and punch the other side.
Tip: Using the repositionable tape runner, adhere the punched edge on the edge of scrap paper (the cover sheet of the paper pack works well). Then place the unpunched edge into the paper holder and punch. This method holds the narrow strip well for punching the other side.
Repeat the process using the deep orchid and deep sea green stripes tonal papers. Adhere the pieces onto the border as shown.
Step 3: Adhere stickers, popping some up with foam squares for added dimension.


Step 1: Cut a 3″ x 12″ strip from the deep orchid stripes tonal paper for the base. Cut a 2-3/8″ x 12″ strip from the orange x-dash designer paper and adhere it onto the base. Cut a 2″ x 11-5/8″ strip from the light orchid brushstrokes tonal paper and mount it on top of the border.
Step 2: Cut a 2″ x 12″ strip from the scrabble swatches designer paper. Using the Decorative Waves BMC, punch one short end, saving the piece punched off. Trim the punched edge at 1-3/4″. Repeat this process four more times. Adhere the pieces onto the border as shown, flipping the punched-off pieces to the reverse (green crosshatch) side.
Step 3: Adhere stickers, popping the title up with foam squares for added dimension.
Borders add a finishing touch that makes each page feel complete. With the Your Own Way collection, your pages will be border-line perfect!
P.S. Are YOU a member of the Virtual Crop Group? It’s your go-to place for MONTHLY Virtual Crops, MONTHLY Completed Album Challenges, QUARTERLY Secret Box Openings with project tutorials and so much more! We hope you’ll join our community of more than 49,000 fellow memory-keeping enthusiasts — you’ll feel right at home!

