November 12, 2026
Gingham & Banners: A Stenciled Moonlit Pines Layout

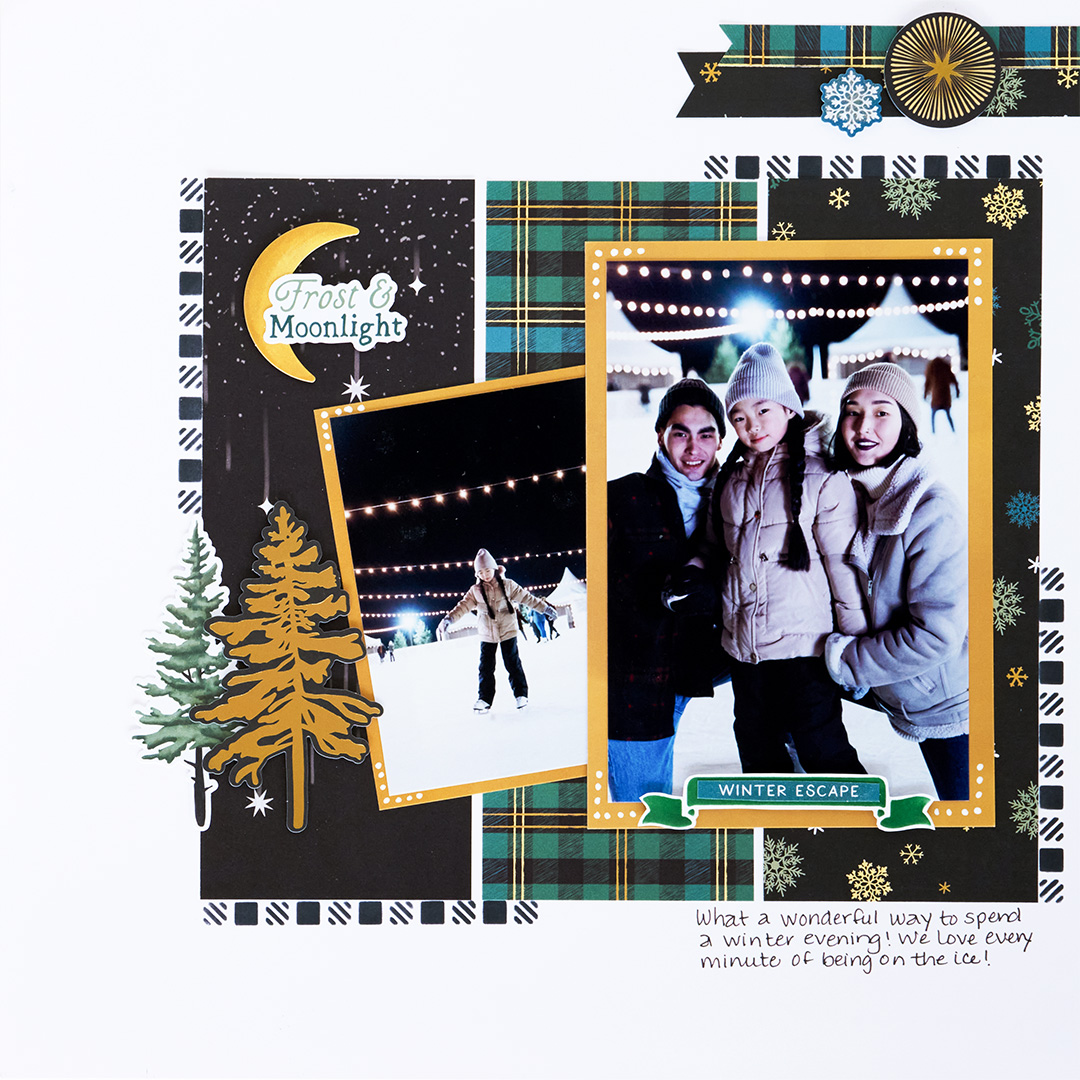
Bring a little cabin-cozy charm to your winter pages! This layout pairs the plaids, snowflakes and falling stars of the Moonlit Pines collection with two of our new 5×5 stencils for details that look hand-painted.
Rows of Black gingham squares frame a trio of patterned strips, while the Banners Stencil and Kelly Green ink create a one-of-a-kind banner for your title. Gold-edged mats and a few White Gelly Roll Pen dots finish it off.
To create this layout, you will need:
- Moonlit Pines Paper Pack
- Moonlit Pines Stickers
- Moonlit Pines Embellishments
- Moonlit Pines Mats
- Bright White Solid Cardstock
- 5×5 Stencil – Gingham
- 5×5 Stencil – Banners
- Ink Pad – Black
- Craft Blending Brush – Black
- Ink Pad – Kelly Green
- Craft Blending Brush – Kelly Green
- Place & Peel Tape
- White Gelly Roll Pen
- 12-inch Trimmer
- Micro-Tip Scissors
- Repositionable Tape Runner
- Foam Squares – 1mm

Love this layout?

Love this layout?

Step 1: Use a sheet of Bright White Solid Cardstock as the base for this layout.
Step 2: Cut three 3″ x 8″ pieces of designer paper: one each of black snowflakes, plaid and falling stars.
Step 3: Adhere the black snowflakes piece 1/2″ from the right edge and 2″ from the bottom of the page. Working to the left, adhere the plaid and falling stars pieces, leaving 1/8″ between each one.
Step 4: Using Place & Peel Tape, tape off the 5×5 Stencil – Gingham so only one line of 11 squares is showing. Using the Black Ink Pad and Craft Blending Brush, stencil the squares next to the patterned pieces on the top left, bottom left, bottom right and top right as shown.
Step 5: Find the mat cards with the gold edges. Use the large mat card as a mat for a 4″ x 6″ photo, and trim the smaller mat card to 3-1/2″ x 4-1/2″ for a 3″ x 4″ photo.
Step 6: Adhere the large photo mat 1″ from the right edge and 2-3/4″ from the bottom. Tuck the smaller photo mat under the left edge of the large mat as shown. Use the White Gelly Roll Pen to add dots in the corners of the gold edges of both mats.
Step 7: Cut a 4-1/2″ x 3/4″ strip of black snowflakes paper and a 4″ x 1/2″ strip of plaid paper. Dovetail the left end of both strips.
Step 8: Adhere the plaid strip 1/4″ from the top of the page and against the right edge. Tuck the black snowflakes strip under the plaid strip.
Step 9: Choose the banner you’d like to use on the 5×5 Stencil – Banners. Stencil it heavily with the Kelly Green Ink Pad and Craft Blending Brush on a scrap of Bright White Solid Cardstock, then fussy cut the banner with Micro-Tip Scissors, leaving a small white edge.
Step 10: Adhere the banner to the bottom of the large photo. Write on it with the White Gelly Roll Pen or add a sticker.
Step 11: Finish the page with embellishments and stickers, using Foam Squares on some for added dimension.

Want to recreate this layout?
We’ve gathered all the products featured in this project in one place, making it easy to find the papers, embellishments, tools and more.
P.S. Are YOU a member of the Virtual Crop Group? It’s your go-to place for MONTHLY Virtual Crops, MONTHLY Completed Album Challenges, QUARTERLY Secret Box Openings with project tutorials and so much more! We hope you’ll join our community of more than 53,000 fellow memory-keeping enthusiasts — you’ll feel right at home!

