January 15, 2024
Hammer Out Your Memories With This Renovation-Themed Layout
You know that feeling when you’re torn between the excitement of a fresh start and the nostalgia of saying goodbye to your old home? The rollercoaster of emotions that comes with remodeling or even moving can sometimes be wild, so what better way to document the chaos and charm of a home makeover or grand move than with this renovation-themed scrapbook layout?
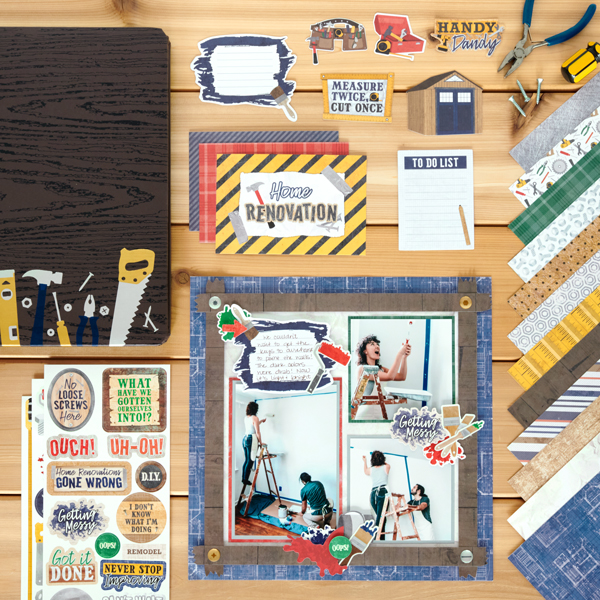
Made with products from the Riveting collection, you’ll love the bright hues and construction-themed icons and designs for creating layouts of before-and-after shots, new construction builds and home renos!

To create this layout you will need:
- Riveting Paper Pack or (Shop Canada | Shop Australia)
- Riveting Variety Mat Pack or (Shop Canada | Shop Australia)
- Riveting Stickers or (Shop Canada | Shop Australia)
- Riveting Embellishments or (Shop Canada | Shop Australia)
- Platinum Shimmer Solid Cardstock or (Shop Canada | Shop Australia)
- 12-inch Trimmer or (Shop Canada | Shop Australia)
- Tape Runner or (Shop Canada | Shop Australia)
- Repositionable Tape Runner or (Shop Canada | Shop Australia)
- Foam Squares Variety Pack or (Shop Canada | Shop Australia)
- Foam Tape or (Shop Canada | Shop Australia)
- Micro-Tip Scissors or (Shop Canada | Shop Australia)
- Brown Dual-Tip Pen or (Shop Canada | Shop Australia)

Pave the way to reminiscing over your renovation moments with the Riveting collection!

Step 1: Use blueprint paper as the base for this layout.
Step 2: Cut a piece from the crinkled paper to measure 10-3/4” x 10-3/4”. Adhere to the layout.
Step 3: Cut four pieces of dark wood paper to measure 12” x 3/4”. Use a scissors to cut the ends in an inconsistent zigzag pattern for the ends of the “wood”. Adhere the wood strips along the inside edges of the crinkled paper using Foam Tape.
Step 4: Place the large red variety mat on the inside bottom-left corner of the wood frame.
Step 5: Using Platinum Shimmer Solid Cardstock, cut one piece that measures 4-1/4” x 4-1/4” and one piece that measures 4-1/4” x 6-1/4”. Adhere to the layout.
Step 6: Cut a piece from the green plaid paper to measure 4-1/4” x 4-1/4”. Adhere to the layout in the upper-right corner as a photo mat.
Step 7: Adhere photos to the mats that measure: (2) 4” x 4” and (1) 4” x 6”.
Step 8: Adhere stickers and embellishments to the layout, using Foam Squares on some for added dimension.
Step 9: Journal as desired using Brown Dual-Tip Pen.
So, what do you think of this layout? It’s like your own personal design diary that showcases the before-and-after magic, the hilarious mishaps and the moments that make you say, “Yep, that’s home.”
P.S. Are YOU a member of the Virtual Crop Facebook Group? It’s your go-to place for MONTHLY Virtual Crops, MONTHLY Completed Album Challenges, WEEKLY LIVE STREAMING of Fast & Fun Projects with Noreen, LIVE QUARTERLY Secret Box Openings with project tutorials and so much more! We hope you’ll join our community of more than 37,000 fellow memory-keeping enthusiasts — you’ll feel right at home!
