February 23, 2024
Remember Your Big Day With This Wedding Scrapbook Layout

Get ready to say “I do” to this wedding scrapbook layout! The perfect match for everything from your first look to reading vows to cutting your first slice of wedding cake. Speaking of cakes, you can use the 2-Way Corner Rounder to create elegant wedding cakes like Nicole did! Are you ready to declare your love for this layout?!
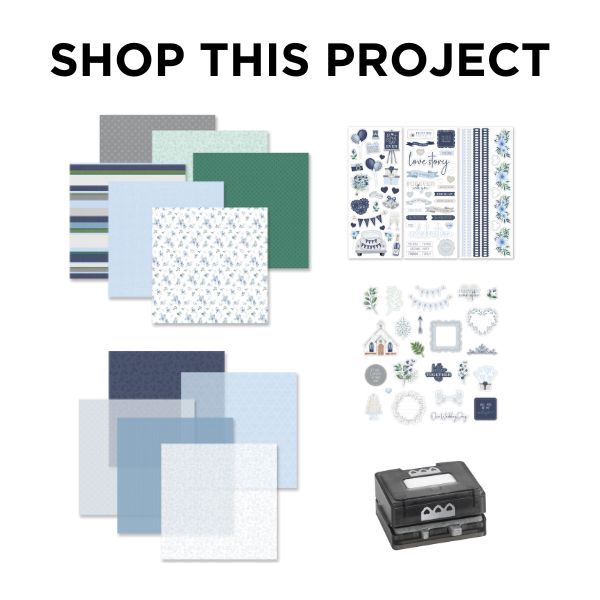
To create this layout you will need:
- Something Blue Paper Pack or (Shop Canada | Shop Australia)
- Something Blue Vellum Paper Pack or (Shop Canada | Shop Australia)
- Something Blue Embossed Embellishments or (Shop Canada | Shop Australia)
- Something Blue Stickers or (Shop Canada | Shop Australia)
- White & Avocado Solid Cardstocks or (Shop Canada | Shop Australia)
- Original Border Maker System with Scalloped Hearts Border Maker Cartridge or (Shop Canada | Shop Australia)
- 12-inch Trimmer or (Shop Canada | Shop Australia)
- 2-Way Corner Rounder or (Shop Canada | Shop Australia)
- Micro-Tip Scissors or (Shop Canada | Shop Australia)
- Tape Runner or (Shop Canada | Shop Australia)
- Repositionable Tape Runner or (Shop Canada | Shop Australia)
- Vellum Tape Runner Refill or (Shop Canada | Shop Australia)
- Foam Squares Variety Pack or (Shop Canada | Shop Australia)
- Navy Dual-Tip Pen or (Shop Canada | Shop Australia)

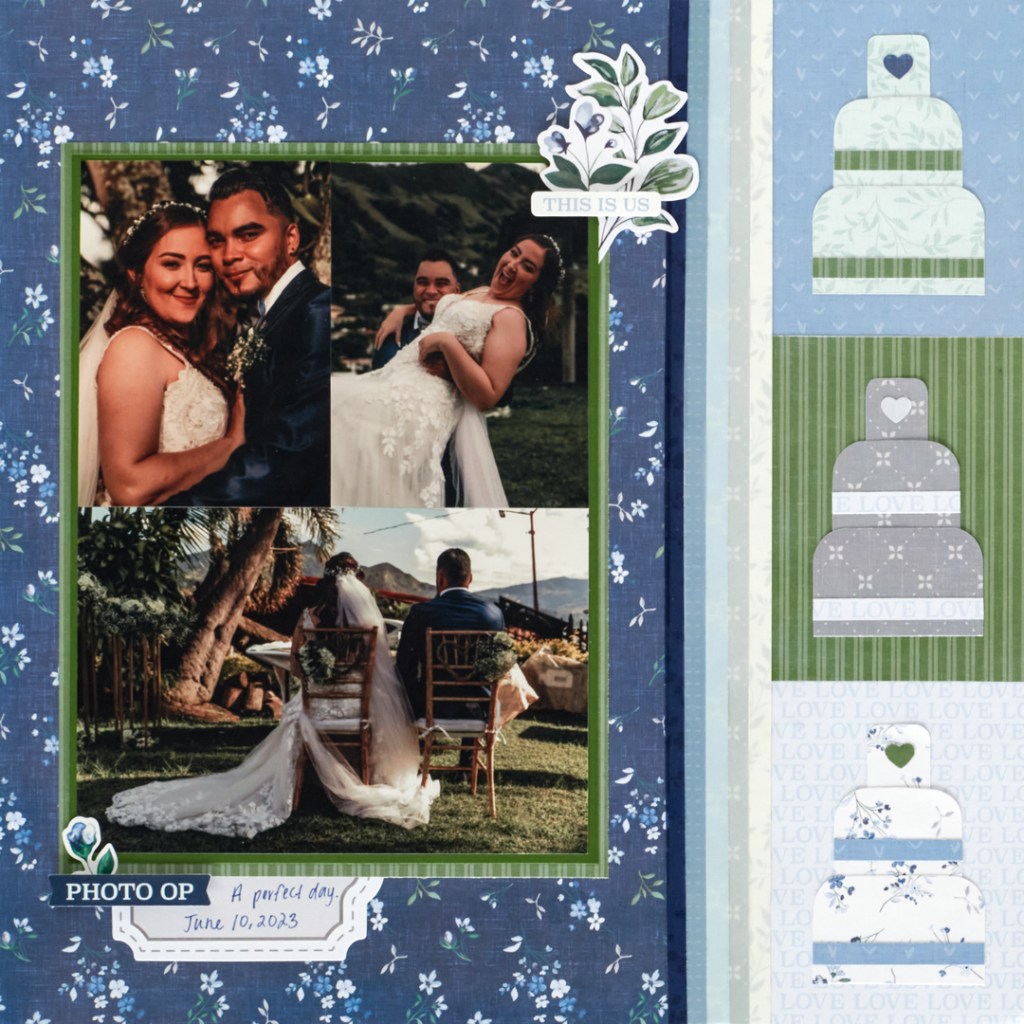
Step 1: Use a piece of navy petite floral paper as the base for this layout.
Step 2: Cut three 3? x 4? pieces — one each from mini hearts, avocado lines and baby blue love papers. Adhere them along the right edge of the base, stacking vertically as shown.

Step 3: Create the cakes —
- Bottom tier: Cut a 2? x 1-1/4? piece from gray diamond dots paper. Round the top corners using the 2-Way Corner Rounder.
- Middle tier: Cut a 1-1/2? x 1-1/4? piece from gray diamond dots paper. Round the top corners using the 2-Way Corner Rounder.
- Top tier: Cut a 3/4? x 1-1/4? piece from gray diamond dots paper. Using Micro-Tip Scissors, carefully round the top two corners.
- Decorative add-ons: Cut one 2? x 1/4? strip and one 1-1/2? x 1/4? strip from baby blue love papers. Using the Original Border Maker System and the Scalloped Hearts Border Maker Cartridge, punch any Something Blue paper scrap and set one heart punchout aside.
Assemble the cakes as shown, slightly overlapping the tiers (completed cakes shown are 2? x 3?). Adhere to the middle of the 3? x 4? avocado lines mat created in step 2. Repeat twice using a variety of papers to create the remaining two cakes and adhere them to the two empty 3? x 4? mats on the base.
Step 4: Cut a 1-1/4? x 12? strip from White Solid Cardstock. Cut a 1/4? x 12? strip from each of the vellum papers, so you have five strips total. Adhere strips to the white border base using the Vellum Tape Runner Refill. Adhere the border to the left of the cake mats.
Step 5: Cut a 6-1/2? x 8-1/2? mat from avocado lines paper. Cut a 6-1/4? x 8-1/4? photo mat from Avocado Solid Cardstock and adhere on top of the avocado lines mat. Mount one 6? x 4? photo and two 3? x 4? photos to the mat. Adhere on top of the navy petite floral paper as shown.
Step 6: Add stickers and embossed embellishments, popping some up with Foam Squares for dimension. Journal as desired.
Have you fallen in love with this wedding scrapbook layout?! What moment from the big day will you feature?
P.S. Are YOU a member of the Virtual Crop Facebook Group? It’s your go-to place for MONTHLY Virtual Crops, MONTHLY Completed Album Challenges, WEEKLY LIVE STREAMING of Fast & Fun Projects with Noreen, LIVE QUARTERLY Secret Box Openings with project tutorials and so much more! We hope you’ll join our community of more than 38,000 fellow memory-keeping enthusiasts — you’ll feel right at home!

This turned out GREAT Nicole! I love the three cakes….Simply splendid!! :)