January 24, 2025
Feel the Nostalgia With This Everyday Layout
Is there any activity more nostalgic than scrapbooking? Look back on your favorite memories and give them the home they deserve with this everyday layout! Keep reading to see how you can make this layout, complete with a lattice-style background.

To create this layout you will need:
- Noteworthy Days Tone-on-Tone Paper Pack or (Shop Canada | Shop Australia)
- Noteworthy Days Variety Mat Pack or (Shop Canada | Shop Australia)
- Noteworthy Days Embellishments or (Shop Canada | Shop Australia)
- Noteworthy Days Stickers or (Shop Canada | Shop Australia)
- Bright White Solid Cardstock or (Shop Canada | Shop Australia)
- Slide Reel Border Punch or (Shop Canada | Shop Australia) — Returning in April
- 13×13 Custom Cutting System Mat or (Shop Canada | Shop Australia)
- 12-inch Trimmer or (Shop Canada | Shop Australia)
- Photo Trimmer or (Shop Canada | Shop Australia)
- Micro-Tip Scissors or (Shop Canada | Shop Australia)
- Tape Runner or (Shop Canada | Shop Australia)
- Repositionable Tape Runner or (Shop Canada | Shop Australia)
- Foam Squares Variety Pack or (Shop Canada | Shop Australia)
- Black Dual-Tip Pen or (Shop Canada | Shop Australia)

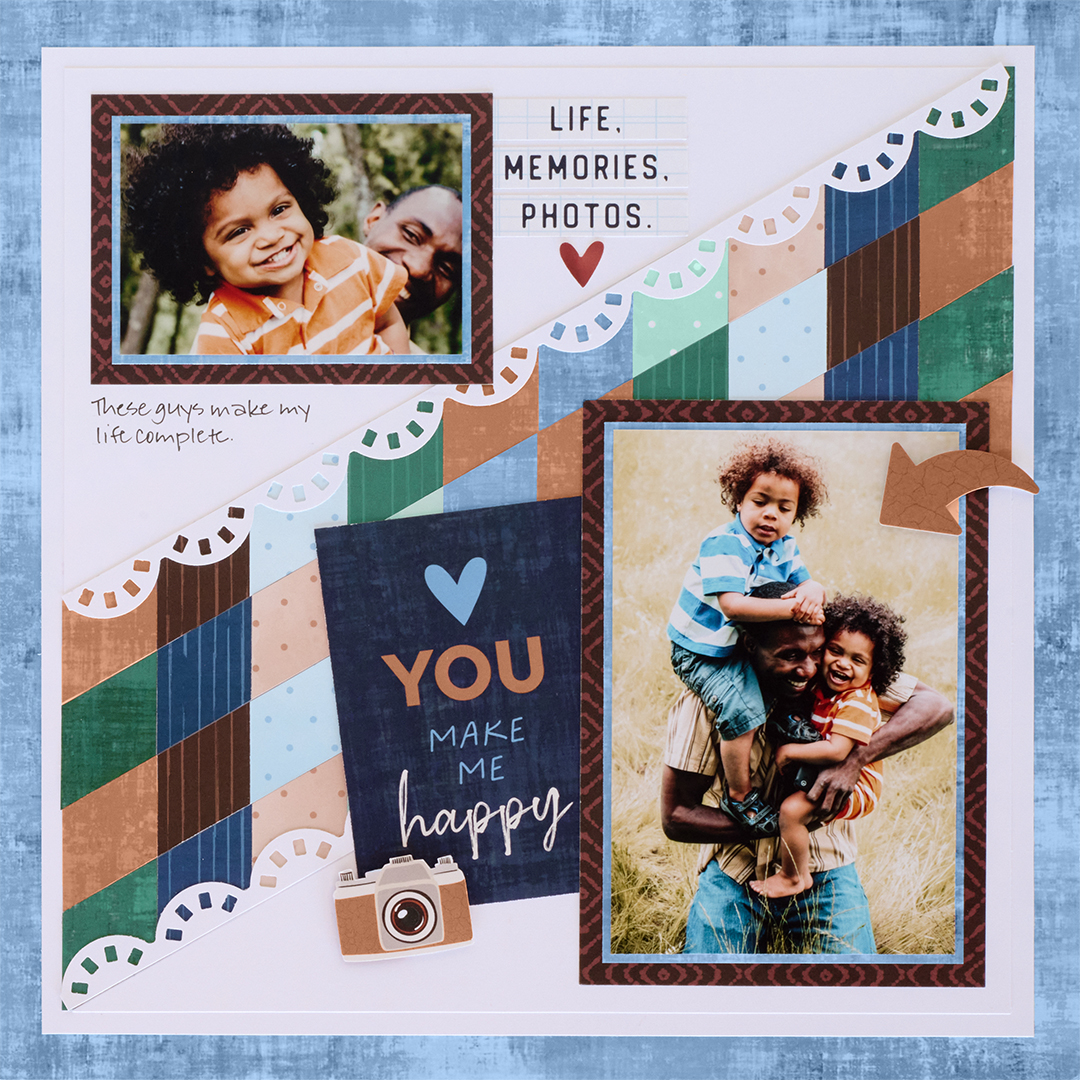
Step 1: Use a piece of distressed light blue paper as the base for this layout. (To conserve paper, you may wish to remove the inside of the sheet using the 12-inch trimmer and save for Step 5.) Cut a sheet of bright white cardstock to 11” x 11” and adhere on top.
Step 2: Using the Slide Reel Border Punch, punch a border with a fresh sheet of bright white cardstock. (Set aside for Step 4.) Cut the remaining bright white cardstock to 10-1/2” x 10-1/2”. Adhere on the layout.
Step 3: Cut a 12” x 4” strip of scrap paper. Apply repositionable adhesive liberally all over this piece and lay on the 13-inch cutting mat on the 30-degree line. Cut ten 1-1/16” x 12” strips with a variety of tone-on-tone papers. Place one strip vertically on the angled scrap strip (lining it up with the vertical lines on the cutting mat). Trim off the excess. Place strips on either side of the first strip, trimming the excess as you go to fill the entire scrap strip. Once all of the strips have been placed, making sure to cut off the excess carefully to leave straight edges, place the whole piece in the 12-inch trimmer. Carefully cut the strip into four 1” wide strips (you may need to use scissors to reach the ends). Adhere the strips at an angle on the bright white cardstock base, rotating every other strip to vary the colors, as shown.
Step 4: Apply a small amount of repositionable adhesive to the back of the Slide Reel border (From Step 2) and place it in the 12-inch trimmer (the adhesive holding it in place). Trim off 1/2″; reposition the border and cut off the other side at 1/2″ (you’ll have just a narrow center strip remaining to discard). Adhere the border halves on the angled strips as shown.
Step 5: Adhere a brown diamonds variety mat on the lower right side of the layout. Cut a 4” x 6” piece with distressed light blue paper and adhere on the mat. Crop a photo to 3-3/4” x 5-3/4” and mount on top. Cut the mat that says “Life Memories Photos” in half (saving the other half for Step 6). Adhere the brown diamonds piece on the upper right side of the layout. Cut a 4” x 2-3/4” piece with distressed light blue paper and adhere on the mat. Crop a photo to 3-3/4” x 2-1/2” and mount on top.
Step 6: Cut the mat in half that says “You make me happy”. Tuck and adhere the piece behind the large photo as shown. Cut apart the “Life Memories Photos” mat, and fussy-cut out the camera. Adhere as shown on the layout, popping the camera up with foam squares for dimension. Adhere the heart sticker and arrow embellishment.
Step 7: Journal as desired.
Does it take more or less time to create layouts when you’re working with your favorite photos?
P.S. Are YOU a member of the Virtual Crop Facebook Group? It’s your go-to place for MONTHLY Virtual Crops, MONTHLY Completed Album Challenges, QUARTERLY Secret Box Openings with project tutorials and so much more! We hope you’ll join our community of more than 40,000 fellow memory-keeping enthusiasts — you’ll feel right at home!

Amazing design, Krislyn! I can’t wait to give this a try!