October 2, 2025
Create a Layout Using Scraps in a Beautiful Grid Design
Here’s a fun, grid‑style layout that’s perfect for using up scraps while still giving space to showcase photos and decorative elements. You’ll layer tonal and patterned squares, then punch, doodle, and embellish to make each square pop. Let’s jump into what you’ll need and how to build it.
To create this layout you will need:
- Birthday Jubilee Paper Pack (12/pk) (Shop Canada | Shop Australia)
- Birthday Jubilee Embossed Embellishments (40/pk) (Shop Canada | Shop Australia)
- Birthday Jubilee Stickers (3/pk) (Shop Canada | Shop Australia)
- Birthday Jubilee Mat Pack (12/pk) (Shop Canada | Shop Australia)
- 12×12 Bright White Solid Cardstock (10/pk) (Shop Canada | Shop Australia)
- Cranberry Solid Cardstock (10/pk) (Shop Canada | Shop Australia)
- Cornflower Solid Cardstock (10/pk) (Shop Canada | Shop Australia)
- Orange Shimmer Solid Core Paper Pack (10/pk) (Shop Canada | Shop Australia)
- Celebration Cake Punch (Shop Canada | Shop Australia)
- Garland Banner Border Punch (U.S.) (Shop Canada | Shop Australia)
- White Gelly Roll Pen (Shop Canada | Shop Australia)
- Black Dual-Tip Pen (Shop Canada | Shop Australia)
- Foam Squares Variety Pack (2/pk) (Shop Canada | Shop Australia)
- Tape Runner (Shop Canada | Shop Australia)
- 12-Inch Trimmer with Straight Blades (Shop Canada | Shop Australia)
Let’s Get Started!
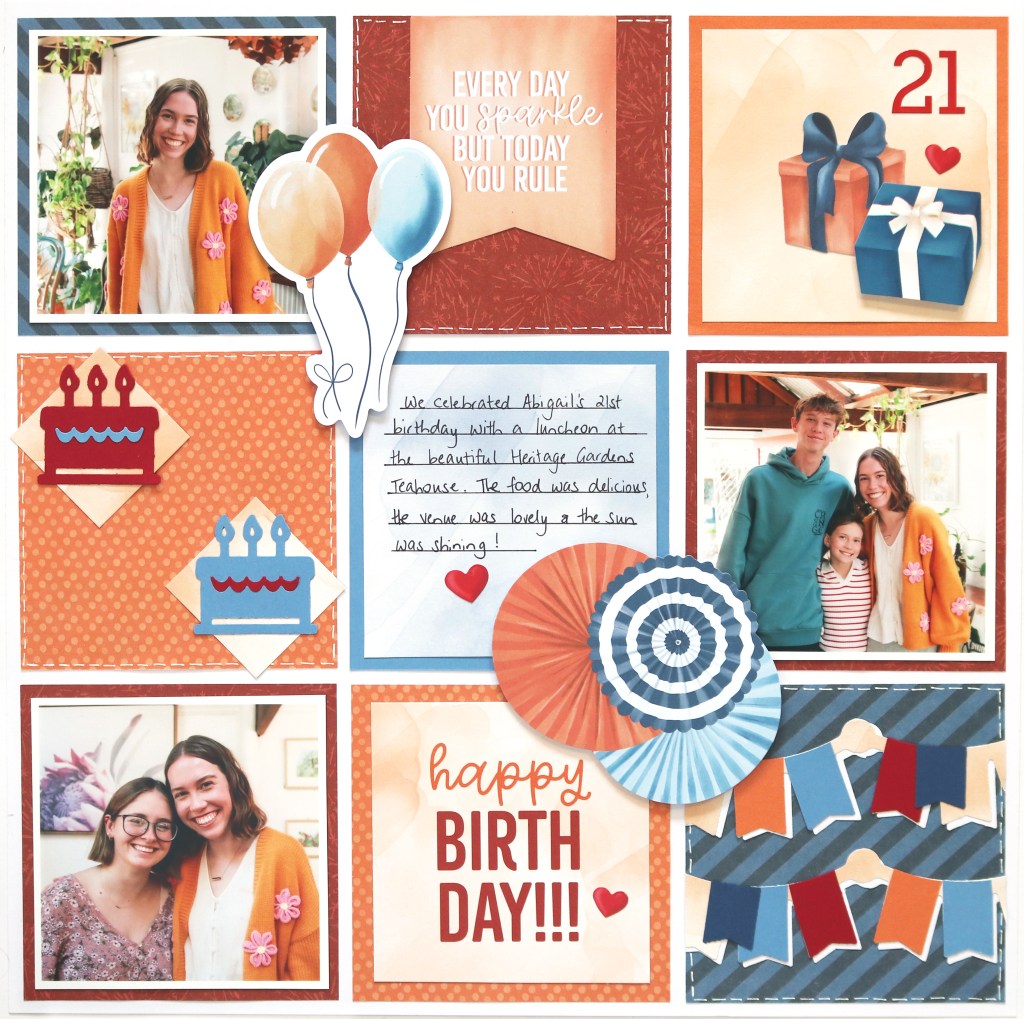
Mandy’s Tip: I chose to limit my color palette to three colors (red, blue and orange), and in each row, I added a square of each of these colors. This helps the layout feel balanced and draws the viewer’s eye around the page. When it comes to embellishing, don’t be afraid to branch out of the squares! Adding a couple of embellishments that overlap into multiple squares helps to break up the linear structure of the layout and add some interest!

Step 1: Begin with your choice of cardstock or tonal paper as your base. Select your designer papers and trim them into (9) 3‑3/4″ squares.
- Tip: This layout is perfect for using up scraps! Choose tonal patterns to let your decorative elements pop, or mix in busier prints and let the papers shine.
Step 2: Arrange and adhere the squares onto the base page, leaving an even gap between each square. This becomes your grid foundation.
Step 3: Crop your photos into 3‑3/8″ squares. Place them into some of the grid spaces, depending on how many photos you want to feature.
Step 4: Use remaining squares for journaling, a title, punched shapes, borders, or layered embellishment clusters. Choose which squares will get detail elements.
Step 5: Optional: Adhere some of your embellishments with foam squares to add dimension. Use a journaling pen to “stitch” or doodle borders around selected squares.
Step 6: Journal as desired.
P.S. Are YOU a member of the Virtual Crop Group? It’s your go‑to place for MONTHLY Virtual Crops, MONTHLY Completed Album Challenges, QUARTERLY Secret Box Openings with project tutorials and so much more! We hope you’ll join our community of more than 48,000 fellow memory‑keeping enthusiasts — you’ll feel right at home!
