April 29, 2026
Craft Along with the Bundle of Joy Collection

Capturing those first few milestones requires a design that is as gentle and sweet as the memories themselves. This layout uses the Bundle of Joy collection to create a soft, intentional backdrop that lets a standalone baby photo truly shine. Whether you follow the design exactly or add your own personal touches, it’s a beautiful way to document those fleeting early days!
You’re invited to craft along with Brenda from the Creative Memories Design Team as she breaks down the assembly step by step.
To create this layout, you will need:
- Bundle of Joy Paper Pack
- Bundle of Joy Boy Stickers
- Bundle of Joy Girl Stickers
- Bundle of Joy Embellishments
- Bundle of Joy BMC
- Border Maker System
- Bright White Cardstock
- 12-inch Trimmer
- Photo Trimmer
- Micro-Tip Scissors
- Repositionable Tape Runner
- Foam Squares Variety Pack
- Rich Cocoa Ink
- Paintbrush
- Water Mister
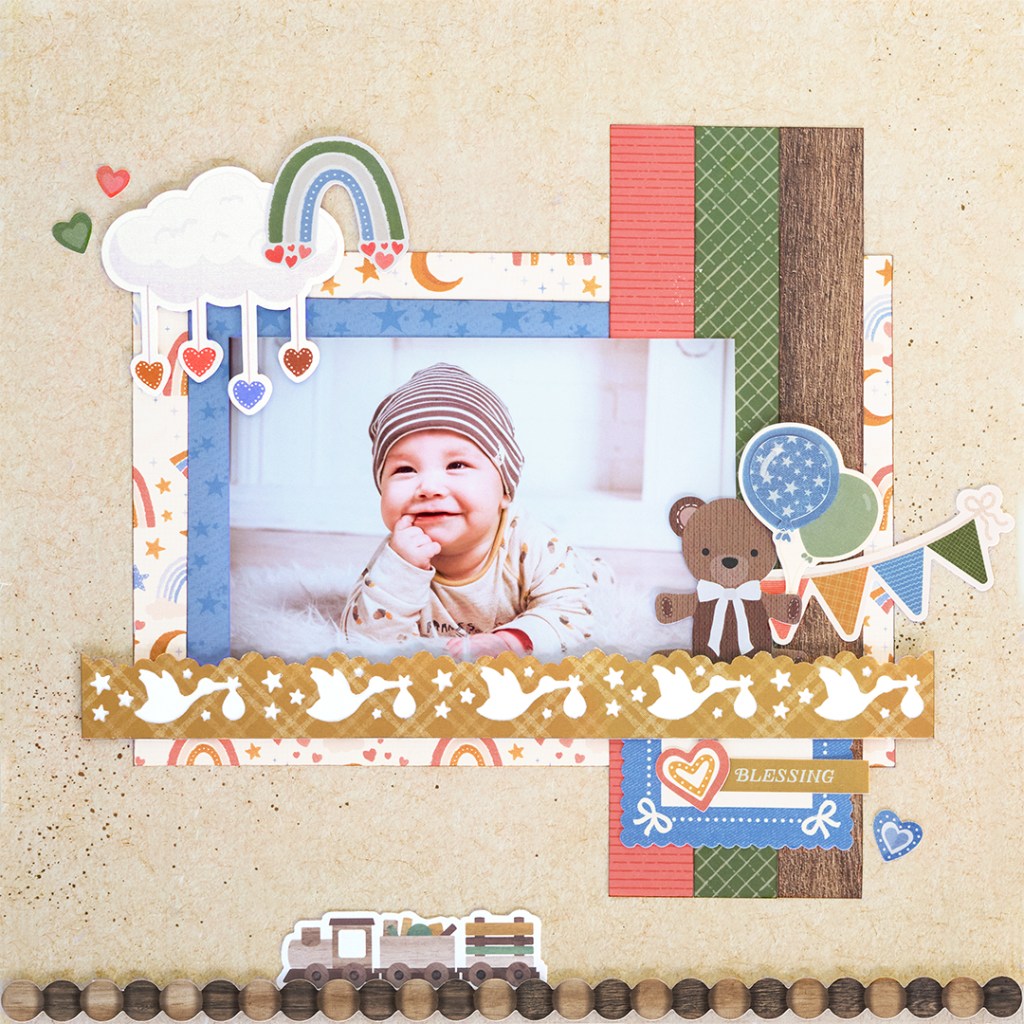

Step 1: Use the paper texture designer paper as the base for this layout. Using your paintbrush, splatter Rich Cocoa ink onto the bottom left and middle right sections of the page.
TIP: If desired, ink the edges of the remaining pieces on the layout with Rich Cocoa Ink. This adds depth and interest to your page.
Step 2: Cut a 9″ x 6″ piece of the sky designer paper. Adhere this piece 1-1/2″ from the left edge and 3″ from the bottom of page.
Step 3: Cut a 1″ x 9″ piece of each of the stripes, grid and dark wood designer papers. Start by placing the dark wood piece 2″ from the right edge and 1-1/2″ from the bottom of the page. Add the grid and stripes designer papers directly to the left of the dark wood piece.
Step 4: Cut a 5″ x 5″ piece of the stars designer paper. Adhere the piece directly to the left of stripes piece and center it on the sky piece.
Step 5: Punch a 12″ border from the yellow plaid designer paper using the Bundle of Joy BMC. Trim the border down to 10″, ensuring that you are not cutting into the design on either side. Adhere the border piece to a 10″ x 3/4″ piece of Bright White Cardstock using thin foam squares. Place this piece 1″ from the left and 3-1/4″ from the bottom of the page.
Step 6: Once you have added your photo, finish by adhering stickers and embellishments using thin foam squares as desired.
Crafting along with our Creative Memories Design Team contributors makes it easy to follow each step and enjoy the process as the page comes together. Tell us what you think in the comments!
P.S. Are YOU a member of the Virtual Crop Group? It’s your go-to place for MONTHLY Virtual Crops, MONTHLY Completed Album Challenges, QUARTERLY Secret Box Openings with project tutorials and so much more! We hope you’ll join our community of more than 52,000 fellow memory-keeping enthusiasts — you’ll feel right at home!

