May 9, 2019
Soar to New Heights with these Airplane Scrapbook Border Ideas
Airplanes represent freedom and new possibilities. When the Wright brothers set out to create a way for humans to take to the sky, they weren’t doing so for their own benefit — they were doing it to open up new possibilities for human travel and where we could go. Just like the invention of the airplane, the new Airplane Punch opens up a new world of possibilities for you and your scrapbook projects. Take a look at these fun airplane scrapbook border ideas and try them out for yourself!
To create these borders, you will need:
- Travel Log Paper Pack or (Shop Canada | Shop Australia)
- Travel Log Stickers or (Shop Canada | Shop Australia)
- Airplane Punch or (Shop Canada | Shop Australia)
- Beige, Black, Crimson, Peacock Blue and White Cardstock or (Shop Canada | Shop Australia)
- Custom Cutting System with Circle Patterns or (Shop Canada | Shop Australia)
- Border Maker System with the Jumbo Jet Border Maker Cartridge or (Shop Canada | Shop Australia)
- 12-inch Trimmer or (Shop Canada | Shop Australia)
- Tape Runner with Repositionable Adhesive or (Shop Canada | Shop Australia)
- Foam Squares or (Shop Canada | Shop Australia)
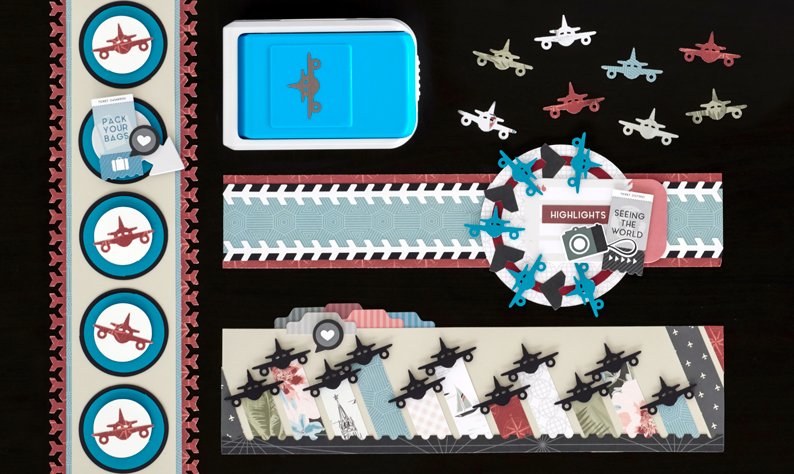
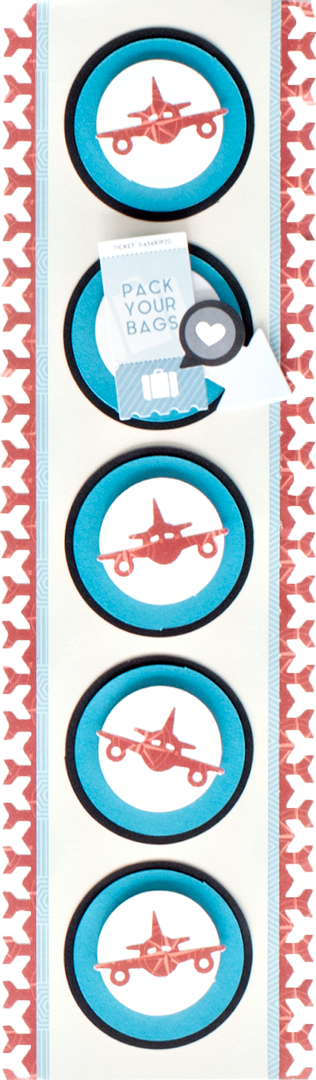 Pack Your Bags Travel Log Border
Step 1: Cut a piece of the blue patterned paper to measure 2-3/4″ x 12″.
Step 2: Cut a piece of Beige Cardstock to measure 2-1/2″ x 12″. Adhere to the blue paper.
Step 3: Using the Custom Cutting System with the Circle Patterns, cut five circles from Black Cardstock using the inside of the medium circle with the Green Blade.
Step 4: Using the Custom Cutting System with the Circle Patterns, cut five circles from the Peacock Blue Cardstock using the inside of the medium circle with the Blue Blade. Adhere to the black circles.
Step 5: Using the Custom Cutting System with the Circle Patterns, cut five circles from White Cardstock using the inside of the small circle with the Red Blade. Adhere to the top of the blue circles using Foam Squares. Then, adhere the circles to the border vertically.
Step 6: Using the Airplane Punch, punch four airplanes from the red patterned paper. Adhere to the middle of each circle except for the second circle from the top.
Step 7: Using the Border Maker System, punch two 12″ borders using the Airplane Border Maker Cartridge. Adhere to the back edge of the blue paper on each side.
Step 8: Adhere stickers and embellishments to the second circle from the top.

Seeing the World Travel Log Border
Step 1: Cut a piece from the red patterned paper to measure 12″ x 2-1/4″.
Step 2: Cut a piece from Black Cardstock to measure 12″ x 1-7/8″. Adhere to the red paper.
Step 3: Cut a piece from the blue patterned paper to measure 12″ x 1-3/4″. Adhere to the Black Cardstock.
Step 4: Adhere the white border stickers.
Step 5: Using the Custom Cutting System, cut a circle from the white patterned paper using the outside of the small circle with the Red Blade. Adhere to the border using Foam Squares.
Step 6: Using the Custom Cutting System, cut a circle from the Crimson Cardstock using the inside of the large circle with the Blue Blade. Do not move the circle pattern and cut with the Red Blade to create the ring. Adhere to the center of the white patterned circle.
Step 7: Punch five airplanes using the Airplane Punch. Adhere to the ring, altering between arrow stickers and airplanes.
Step 8: Decorate with stickers and embellishments.

Airplane Love Travel Log Border
Step 1: Cut a piece of Beige Cardstock to measure 12″ x 3″.
Step 2: Cut random pieces of paper to measure 3/4″ wide and in varying lengths. Adhere at an angle to the Beige Cardstock.
Step 3: Punch 11 airplanes from Black Cardstock. Adhere to the ends of each strip using a small Foam Square.
Step 4: Adhere sticker tabs to the top edge, layering some behind the top edge. Add the heart sticker on the top tab with a Foam Square.
Step 5: Adhere the black border sticker to the bottom edge of the border.
A beautiful border can turn a good layout into a great layout. Help your layouts take flight by adding these airplane scrapbook borders to them! What types of projects do you think you’ll use them for? Let us know in the comments!

put the airplanes on some old military layouts !!!!
[…] Create this border by reading this “Soar to New Heights” post! […]
[…] Want to create both of these airplane borders? Find out how on this blog post! […]