March 24, 2022
Create A Bouquet Of Memories: Spring Scrapbooking Layout With Rose Scrapbooking Border

From a hidden botanical gardens to local parks, bustling farmers’ markets and soaring conservatories bursting at the seams with fragrant blooms, there are so many places and opportunities to stop and smell the roses (or lilacs, peonies, tulips, daisies and more!) come springtime. This spring scrapbooking layout is in full bloom for this budding season and features a rose scrapbooking border that will put the petal to the metal!
(Hint: The border punch is a part of a current promotion going on now — find details about the tiered promo in the links below and get it for yourself before the beauties are gone for good!)
To create this layout you will need:
- Endless Meadows Paper Pack or (Shop Canada | Shop Australia)
- Endless Meadows Tone-on-Tone Paper Pack or (Shop Canada | Shop Australia)
- Endless Meadows Stickers or (Shop Canada | Shop Australia)
- Rose Garden Border Punch — Exclusive in the promotion
- 12-inch Trimmer with Straight & Scallop Blades or (Shop Canada | Shop Australia)
- Micro-Tip Scissors or (Shop Canada | Shop Australia)
- Tape Runner or (Shop Canada | Shop Australia)
- Repositionable Tape Runner or (Shop Canada | Shop Australia)
- Foam Squares or (Shop Canada | Shop Australia)
- Black Dual-Tip Pen or (Shop Canada | Shop Australia)

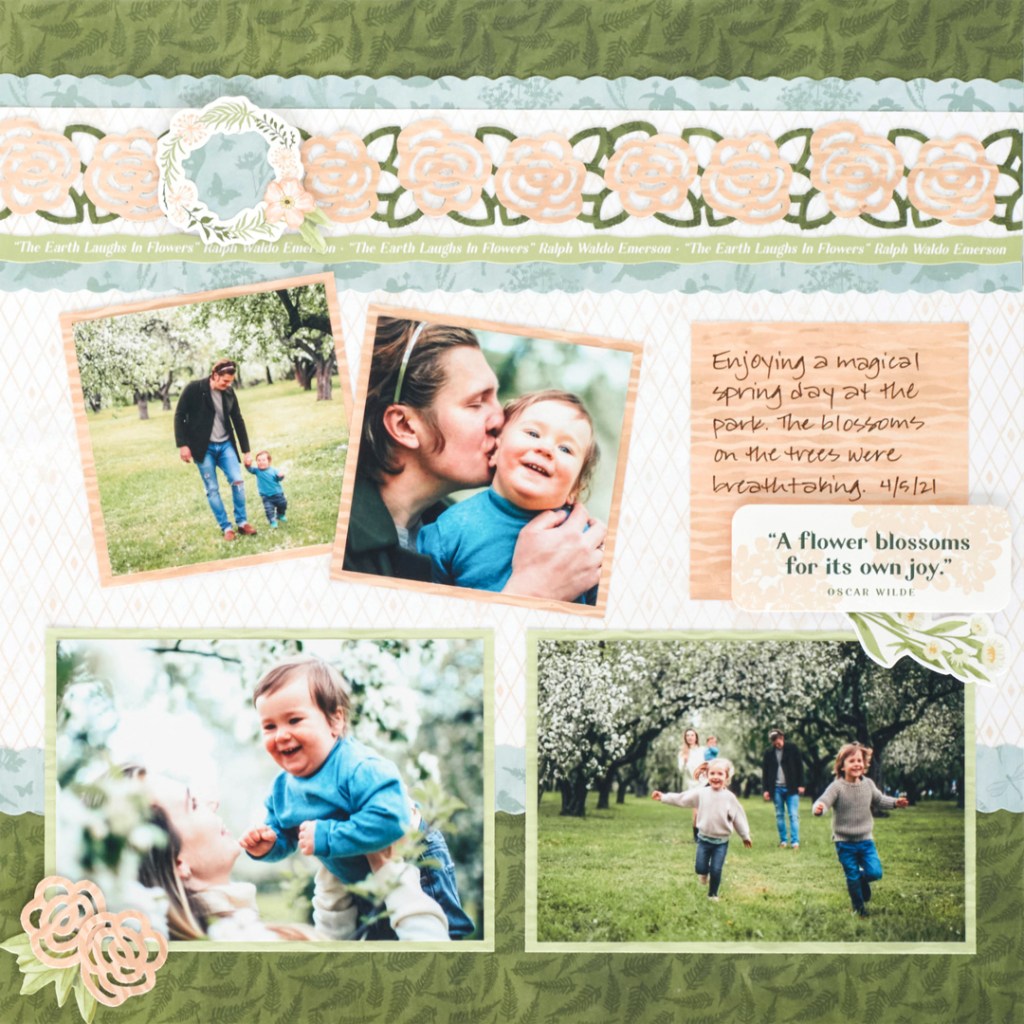
Step 1: Use a piece of green fronds tonal paper as the base for this layout.
Step 2: Cut a 12″ x 6″ piece of diamond grid designer paper and adhere to the layout, about 2-1/2″ from the bottom. Using the 12-inch Trimmer and the Scallop Blade, cut a 12″ x 1″ strip of dusty sky blue wildlife and wildflower silhouettes designer paper and adhere about 2-1/2″ from the bottom.
Step 3: Using the 12-inch Trimmer and Scallop Blade, cut a 12″ x 2-1/2″ strip of dusty sky blue wildlife and wildflower silhouettes designer paper and adhere about 1″ from the top. Cut a 12″ x 1-1/2″ strip of diamond grid paper and adhere it on top. Place a green quote border sticker along the lower edge of the diamond grid strip.
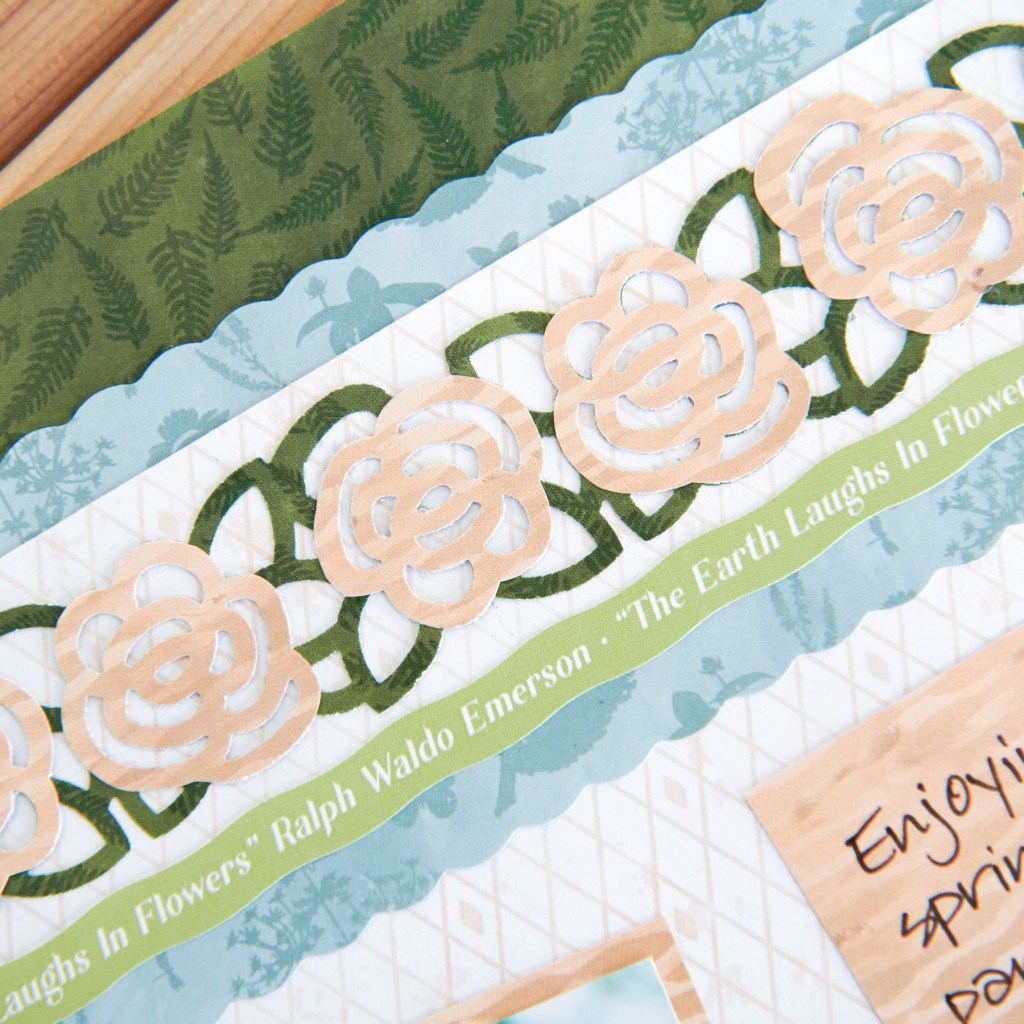
Step 4: Using the Rose Garden Border Punch, punch a border with each green fronds and peach waves tonal papers. Adhere the green border on the layout. Using scissors, trim out each rose from the peach border. Apply Repositionable Tape Runner adhesive and adhere to the border as shown.
Step 5: Trim out a small dusty sky blue wildlife and wildflower silhouettes scrap to place behind the wreath sticker and adhere on the border.
Step 6: Crop two photos to 5″ x 3-1/2″ and mat on two 5-1/4″ x 3-3/4″ pieces of leaf green waves tonal paper. Crop two photos to 3″ x 3″. Cut three 3-1/4″ x 3-1/4″ pieces of peach waves tonal paper. Mount photos on top of two and adhere to the layout.
Step 7: Mount the third peach waves square on the layout and journal as desired. Add stickers.
Step 8: Using the Rose Garden Border Punch, punch a small border section with peach waves tonal paper. Trim out the flowers and adhere to the lower-left corner of the layout, along with a leaf embellishment.
What are your thoughts on this spring scrapbooking layout? Have you taken advantage of the current promo going on now in order to create rose scrapbooking borders? Let us know!

beautiful design. Always curious, how did you do the words in the border?
Hi, Julie
The “words in the border” is a sticker strip, 12″x12″, from the Endless Meadows Border Stickers (3/pk).
I enlarged the picture to see all of the lovely details. I’m so glad that I did. Fantastic Layout.
Step 4 ~ looks like on the green fronds paper, you cut out the rose center and just adhered the leaf part. I don’t see any green rose centers underneath the peach waves roses. Is that correct?