July 5, 2022
Have A Zoo-per Day Creating This Zoo Layout For Scrapbooking

It’s a jungle out there in the scrapbooking landscape, for the wildly wonderful What A Zoo, Too! collection is roaring a loud presence. Inspired by family trips to the zoo, petting zoo playdates, jungle-themed birthday celebrations and more, these scrapbooking supplies will be a scrappin’ safari for your wild adventures! Well, if you’re in high spirits (like a high-rise giraffe!) for the newest and notable collection, then long for this zoo layout!
To create this layout you will need:
- What A Zoo, Too! Paper Pack or (Shop Canada | Shop Australia)
- What A Zoo, Too! Fast2Fab™-Inspired Designer Paper Pack or (Shop Canada | Shop Australia)
- What A Zoo, Too! Variety Mat Pack or (Shop Canada | Shop Australia)
- What A Zoo, Too! Layered Embellishments or (Shop Canada | Shop Australia)
- What A Zoo, Too! Stickers or (Shop Canada | Shop Australia)
- What A Zoo, Too! Letter Stickers or (Shop Canada | Shop Australia)
- What A Zoo, Too! Border Stickers or (Shop Canada | Shop Australia)
- Black & White Solid Cardstocks or (Shop Canada | Shop Australia)
- Original Border Maker System with Zebra Stripe Border Maker Cartridge or (Shop Canada | Shop Australia)
- Bamboo Border Punch or (Shop Canada | Shop Australia)
- Piece by Piece Mini Trio Punch Set or (Shop Canada | Shop Australia)
- Custom Cutting System with Circle, Oval & Gemstone Patterns or (Shop Canada | Shop Australia)
- 12-inch Trimmer with Straight & Deckle Blades or (Shop Canada | Shop Australia)
- 12-inch Decorative Trimmer or (Shop Canada | Shop Australia)
- Micro-Tip Scissors or (Shop Canada | Shop Australia)
- Tape Runner or (Shop Canada | Shop Australia)
- Repositionable Tape Runner or (Shop Canada | Shop Australia)
- Black Dual-Tip Pen or (Shop Canada | Shop Australia)
- Standard Hole Punch
Check out the whole What A Zoo, Too! collection in the video below.

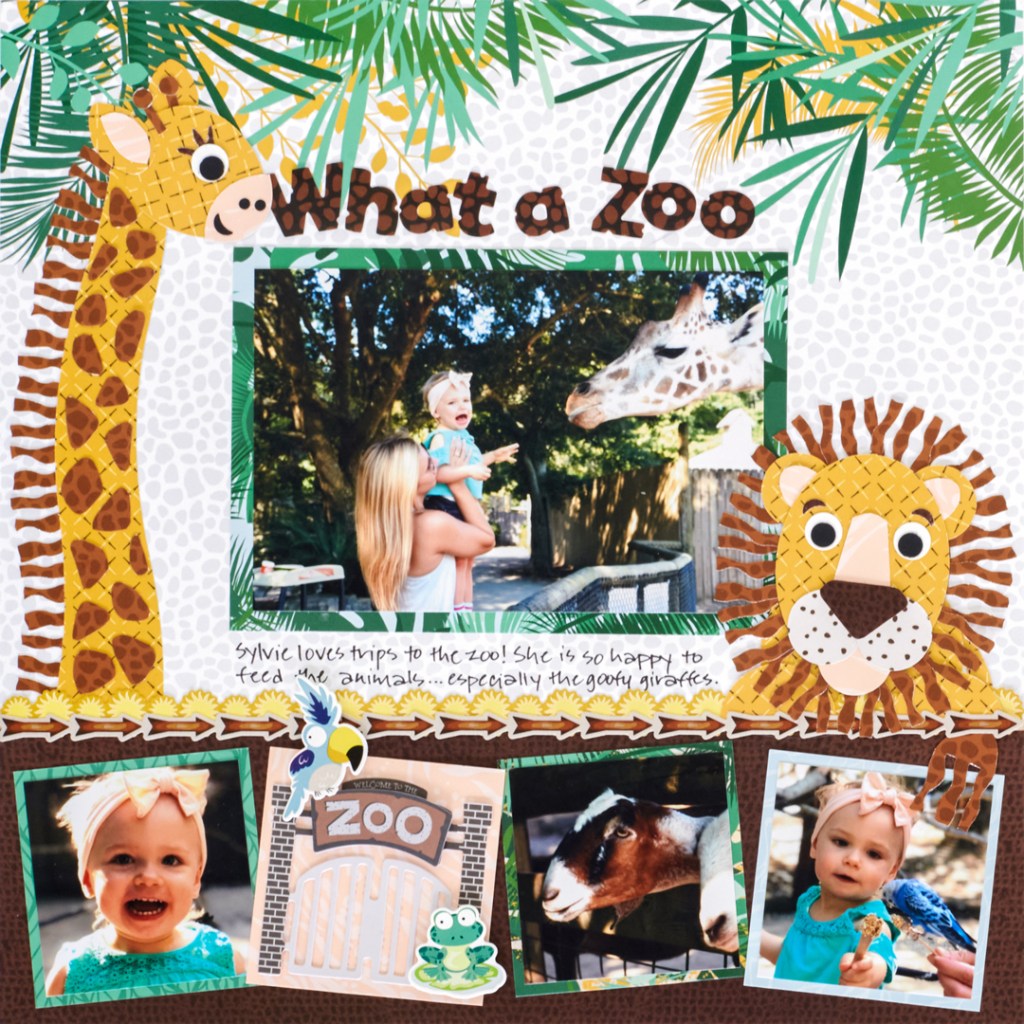
Step 1: Use a piece of the tropical fronds Fast2Fab™-inspired designer paper as the base for this layout.
Step 2: Mat a 6″ x 4″ photo with a 6-1/2″ x 4-1/2″ variety mat and adhere to the middle of the layout. Cut four 2-3/4″ x 2-3/4″ squares with various designer papers. Adhere along the bottom dark brown reptile edge as shown. Crop three photos to 2-1/2″ x 2-1/2″ and mount on three of the squares.
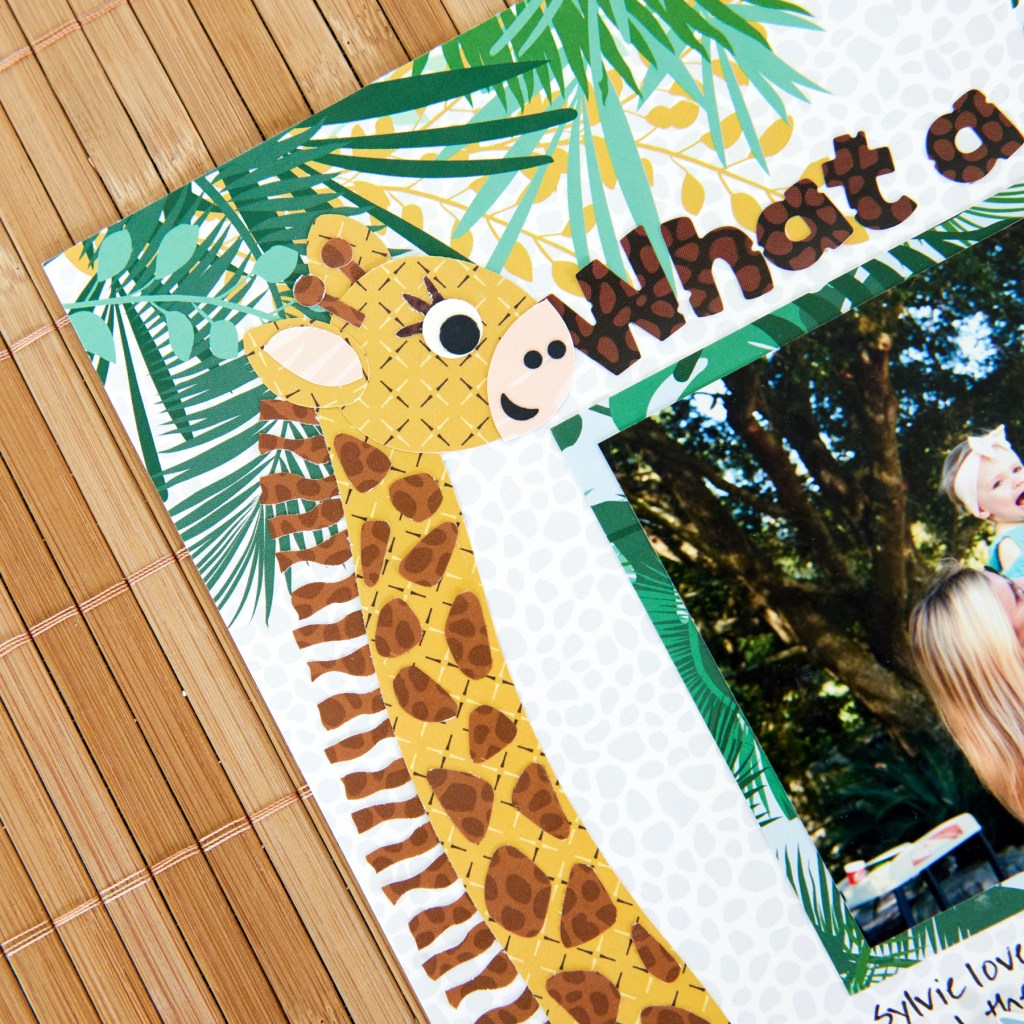
Step 3: Create the giraffe.
- Cut the neck with mustard diamond grid designer paper and the swell edge of the 12-inch Decorative Trimmer.
- With the Zebra Stripe Border Maker Cartridge, punch a zebra stripes border with brown animal spots designer paper. Trim off the outer edge using the 12-inch Trimmer and Deckle Blade. Trim the border off at 1-1/4″ and cut into small three-stripe sections. Adhere sections behind the neck.
- Make the head using the oval inside the heart Custom Cutting System Gemstone Pattern and the Red Blade.
- Punch eyes from White and Black Solid Cardstocks using the Piece by Piece Mini Trio Punch Set and standard hole punch. Punch eyelashes with a small piece of Black Solid Cardstock and the Bamboo Border Punch.
- The Piece by Piece Mini Trio Punch Set will also make the nostrils, mouth and “ossicones.”
- Use a scissors to cut remaining pieces freehand.
- Assemble and adhere on the left side of the layout.

Step 4: Create the lion.
- Use the same technique as above to create the mane.
- Using the inside of the second-largest Custom Cutting System Oval Pattern and the Red Blade, cut the head with mustard diamond grid designer paper.
- Cut the ears, chin and jowls using the inside of the smallest Custom Cutting System Circle Pattern and the Blue Blade.
- Cut the inner ears using the inside of the smallest Custom Cutting System Oval Pattern and the Blue Blade.
- Cut the nose pieces freehand.
- Punch eyes and eyebrows from White and Black Cardstocks using the Piece by Piece Mini Trio Punch Set and standard hole punch.
- Cut the body using the inside edge of the medium Custom Cutting System Circle Pattern and the Red Blade. Cut the paws using a circle (cut in half) cut from the inside edge of the smallest Custom Circle System Circle Pattern and the Red Blade.
- Make the tail using a piece from the Zebra Stripe Border Maker Cartridge.
- Assemble and adhere on the right side of the layout.
Step 5: Adhere border stickers, letter stickers and the “Zoo” layered embellishment. Add the bird and frog stickers, popping them up with Foam Squares for added dimension.
Step 6: Journal as desired.
Are you roaring over this What A Zoo, Too! collection? What are your thoughts on this zoo layout with too-cute-to-handle paper decorations? Chirp up and let us know your thoughts and answers!

What a cute, cute layout! Just right to match the darling Sylvie.
“What a Zoo” makes me miss visiting the wild animals at a zoo.
I wish there was one close by so I could go often.
The cutest thing I’ve seen!!!!!
So adorable! I love the giraffe!!
Such a great layout. Someone is very creative thinking outside of the lines to make the lion and the giraffe. It is a truly AMAZING page
I absolutely love this!! Giraffes are my favorite