October 3, 2022
Bring On The Joy And Jolly: Christmas Scrapbook Layout

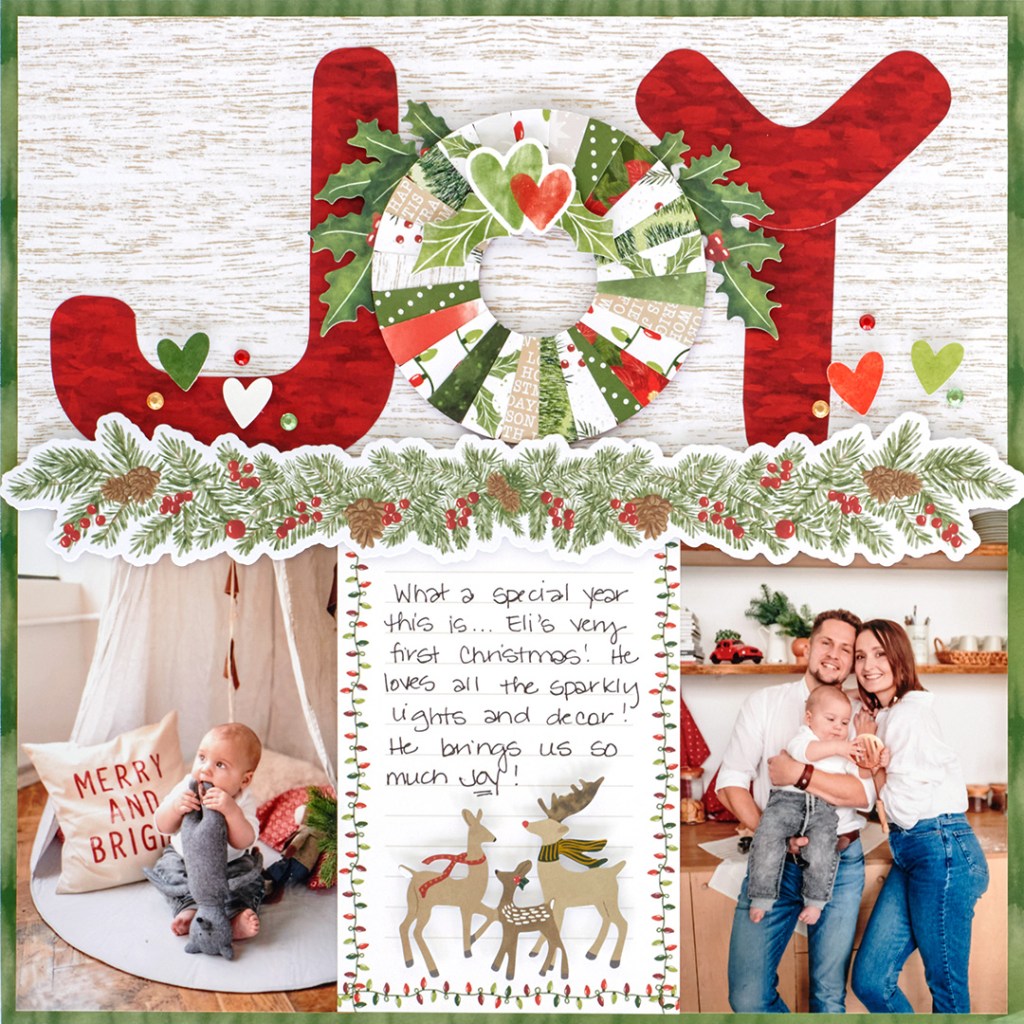
It’s only October, but there’s always a reason for the season of Christmas! And you can show off the yuletide decor with the latest Seasonal Sightings collection — think cardinals, deer, snowflakes, poinsettias and snow-covered pine trees — in a festive palette of cardinal red, holly green, tan and gold. Talk about a holly jolly time! Speaking of that, check out this Christmas scrapbook layout so you’re prepped for the festive season ahead! It’ll bring you much JOY!
To create this layout you will need:
- Seasonal Sightings Paper Pack or (Shop Canada | Shop Australia)
- Seasonal Sightings Tone-on-Tone Paper Pack or (Shop Canada | Shop Australia)
- Seasonal Sightings Stickers or (Shop Canada | Shop Australia)
- Seasonal Sightings Variety Mat Pack or (Shop Canada | Shop Australia)
- Seasonal Sightings Laser Cut Borders or (Shop Canada | Shop Australia)
- Seasonal Sightings Foiled Embellishments or (Shop Canada | Shop Australia)
- 12-inch Trimmer or (Shop Canada | Shop Australia)
- Custom Cutting System with Rectangle & Circle Cutting Patterns or (Shop Canada | Shop Australia)
- Red Custom Cutting System Blade Cartridge or (Shop Canada | Shop Australia)
- 13×13 Custom Cutting System Mat or (Shop Canada | Shop Australia)
- 2-Way Corner Rounder or (Shop Canada | Shop Australia)
- Tape Runner or (Shop Canada | Shop Australia)
- Repositionable Tape Runner or (Shop Canada | Shop Australia)
- Foam Squares or (Shop Canada | Shop Australia)
- Black Dual-Tip Pen or (Shop Canada | Shop Australia)
Take a look at the whole Seasonal Sightings collection in the video below.

Step 1: Use a piece of holly green wash tonal paper as the base for the layout.
Step 2: Cut a piece of the white woodgrain paper to measure 11-1/2″ x 5-1/2″. Adhere to the top of the layout.
Step 3: Cut two photos to measure 3-3/4″ x 6″. Adhere to the outer-lower corners of the layout.

Step 4: Adhere a 4″ x 6″ mat in between the photos.
Step 5: Use the Custom Cutting System with the Rectangle Patterns to create the “J” and “Y” letters. Cut where desired to end the pieces, and then round the corners with the 2-Way Corner Rounder.
Step 6: Using the inside and outside edge of the smallest Custom Cutting System Circle Pattern and the Red Blade cut a piece of any paper/cardstock.

Step 7: Cut 1/2″ strips from a variety of papers. Adhere around the circle, overlapping them. Turn the circle over, placing the Custom Cutting System Circle Pattern back on top of it, then cut again with the Red Blade to cut the excess. Turn back over, adhering between the J and Y as the “O” for “Joy.”
Step 8: Adhere the stickers and embellishments to the layout, using Foam Squares on some for added dimension.
Step 9: Journal as desired.
Are you already looking forward to the Christmas season? What do you think of the latest Seasonal Sightings collection?

This layout is beautiful, thank you for posting
Love the “O” in JOY!! Definitely a cool looking layout!! Thanks for sharing Melissa!
Very clever use of the CCS Rectangles!! Great idea!
I love this layout. I’m not sure what the ccs rectangles are? Are they something new? I have circles and ovals
Love everything about this one! A+++
That wreath is so cleaver. Great Layout!
I took the little wreath idea and used it for a title page for my current Christmas album! I used the red blade on the inside of the jumbo ccs circle and the red blade on the outside of the small ccs circle for the base. I left the outside of the wreath uneven and trimmed the inside. Added a hand drawn bow. I’d post a photo if I was able. Thanks for the idea!!