October 27, 2022
Spin Together Spooky Sensations: Halloween Scrapbook Layout And Halloween Borders
“Spooky season” is here, witch calls for an array for thematic Halloween décor, and that can include gauze or cotton batting spiderwebs strewn across doorways and wall corners and plastic spiders scattered across to give a creepy crawly or haunted house experience! But fear not, today’s Halloween scrapbook layout and Halloween borders will spin together a scene that will have your scrappy spidey-senses tingling in anticipation and awe of the October occasion!

To create the layout & borders you will need:
- Happy Hauntings Paper Pack or (Shop Canada | Shop Australia)
- Happy Hauntings Laser Cut Embellishments or (Shop Canada | Shop Australia)
- Happy Hauntings Stickers or (Shop Canada | Shop Australia)
- Black & White Solid Cardstocks or (Shop Canada | Shop Australia)
- Spider Webs Frame Punch or (Shop Canada | Shop Australia)
- Original Border Maker System with Bats & Stars Border Maker Cartridge or (Shop Canada | Shop Australia)
- Custom Cutting System with Jumbo Circle & Circle Patterns or (Shop Canada | Shop Australia)
- 12-inch Trimmer with Straight, Scallop & Scoring Blades or (Shop Canada | Shop Australia)
- Micro-Tip Scissors or (Shop Canada | Shop Australia)
- Tape Runner or (Shop Canada | Shop Australia)
- Repositionable Tape Runner or (Shop Canada | Shop Australia)
- Precision Point Adhesive Pen or (Shop Canada | Shop Australia)
- Foam Squares or (Shop Canada | Shop Australia)
- Black Dual-Tip Pen or (Shop Canada | Shop Australia)


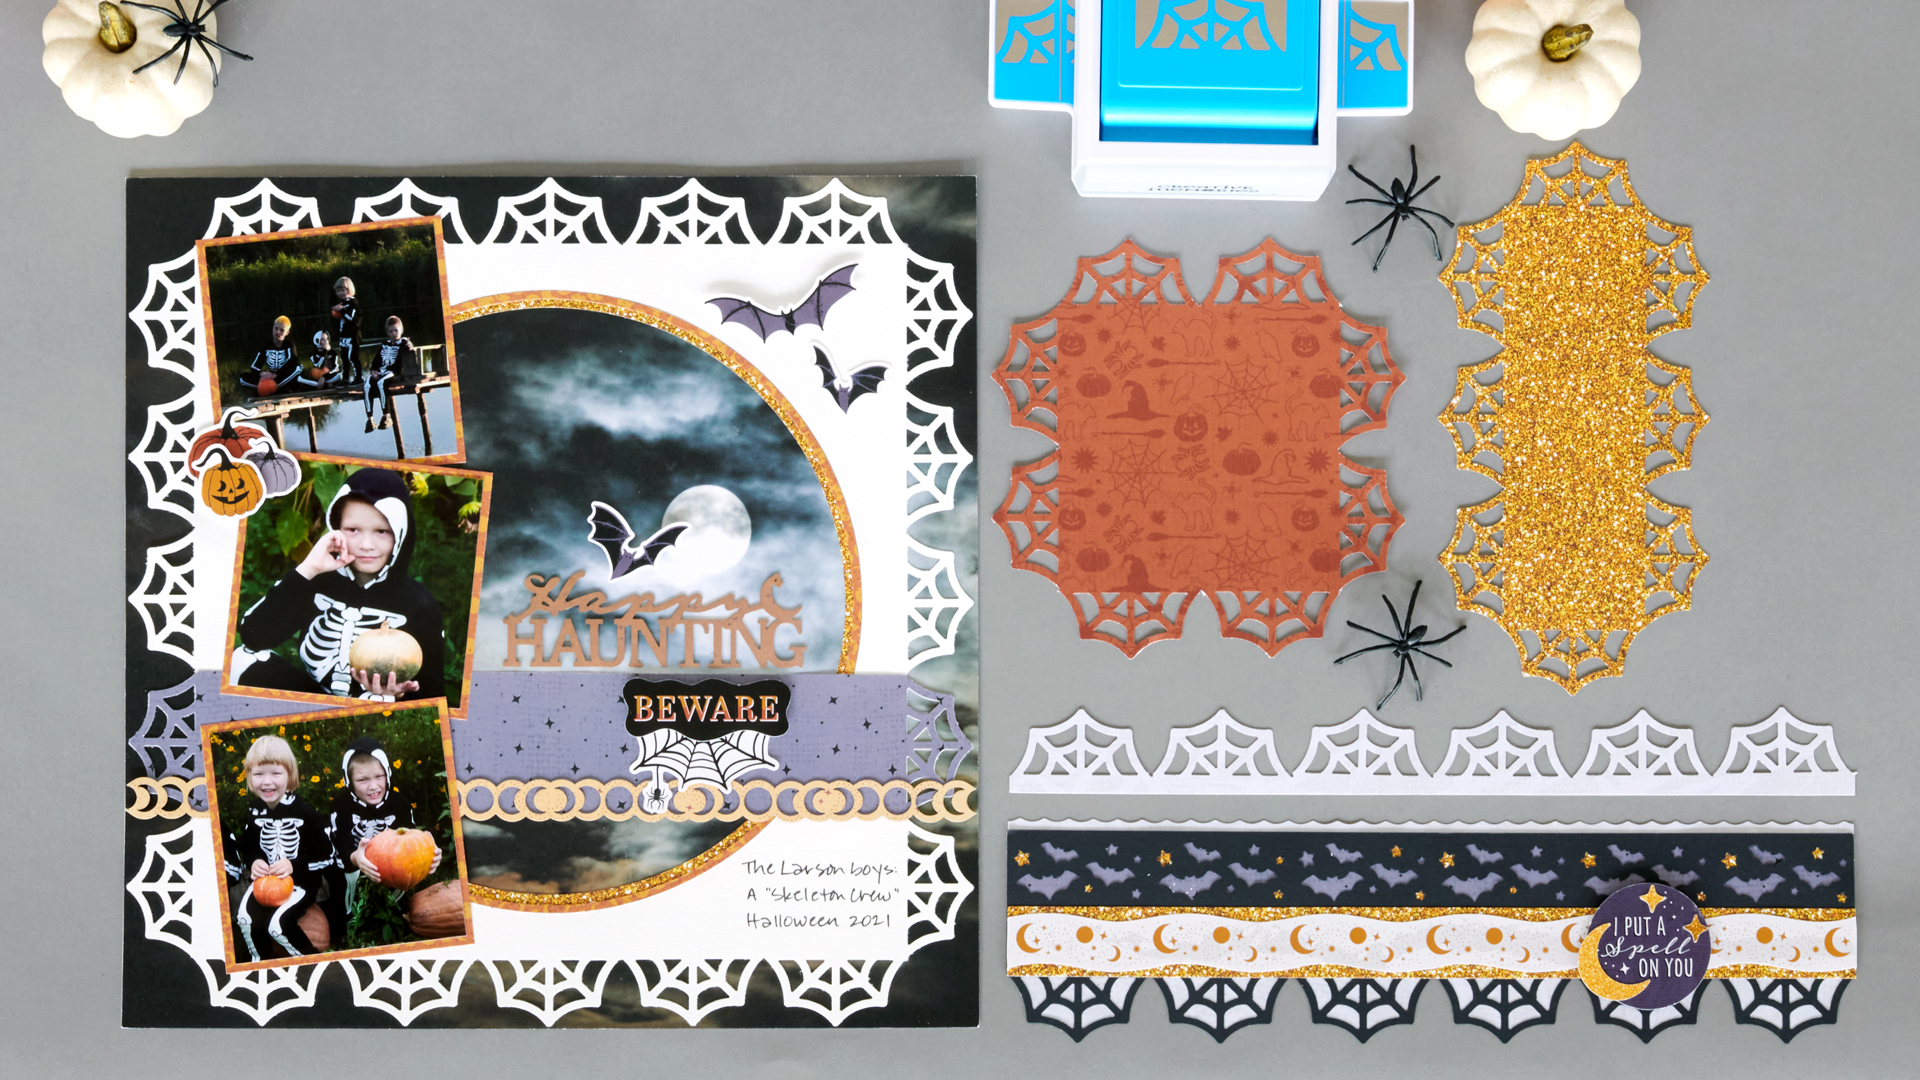
Step 1: Use a piece of photographic cloudy moonlit sky designer paper as the base for this layout.
Step 2: Using the Spider Webs Frame Punch, punch a frame around the White Solid Cardstock. Position one edge at a “frame” silver mark on the arm of the punch. Punch, then rotate the cardstock to the adjacent corner and position at the silver mark on the opposite arm of the punch. Punch. Repeat with the three remaining corners. Once the corners are punched, align one punched web with the web markings on the arm of the punch. Punch, then slide the cardstock down to align the just punched web with the web markings on the arm of the punch. Punch and continue all around the frame until complete.
Step 3: Using the inside edge of the Jumbo Circle Custom Cutting System Pattern and the Red Blade, cut a circle from the middle of the White Cardstock frame. Adhere on the layout.
Step 4: Using the Blue Blade, cut a circle with gold glitter paper. Without moving the pattern, switch to the Red Blade and cut out a ring. Adhere on the layout. Using the Green Blade, cut a circle with orange crescent moons paper. Without moving the pattern, switch to the Red Blade and cut out a ring. Adhere on top of the gold glitter ring.
Step 5: Cut a 12″ x 2″ strip of stardust paper. Align one short end in the Spider Webs Frame Punch with the black marking on the front of the punch. Punch. Repeat with the other short end. Adhere on the layout as shown. Adhere a moons laser-cut border along the bottom edge using the Precision Point Adhesive Pen.
Step 6: Crop three photos to 3-1/4″ x 3-1/4″ and mat with three 3-1/2″ x 3-1/2″ pieces of orange crescent moons paper. Mount on the layout as shown.
Step 7: Adhere additional stickers and embellishments, popping some up with Foam Squares for added dimension.
Step 8: Journal as desired.
I Put A Spell On You Border
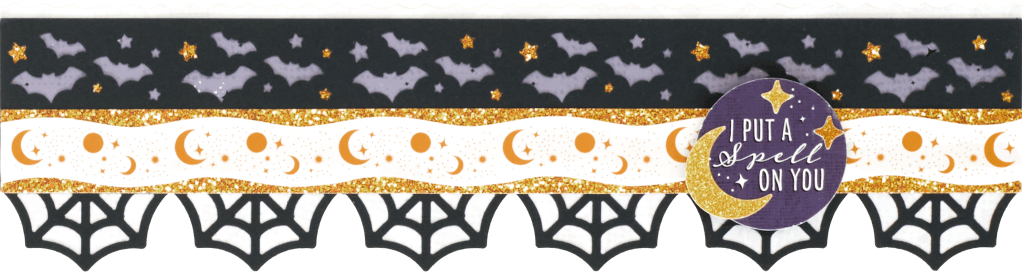
Step 1: Cut a 12″ x 2-1/4″ strip of light distressed paper for the base, using the 12-inch Trimmer and the Scallop Blade to cut reverse scallops on one edge. Cut a 12″ x 1″ strip of stardust paper and adhere on the base, 1/4″ from the top edge.
Step 2: Cut a 12″ x 3″ strip of Black Solid Cardstock. Punch one side using the Bats & Stars Border Maker Cartridge. Punch the other side using the Spider Webs Frame Punch. Cut small pieces of gold sparkle paper and adhere behind several of the stars. Adhere on the base.
Step 3: Cut a 12″ x 1″ strip of gold glitter paper and adhere on the border as shown. Top with a moons and stars border sticker.
Step 4: Using the inside edge of the medium Custom Cutting System Circle Pattern and the Blue Blade, cut three circles with light distressed paper. Cut each in half and adhere behind the spider webs, trimming the excess as necessary.
Step 5: Add stickers, popping some up with Foam Squares for added dimension.
All Hallows’ Eve Border
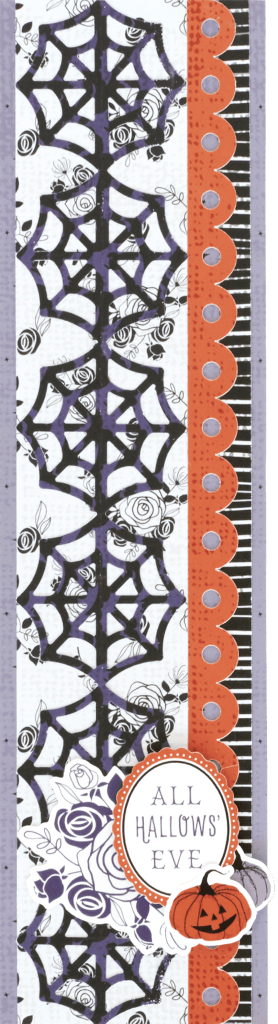
Step 1: Cut a 3-1/8″ x 12″ strip with stardust paper for the base.
Step 2: Cut a 2” x 12” strip of roses paper and adhere on the base, about 1/4″ from the left edge. Cut a 3/8″ x 12″ strip of black-and-white stripes paper and adhere on the base, about 1/4″ from the right edge. Adhere a dark orange scallop border sticker in between as shown.
Step 3: Cut a 2-1/8″ x 12″ strip of bats paper. Using the 12-inch Trimmer and the Scoring Blade, score and fold in half lengthwise. Place the folded strip in the Spider Webs Frame Punch so the fold is facing out. Punch, then unfold. Adhere on the border.
Step 4: Adhere stickers, popping some up with Foam Squares for added dimension.
Oct 31st Border
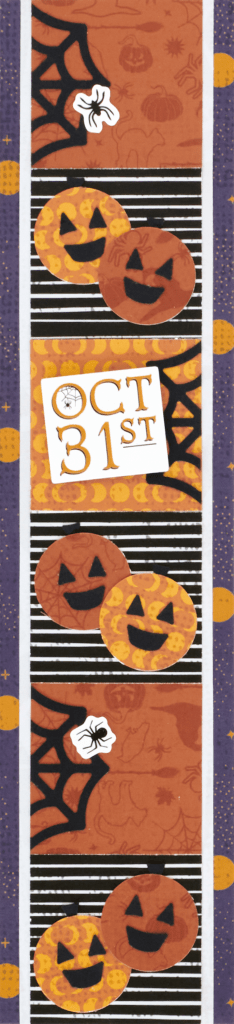
Step 1: Cut a 2-3/4″ x 12″ strip of dark purple moondance paper for the base. Cut a 2-1/4″ x 12″ strip of light distressed paper and adhere on the base.
Step 2: Cut two 2″ squares with each dark orange Halloween icons, orange crescent moons and black-and-white stripes papers. Adhere on the border as shown.
Step 3: Using the Spider Webs Frame Punch, punch a border with Black Solid Cardstock, saving the little punched-out pieces for Step 4. Cut off the webs. Adhere three of the webs on the border as shown.
Step 4: Using the inside edge of the smallest Custom Cutting System Circle Pattern and the Green Blade, cut three circles with each dark orange Halloween icons and orange crescent moons papers. Using the Precision Point Adhesive Pen, create jack-o’-lantern faces with the leftover punched-out pieces from Step 3. Adhere on the border as shown.
Step 5: Add stickers, popping some up with Foam Squares for added dimension.
Are your scrappy spidey-senses tingling with this Halloween scrapbook layout and Halloween borders? Which one will you be making first to prepare for All Hallows’ Eve?

How cute!
Beautiful page and cute borders. You are so creative.
WOW ? this is awesome ?, my little one is going to be a skeleton ? too, this layout will work perfectly. Thanks ??
Love the page layout with the photgraphic cloudy moonlit sky!