November 6, 2023
Build 3 Layouts With The Black Friday 2023 Bundles!
You’ve heard of TGIF, but today we’re saying TGIBF… Thank Goodness It’s Black Friday (the start of CM’s Black Friday Promo, that is!). Yes, we’re celebrating Black Friday early this year with a packed promo!
It’s easier than going to a busy mall or shopping at a big store outlet — shop from the comfort of your home (maybe some fuzzy Christmas pjs on too, eh?!) — for a limited time and while supplies last, you can earn YOUR choice of an exclusive bundle FREE with qualifying orders. And for any quantity you earn, you can choose exactly which bundle(s) you would like to get free! Psst, there is also a Digital Artwork version of the promo, too!
More info and what’s in each bundle here: US | CA | AU
See the Black Friday scrapbook layouts in action NOW so you can make a plethora of pretty projects soon! Happy Black Fri-YAY!
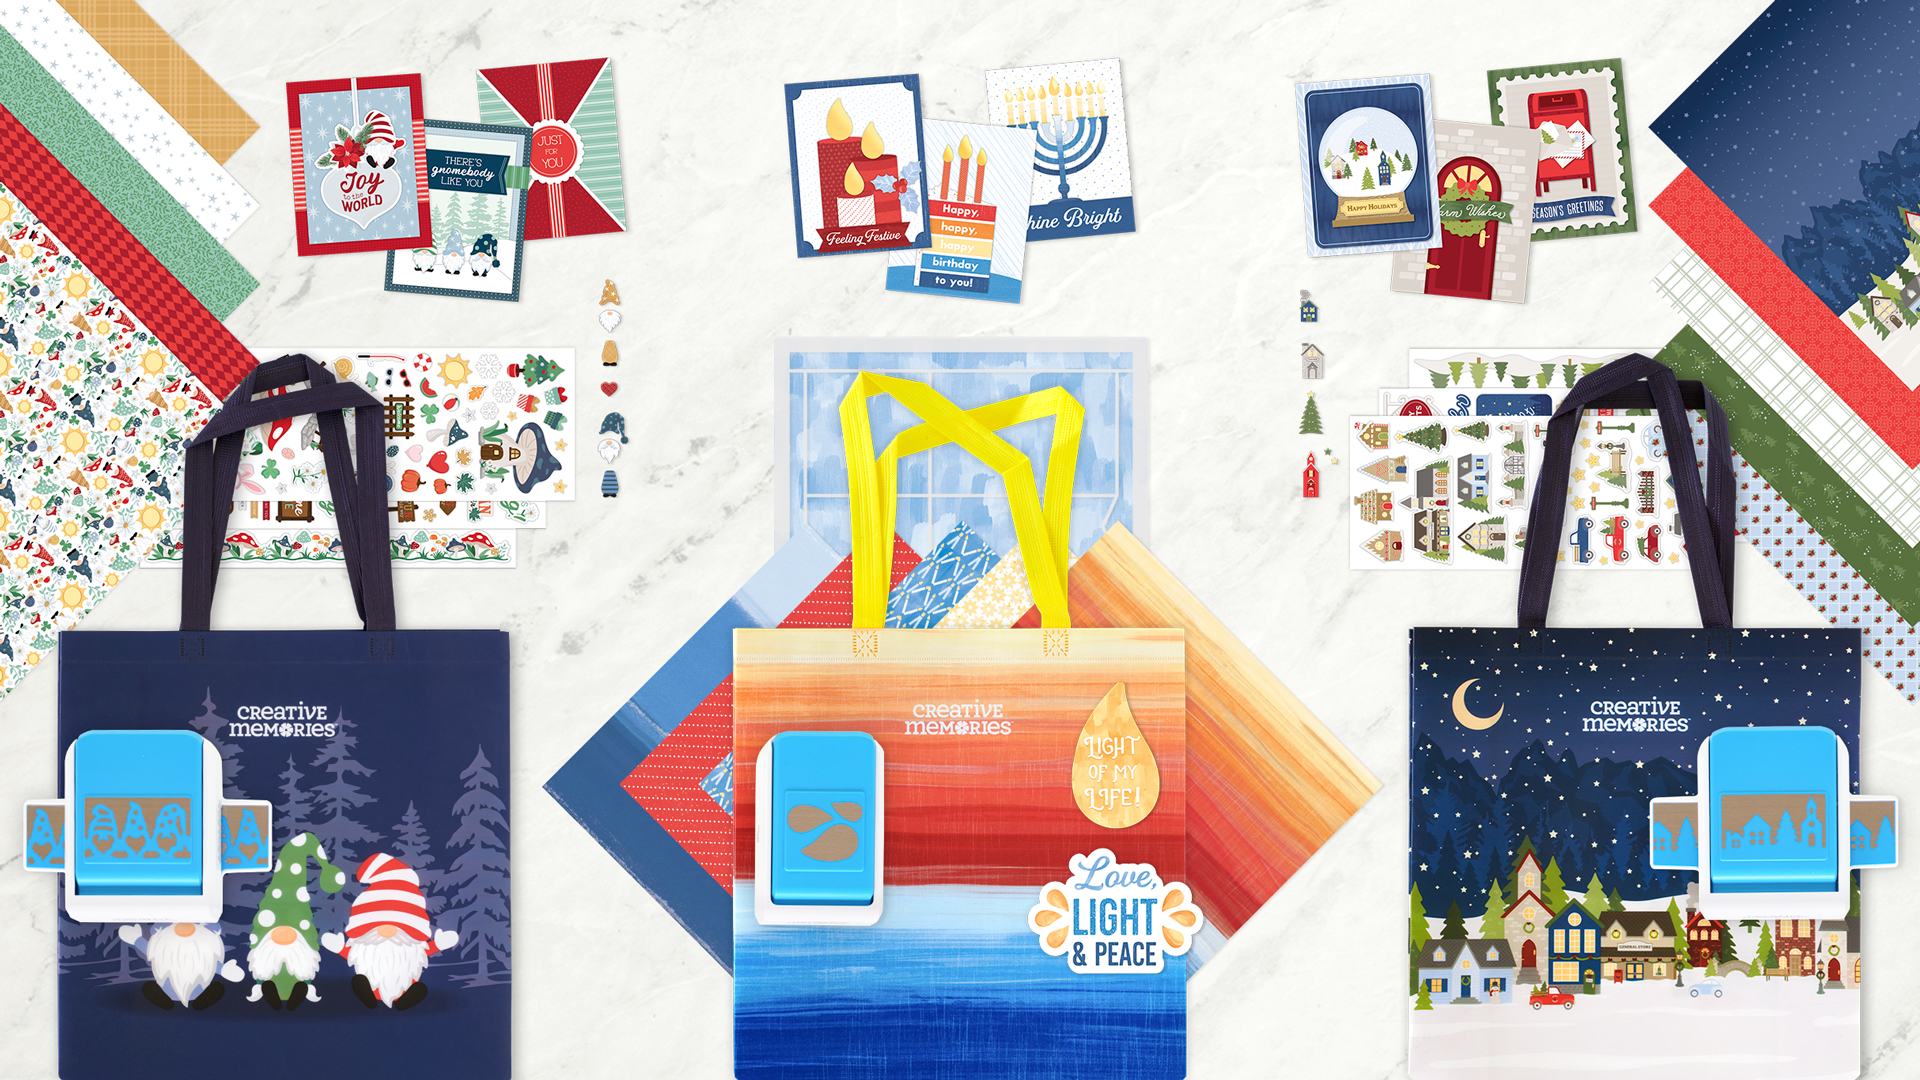
Take a look at the Black Friday Bundles you can earn FREE!


Check out the three unique options above for gift bundles that you can earn free — the Welcome Gnome Bundle, the Candlelit Bundle and the Charming Village Bundle! And remember, for any quantity you earn, you can choose exactly which bundle(s) you would like to get FREE!
For more details, visit: US | CA | AU
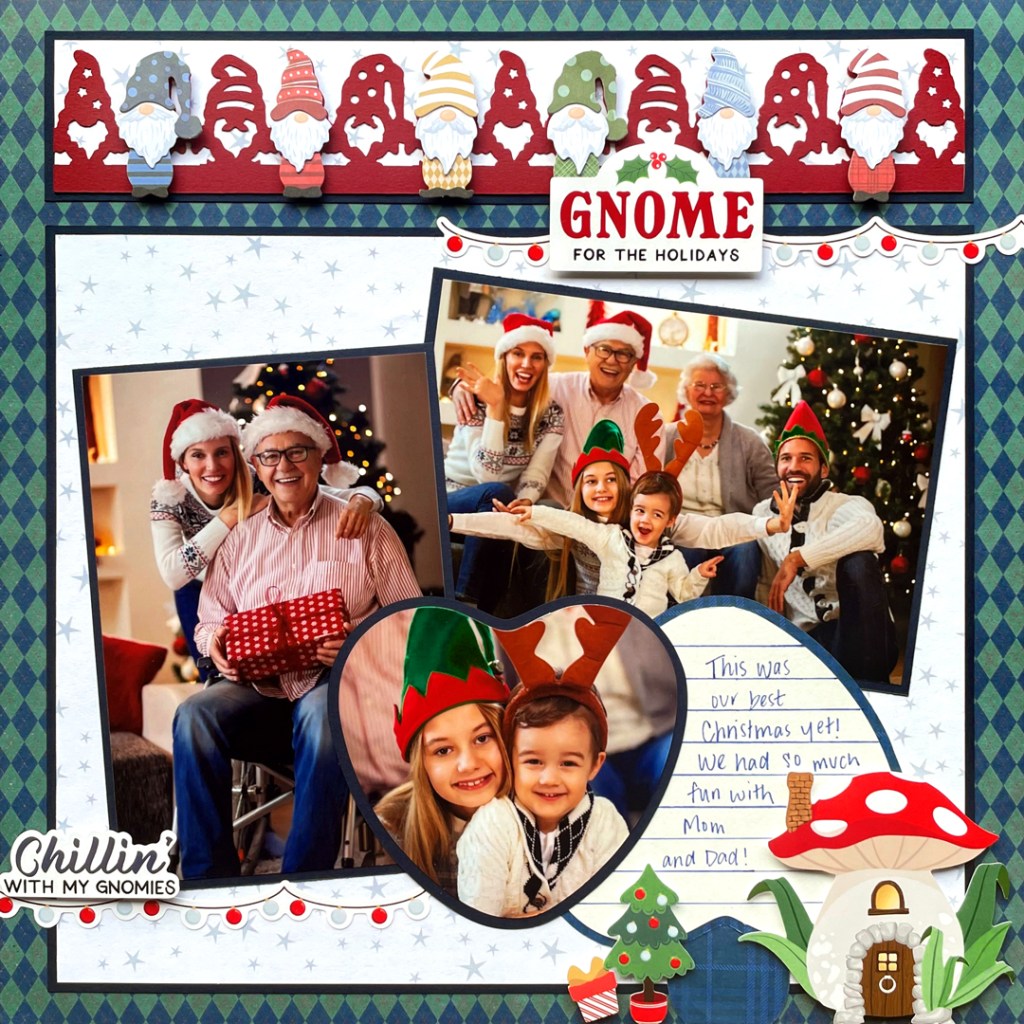
To create the Welcome Gnome layout, you will need:
- Welcome Gnome Bundle — Earn this exclusive bundle FREE during the Black Friday Promo!
- 12×12 Welcome Gnome Paper Pack (12/pk)
- Welcome Gnome Embellishments
- Welcome Gnome Stickers (3/pk)
- Gnomes Border Punch
- Cranberry, Navy & White Solid Cardstocks or (Shop Canada | Shop Australia)
- 12-inch Trimmer or (Shop Canada | Shop Australia)
- Micro-Tip Scissors or (Shop Canada | Shop Australia)
- Custom Cutting System with Gemstone Patterns or (Shop Canada | Shop Australia)
- Repositionable Tape Runner or (Shop Canada | Shop Australia)
- Foam Squares Variety Pack or (Shop Canada | Shop Australia)
- Navy Dual-Tip Pen or (Shop Canada | Shop Australia)

Step 1: Use a sheet of argyle paper as the base. Cut Navy Solid Cardstock to 10-7/8” x 9”. Cut white stars paper to 10-5/8” x 8-3/4”. Adhere white stars paper piece to cardstock piece. Align in the middle and adhere the piece about 3/8” from the bottom of the base page.
Step 2: Cut Navy Solid Cardstock to 10-7/8” x 2”. Cut white stars paper to 10-5/8” x 1-3/4”. Adhere the stars paper piece to the cardstock. Align in the middle and adhere the piece about 3/8” from the top of the base page.
Step 3: Use the Gnomes Border Punch to punch a border from Cranberry Solid Cardstock. Cut off of the cardstock at 1-5/8”. Use Micro-Tip Scissors to trim off one gnome from each end of the border. Adhere the piece to the border you created in Step 2.
Step 4: Use Foam Squares to adhere gnome embellishment pieces to the border.
Step 5: Cut two 6-1/4” x 4-1/4” mats from Navy Solid Cardstock. Adhere one 6″ x 4″ and one 4″ x 6″ photo to the mats. Using the outside edge of the smallest heart Gemstone Custom Cutting System Pattern and the Green Blade, cut a heart from Navy Solid Cardstock. Use the Red Blade on the outside edge to cut a photo. Adhere photo to the mat.
Step 6: Using the outside edge of the smallest heart Gemstone Custom Cutting System Pattern and the Blue Blade, cut a heart from blue plaid paper. Use the Green Blade on the outside edge to cut a heart from White Solid Cardstock. Adhere the white heart to the blue plaid heart. Use the Red Blade on the inside edge to cut an egg shape from blue plaid paper. Use the 12-inch Trimmer to cut a straight edge on the wider end of the egg piece. Turn the heart upside down and adhere the egg shape to the bottom to create a “mushroom.” Use a Navy Dual-Tip Pen to draw journal lines.
Step 7: Layer and adhere photos and the mushroom piece as shown.
Step 8: Add stickers adhering some with Foam Squares for added dimension.

To create the Candlelit layout you will need:
- Candlelit Bundle — Earn this exclusive bundle FREE during the Black Friday Promo!
- 12×12 Candlelit Paper Pack (12/pk)
- Candlelit Flame Recipe Template
- Candlelit XL Embellishments
- Flames & Drops Punch
- Personal Trimmer or (Shop Canada | Shop Australia)
- Photo Labeling Pencil or (Shop Canada | Shop Australia)
- Micro-Tip Scissors or (Shop Canada | Shop Australia)
- Repositionable Tape Runner or (Shop Canada | Shop Australia)
- Foam Squares Variety Pack or (Shop Canada | Shop Australia)
- Black Dual-Tip Pen or (Shop Canada | Shop Australia)
- Pencil
Step 1: Use a pencil and the Candlelit Frame Recipe Template to trace paper pieces and an extra-large embellishment. Use Micro-Tip Scissors to cut out pieces.
Step 2: Use the Repositionable Tape Runner to adhere pieces into the spaces in the recipe template.
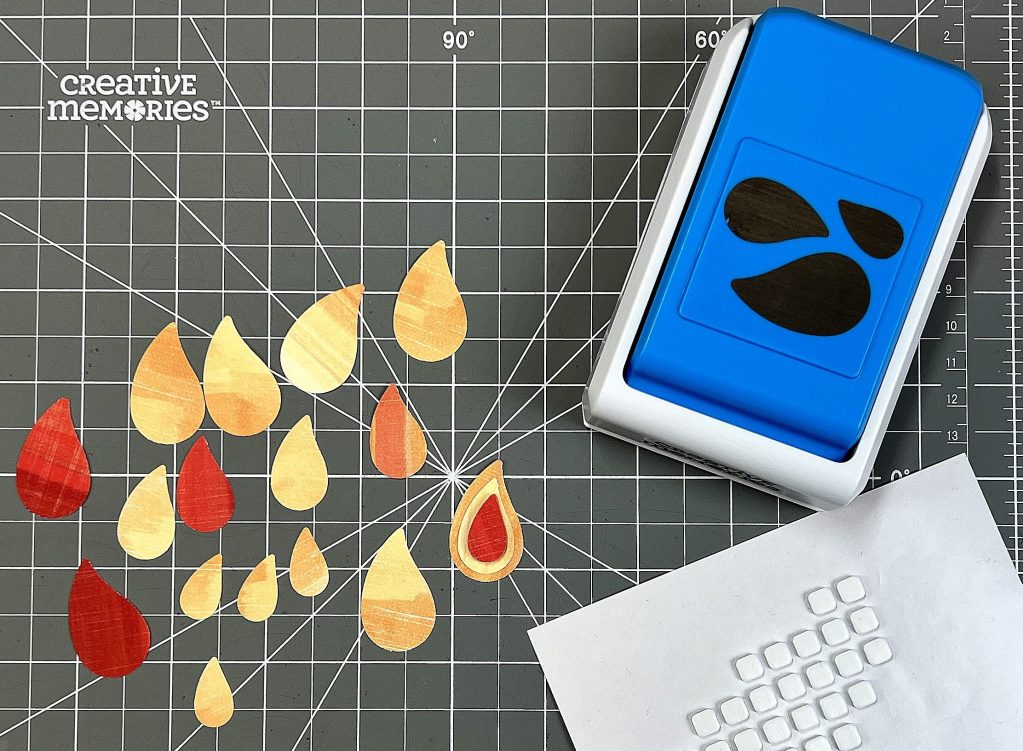
Step 3: Use a Photo Labeling Pencil with the Candlelit Frame Recipe Template to trace photos. Cut photos with a Personal Trimmer and adhere in the appropriate spaces of the template.
Step 4: Use the Flames & Drops Punch to punch flames from a variety of papers. Adhere flames to the tops of the candles and to the title embellishment. Layer some of the flames and adhere some of the flames with Foam Squares for added dimension.
Step 5: Add a second extra-large embellishment to the bottom of the layout.
Step 6: Journal with a Black Dual-Tip Pen.
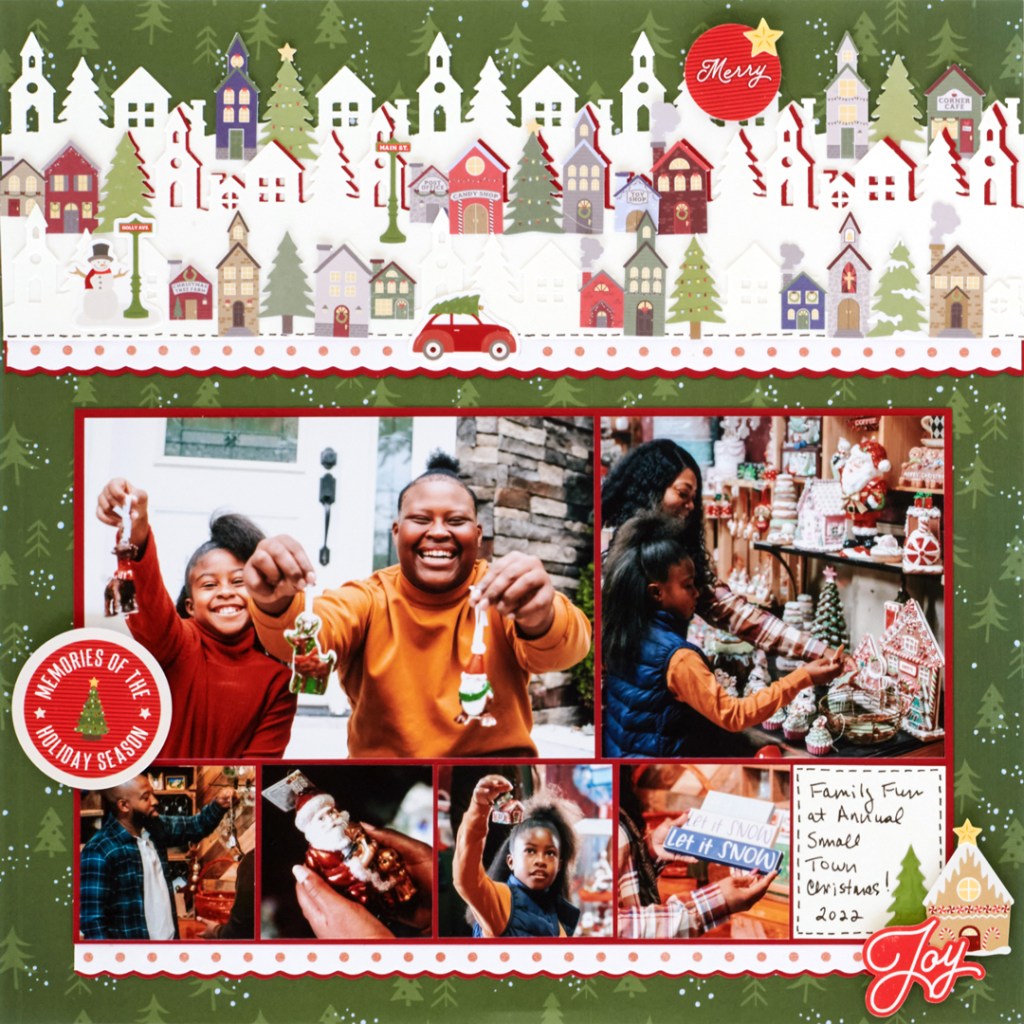
To create the Charming Village layout you will need:
- Charming Village Bundle — Earn this exclusive bundle FREE during the Black Friday Promo!
- 12×12 Charming Village Paper Pack (12/pk)
- Charming Village Embellishments
- Charming Village Stickers (3/pk)
- Charming Village Border Punch
- Cranberry & White Solid Cardstocks or (Shop Canada | Shop Australia)
- 12-inch Trimmer with Straight & Scallop Blades or (Shop Canada | Shop Australia)
- Black Dual-Tip Pen or (Shop Canada | Shop Australia)
- Repositionable Tape Runner or (Shop Canada | Shop Australia)
- Foam Squares Variety Pack or (Shop Canada | Shop Australia)
Step 1: Use the Charming Village Border Punch to punch two borders from White Solid Cardstock and one border from Cranberry Solid Cardstock. Cut off the cardstock at 2-1/2”. Punch another border from White Solid Cardstock and cut off the cardstock at 1-1/2”.
Step 2: Flip the cranberry and one white border to their opposite sides. Layer and adhere the cranberry border slightly off of the white border to create a shadow.

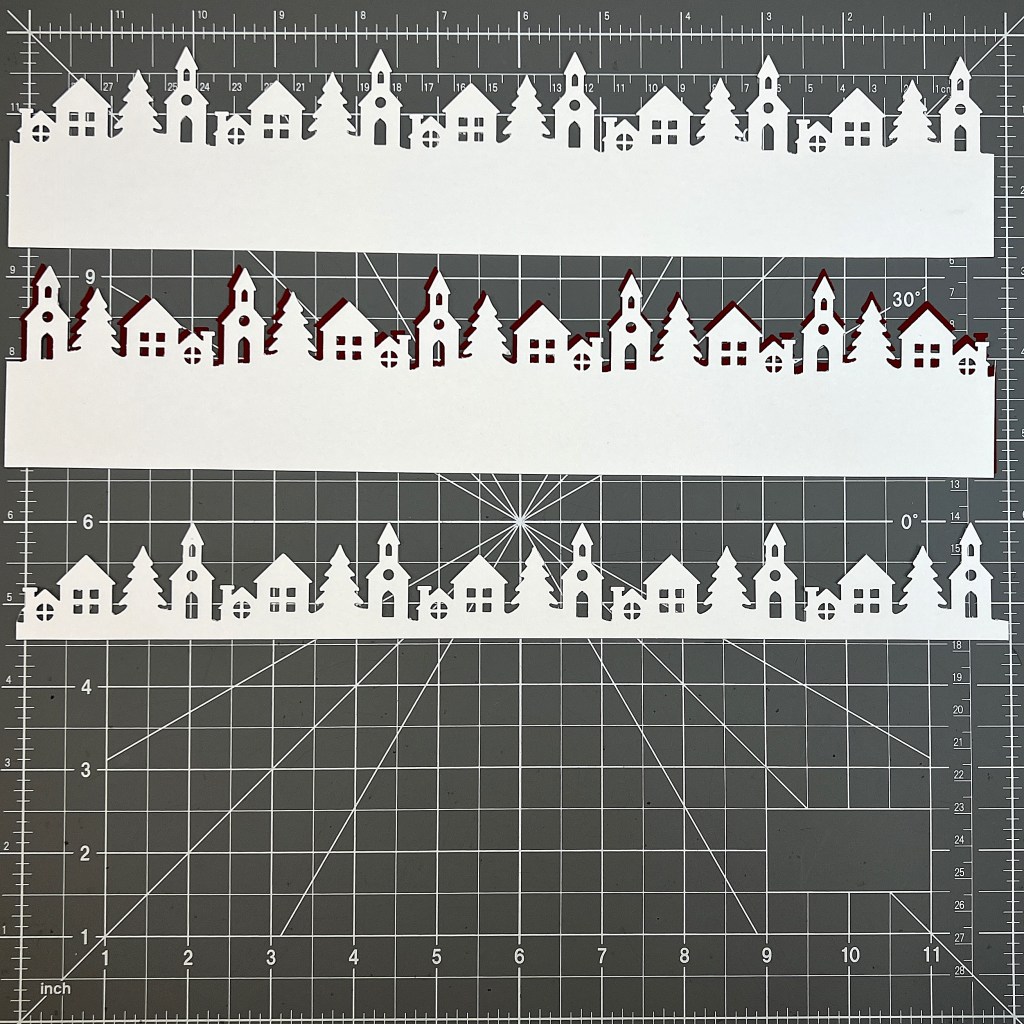
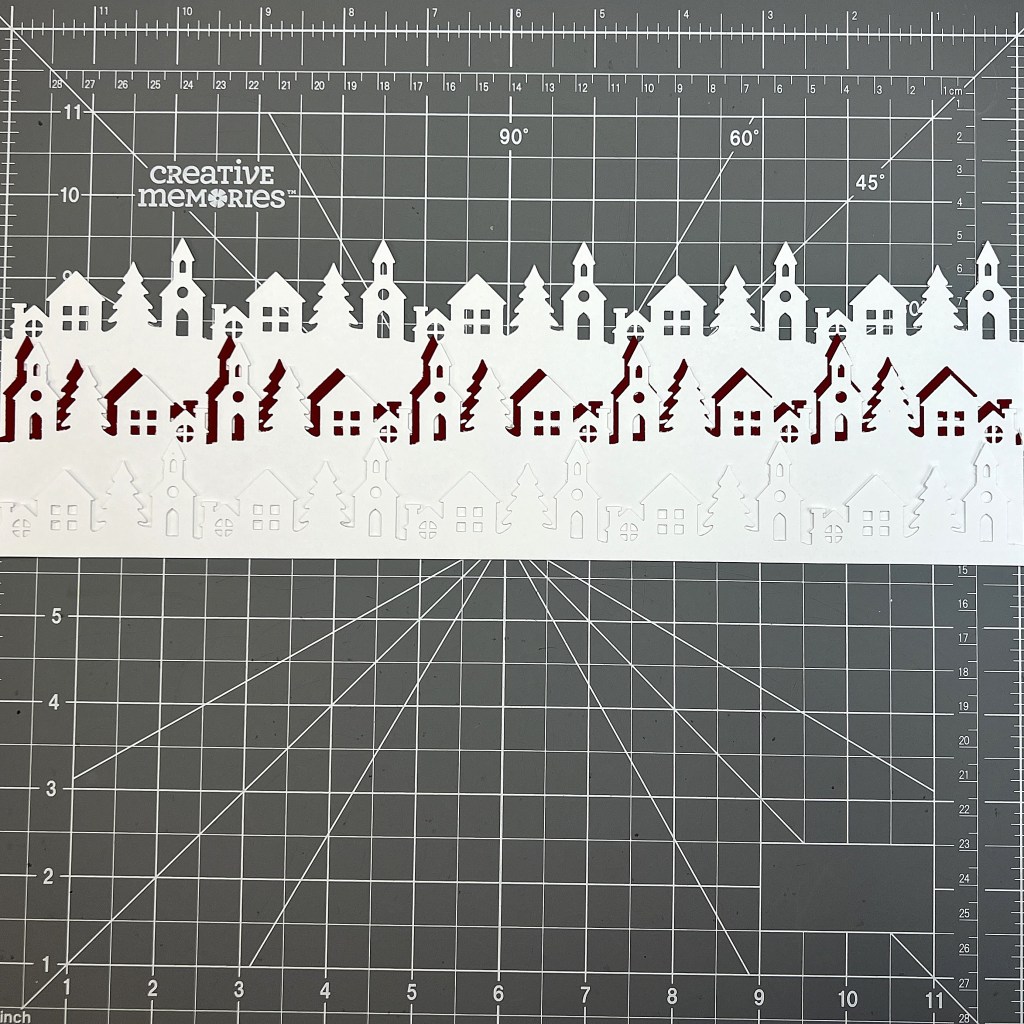
Step 3: Layer and adhere the three border pieces together as shown with the 1-1/2” border at the bottom.
Step 4: Use the 12-inch Trimmer and the Scallop Blade to cut 12” x 3/4” strips from White and Cranberry Solid Cardstocks. Layer and adhere the white piece to the cranberry piece. Adhere the layered piece underneath the village border.
Step 5: Adhere the layered border to the top of a sheet of forest trees paper.
Step 6: Cut a 10-1/4” x 6-1/4” piece from Cranberry Solid Cardstock. Crop photos to 5-7/8” x 4”, 4” x 4” and 2” x 2”. Cut a piece of White Cardstock to 1-3/4” x 2”. Adhere the white piece and photos to the cranberry panel.
Step 7: Use the 12-inch Trimmer and the Scallop Blade to cut 10-1/4” x 3/4” strips from White and Cranberry Solid Cardstocks. Layer and adhere the white piece to the cranberry piece. Adhere the layered piece underneath the photo panel. Adhere the layered panel to the layout as shown.
Step 8: Use a Black Dual-Tip Pen to add faux stitch lines and to journal with.
Step 9: Add embellishments as shown. Add stickers as shown with Foam Squares for added dimension.
Which of these three scrapbook layouts featuring the latest Black Friday Promo Bundles draws you in the most?
P.S. Are YOU a member of the Virtual Crop Facebook Group? It’s your go-to place for MONTHLY Virtual Crops, MONTHLY Completed Album Challenges, WEEKLY LIVE STREAMING of Fast & Fun Projects with Noreen, LIVE QUARTERLY Secret Box Openings with project tutorials and so much more! We hope you’ll join our community of more than 36,000 fellow memory-keeping enthusiasts — you’ll feel right at home!

What is a idea: I saw this page in late Oct I was having trouble ordering it for some reason by the time I got it through the village punch was sold and they were not going to make anymore punches. Than someone told me it was a really old punch. So does anyone know can you find old punches or can you hire someone so to speak to cut the pieces for you. Thank you