November 20, 2023
A Woodland Wonder Of Evergreen Memories: Winter Scrapbook Borders

When deciduous trees go into dormancy and drop their leaves, what’s left are sturdy brown trunks and branches that seem to blend into the frigid landscape, only to be forgotten until budding spring. But evergreens never take a break; they withstand blustery days and stand out against Old Man Winter’s white coat. The frosty scene turns into a magical wonderland and a forest of opportunities — snowshoeing, nature walks, birdwatching and skiing. Also to add to the list? Making these winter scrapbook borders featuring the Treeline Border Maker Cartridge!
To create these borders you will need:
- Nordic Winter Paper Pack or (Shop Canada | Shop Australia)
- Nordic Winter Embossed Embellishments or (Shop Canada | Shop Australia)
- Nordic Winter Stickers or (Shop Canada | Shop Australia)
- Original Border Maker System with Treeline Border Maker Cartridge or (Shop Canada | Shop Australia)
- Snow Capped Mountains Border Punch or (Shop Canada | Shop Australia)
- Avocado & White Solid Cardstocks or (Shop Canada | Shop Australia)
- Custom Cutting System with Circle Patterns or (Shop Canada | Shop Australia)
- 12-inch Trimmer or (Shop Canada | Shop Australia)
- 12-inch Decorative Trimmer or (Shop Canada | Shop Australia)
- Micro-Tip Scissors or (Shop Canada | Shop Australia)
- Tape Runner or (Shop Canada | Shop Australia)
- Repositionable Tape Runner or (Shop Canada | Shop Australia)
- Foam Squares Variety Pack or (Shop Canada | Shop Australia)


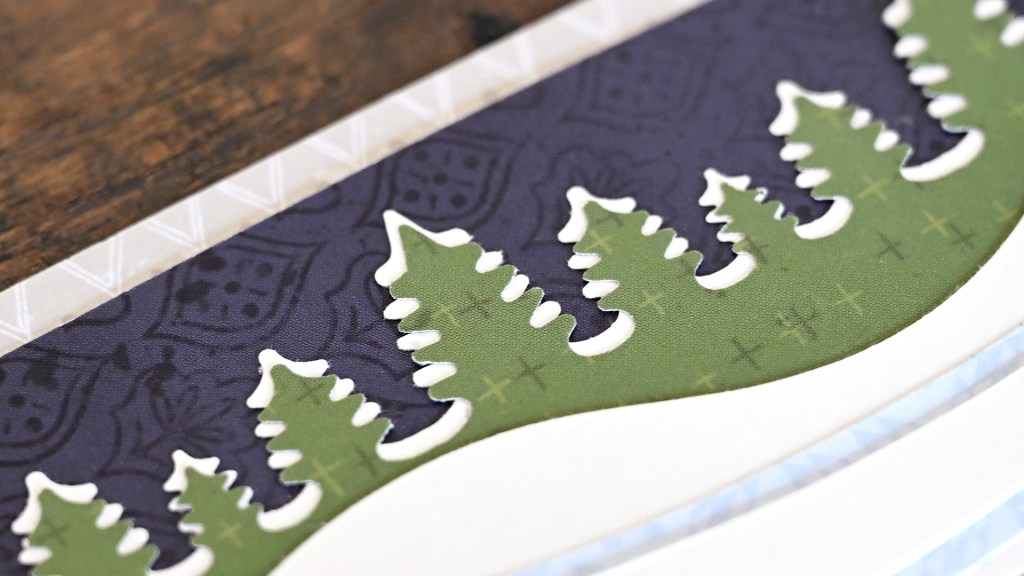
Comfy Winter Evenings Border
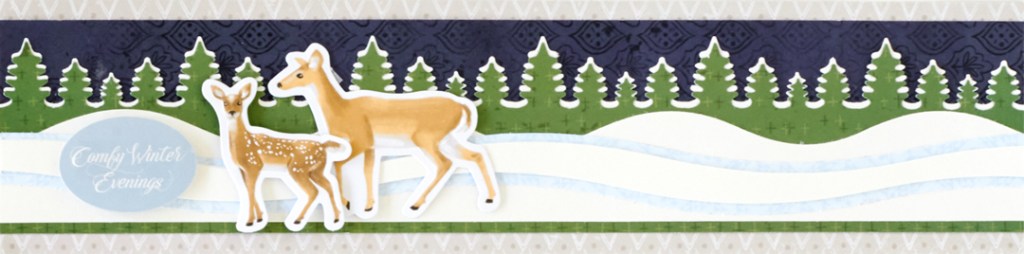
Step 1: Cut a 12” x 3” strip with beige V geometric paper for the base. Cut a 12” x 1” strip with navy line art leaves paper and adhere about 1/4” from the top of the base.
Step 2: Using the Treeline Border Maker Cartridge, punch a border with White Solid Cardstock. Trim to 12” x 1”. Punch a border with green plus signs paper. Trim to 12” x 2-1/4”. Adhere the white border just behind the green one and mount on the base, about 1/4” from the bottom edge.
Step 3: Using the wavy edge of the 12-inch Decorative Trimmer, cut a wavy edge on a piece of White Solid Cardstock. Trim to 12” x 1-3/8” and adhere on the border, about 1/8” from the bottom edge of the green piece.
Step 4: Using the swell edge of the decorative trimmer, cut a 12” x 5/8” strip with baby blue pinwheel quilt paper and then a 12” x 1/2” strip with White Solid Cardstock. Layer and adhere on the border as shown.
Step 5: Add embellishments and a sticker title, popping some up with Foam Squares for dimension
Snowed In Border

Step 1: Cut a 12” x 2-1/2” strip with Avocado Solid Cardstock for the base. Cut a 12” x 2-1/4” strip with woodgrain paper and adhere on the base.
Step 2: Cut a 12” x 1/2″ strip with navy geometric tile paper and adhere about 3/8” from the bottom edge. Cut a 12” x 1-1/4” strip with baby blue pinwheel quilt paper and adhere just above the geometric tile strip.
Step 3: Using the Treeline Border Maker Cartridge, punch a border with Avocado Solid Cardstock, but only punch every other “stop” (three punches instead of six). Trim off the border to 12” x 1”, keeping the 1/8” slivers intact on the punched areas. Adhere the border on the baby blue strip.
Step 4: Cut six 7/8” squares with White Solid Cardstock and adhere them on the unpunched areas of the avocado strip. Cut three woodgrain and three navy line art leaves 3/4″ squares. Adhere on the white squares, alternating hues.
Step 5: Using the Treeline Border Maker Cartridge, punch a border with both navy line art leaves and woodgrain papers. Trim out three large trees from each and adhere on the squares as shown.
Step 6: Adhere the snowmen embellishment and the title sticker using Foam Squares for added dimension.
Circles Of Trees Border

Step 1: Cut a 3-1/2” x 12” strip with brown stripes paper for the base. Cut a 3” x 11-5/8” strip with green plus signs paper and adhere on the base. Cut a 2-3/4” x 11-3/8” strip with navy geometric tile paper and mount on top.
Step 2: Cut a 12” x 2-3/4” strip with navy line art leaves paper. Using the Treeline Border Maker Cartridge, punch a border with green plus signs paper. Trim to 12” x 2-1/4” and adhere on the navy strip. Cut a 12” x 1” strip with pine branches paper and adhere on top. Using the inside edge of the medium Circle Custom Cutting System Pattern and the Red Blade, cut three circles from the border, positioning the pattern so that the tall tree is in the middle each time. Adhere on the border using Foam Squares.
Step 3: Cut two 2-3/4” x 1-1/4” strips with folk floral paper and adhere between the circles.
Step 4: Adhere stickers using Foam Squares for added dimension.
Winter Scene Border

Step 1: Cut a 12” x 2-3/4” strip with woodgrain paper for the base. Cut a 12” x 2-1/4” strip with navy line art leaves paper and adhere on the base.
Step 2: Using the Snow Capped Mountains Border Punch, punch a border with baby blue pinwheel quilt paper. Trim to 12” x 2-1/8” and adhere on the border.
Step 3: Using the Treeline Border Maker Cartridge, punch a border with green plus signs paper. Trim to 12” x 1-3/4” and adhere on top. Cut a 12” x 1/2″ strip with folk florals paper and adhere on the green strip.
Step 4: Cut a 1” x 4” strip with pine branches paper, a 1” x 3-3/4” strip with woodgrain paper and a 1-1/4” x 4-1/2” strip with navy line art leaves paper. Using Micro-Tip Scissors, cut a V shape from one end of each. Adhere on the border as shown. Adhere a wreath sticker using Foam Squares for added dimension. Add gems as desired.
What do you think of these winter scrapbook borders?
P.S. Are YOU a member of the Virtual Crop Facebook Group? It’s your go-to place for MONTHLY Virtual Crops, MONTHLY Completed Album Challenges, WEEKLY LIVE STREAMING of Fast & Fun Projects with Noreen, LIVE QUARTERLY Secret Box Openings with project tutorials and so much more! We hope you’ll join our community of more than 36,000 fellow memory-keeping enthusiasts — you’ll feel right at home!

These are wonderful!!! Thanks for the ideas.
Very Nice for Masculine looking Cards or Layout!
Great ideas to use to display product at my Christmas Open House!
Love it
I love all of these borders and will definitely be using them.
I love all the borders, but especially the multi-colored trees inside squares. That is so useful! I can see me using it again and again, even with different punches, but with the trees. I take the grands tent camping every summer – will have lots of uses for the tree punch border.