August 20, 2024
Take a Peek at This Nautical Layout
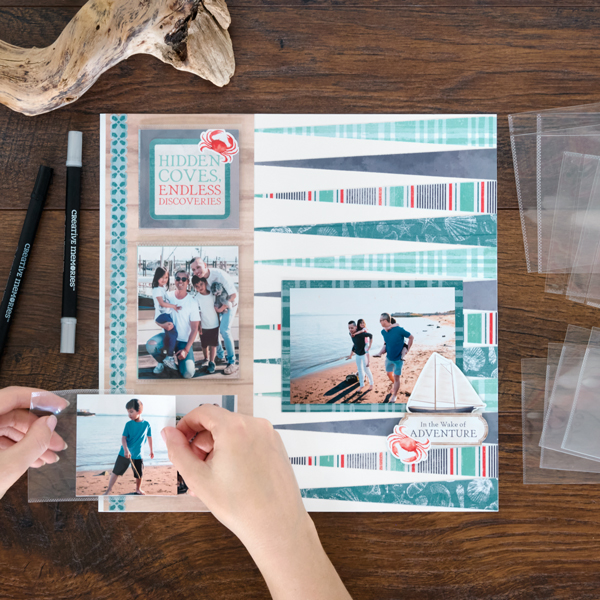
Take stock of your summer memories with this nautical-themed layout! Using the Coastal Shore collection and Peekaboo Pockets, you can showcase extra summer photos and journal entries. The Peekaboo Pockets allow you to slip in extra mementos and easily adhere it to your scrapbook’s protective layer. Keep reading to learn how!
Learn more about Creative Memories Pockets here ?

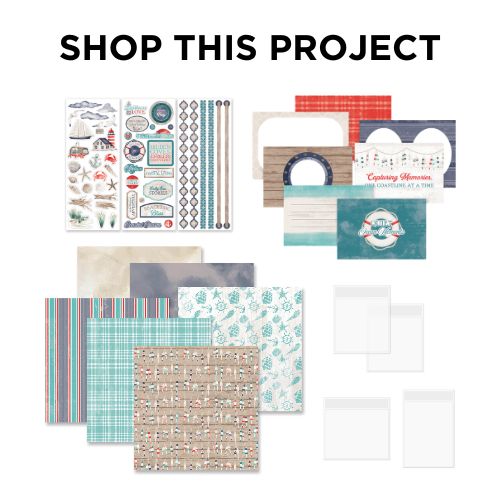
To create this layout you will need:
- Coastal Shore Paper Pack or (Shop Canada | Shop Australia)
- Coastal Shore Variety Mat Pack or (Shop Canada | Shop Australia)
- Coastal Shore Stickers or (Shop Canada | Shop Australia)
- 3×3 Peekaboo Pockets™ or (Shop Canada | Shop Australia)
- 3×4 Peekaboo Pockets™ or (Shop Canada | Shop Australia)
- White Solid Cardstock or (Shop Canada | Shop Australia)
- 12-inch Trimmer or (Shop Canada | Shop Australia)
- 13×13 Custom Cutting System Mat or (Shop Canada | Shop Australia)
- Photo Trimmer — coming Aug. 26!
- All-Purpose Scissors or (Shop Canada | Shop Australia)
- Tape Runner or (Shop Canada | Shop Australia)
- Repositionable Tape Runner or (Shop Canada | Shop Australia)
- Foam Squares Variety Pack or (Shop Canada | Shop Australia)
- Black Dual-Tip Pen or (Shop Canada | Shop Australia)
- Pencil

Step 1: Use a sheet of White Solid Cardstock (or a White Refill Page) as the base for this layout.
Step 2: Cut 8” x 2” strips with plaid, cloudy sky, nautical stripes and shells papers. Lay one on the 13×13 Custom Cutting System Mat with the short end on the ruler. Make pencil marks on the top edge at 1/2″ and 1-1/2” and on the bottom edge at 1”. Cut from top to bottom between the marks to create long, thin triangles. Repeat with the rest of the strips to make twelve strips total. Adhere the strips, alternating colors, along the right edge of the layout, as shown.
Step 3: Cut a 4-1/2” x 12” strip with wood paper. Adhere 1/8” from the left edge. Adhere a border sticker along the left edge of the strip.
Step 4: Cut a 3” x 4” piece from a variety mat to use as a journal box and adhere to the middle of the wood strip. Crop two photos to 3” x 4”, layer them with back sides together and slip them into a 3×4 Peekaboo Pocket. Crop five photos to 3” x 3”. Adhere two on the wood strip, as shown. Layer two more with the back sides together and slip them into a 3×3 Peekaboo Pocket. Cut a 3” x 3” piece with cloudy sky paper. Top with a title sticker and crab sticker. Layer with the last 3” x 3” photo, putting the back sides together, and slip them into another 3×3 Peekaboo Pocket. Set Peekaboo Pockets aside for Step 7.
Step 5: Crop a photo to 5” x 3-1/2” and mount on a variety mat cut to 5-1/2” x 4”. Adhere on the layout as shown.
Step 6: Adhere stickers, popping some up with Foam Squares for dimension. Journal in the journal box as desired.


Step 7: After slipping on the Page Protector (or slipping the layout into a Top-Loading Single-Pocket Page), remove the backing from the adhesive strips on the Peekaboo Pockets and adhere them directly onto the Page Protector.
What photos did you slip into the Peekaboo Pockets?
Learn how to use Peekaboo Pockets in the video below!
Learn more about Creative Memories Pockets here ?
P.S. Are YOU a member of the Virtual Crop Facebook Group? It’s your go-to place for MONTHLY Virtual Crops, MONTHLY Completed Album Challenges, QUARTERLY Secret Box Openings with project tutorials and so much more! We hope you’ll join our community of more than 40,000 fellow memory-keeping enthusiasts — you’ll feel right at home!

I love this layout and I can’t wait to try it! One of my sons lives on a sailboat with his cat and I’m making an album for him.
It’s perfect for my Backgammon games!