October 3, 2024
These Border Projects Are a Catch!

Looking to reel in some creativity? Set your sights on these border projects made with the Coastal Charm collection and Fishnet Border Punch! Even as the months start to cool down, they’ll help you remember the smell of salt air and delicious seafood.
To create the borders you will need:
- Coastal Shore Paper Pack or (Shop Canada | Shop Australia)
- Coastal Shore Stickers or (Shop Canada | Shop Australia)
- Lagoon Shimmer Paper or (Shop Canada | Shop Australia)
- Coastal Shore Fast2Fab Paper Pack — sold out
- Red, Dark Sea Green and White Solid Cardstock or (Shop Canada | Shop Australia)
- Fishnet Border Punch or (Shop Canada | Shop Australia)
- 12-inch Trimmer with Straight & Pinking Blades or (Shop Canada | Shop Australia)
- Tape Runner or (Shop Canada | Shop Australia)
- Repositionable Tape Runner or (Shop Canada | Shop Australia)
- Foam Squares Variety Pack or (Shop Canada | Shop Australia)
Coastal Charm Border

Step 1: Cut a 12″ x 3″ strip with shells paper for the base. Cut a 12″ x 2-1/8″ strip with green plaid paper and adhere on the base. Cut a 12″ x 1-1/2″ strip with white cardstock and mount on top.
Step 2: Using the Fishnet Border Punch, punch borders with lagoon shimmer paper and cloudy sky and stripes designer papers. Adhere the lagoon shimmer border on the center of the border. Save the cloudy sky and stripes borders for another use, but adhere the top and bottom leftover pieces above and below the lagoon border, alternating colors as shown.
Step 3: Using the Pinking Blade on the 12-inch Trimmer, cut two 12″ x 1/8″ strips. Adhere the strips along the seams as shown.
Step 4: Adhere stickers, popping some up with foam squares for dimension.
Coastal Living Border
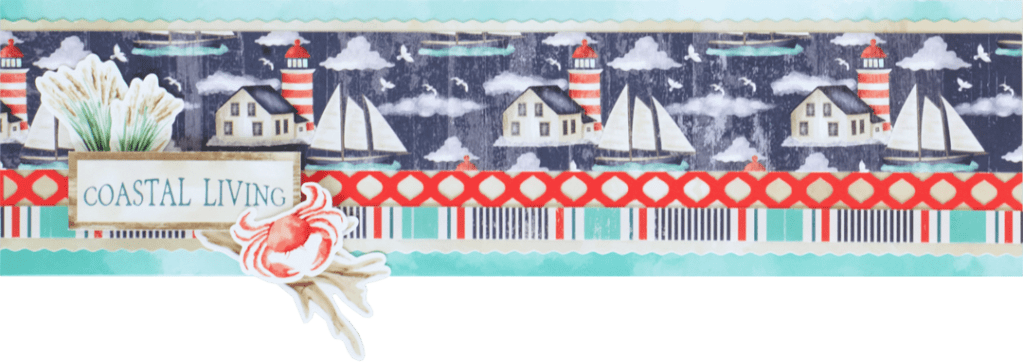
Step 1: Cut a 12” x 3-1/4” strip with green wash F2F paper for the base. Using the pinking blade, cut a 12″ x 2-3/4″ strip with beige wash paper and adhere on the base.
Step 2: Using the fishnet border punch, punch a border with red cardstock. Adhere on the border 1/2″ from the bottom edge. Cut a 12″ x 1-1/2″ strip with lighthouses & sailboats paper and a 12″ x 3/8″ strip with nautical stripes paper. Adhere as shown on the border so that one row of the fishnet shows in between.
Step 3: Adhere stickers, popping some up with foam squares for dimension.
Salty Sea Stories Border
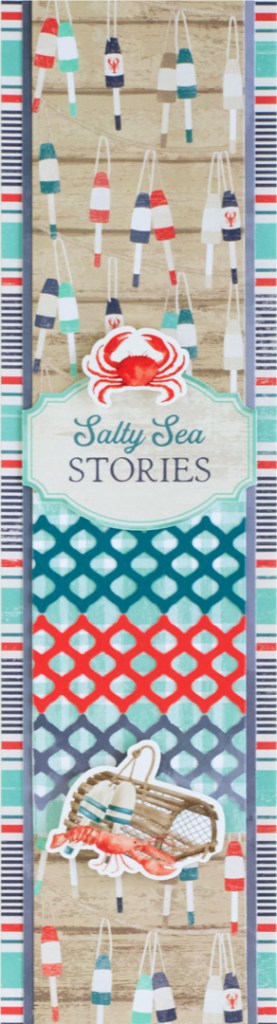
Step 1: Cut a 3-1/4″ x 12″ strip with nautical stripes paper for the base. Cut a 2-3/4″ x 12″ strip with cloudy sky paper and adhere on the base. Cut a 2-1/2″ x 12″ strip with lobster buoys paper and mount on top.
Step 2: Cut a 2-1/2″ x 4″ strip with green plaid paper. Using the Fishnet Border Punch, punch borders with dark sea green and red cardstock and cloudy sky paper. Adhere on the green plaid strip as shown. Trim the excess. Mount the piece on the border, 2-1/4″ from the bottom edge.
Step 3: Adhere stickers, popping some up with foam squares for dimension.
Did these borders get you hooked on the Fishnet Border Punch?
P.S. Are YOU a member of the Virtual Crop Facebook Group? It’s your go-to place for MONTHLY Virtual Crops, MONTHLY Completed Album Challenges, QUARTERLY Secret Box Openings with project tutorials and so much more! We hope you’ll join our community of more than 40,000 fellow memory-keeping enthusiasts — you’ll feel right at home!

Are there supposed to be three borders show in the post? I don’t see the instructions for the one made with the lighthouse paper
There are only 2. The top is the border maker punch used for the 2 borders .
But I see your point. Where is that 3 rd one. Maybe in a future blog?
It appears the second photo does not belong in this post, and that there should be a different photo, of the second border
As someone who lives near the coast and loves flora and fauna of the sea patiently waited for more ideas for the Coastal Shore collection to show up on the blog. I’ve been working on recreating the missing border. Here’s what I’m thinking re: the specific papers and such – Base of the border is from Lagoon Shimmer OR possibly the Lagoon Sky paper or the sky area of the Lighthouse paper from the CS F2F pack. There is a strip of Sailboats, a smaller strip of the Nautical stripes, a small strip of Fishnet border punched Red Cardstock. I think that the red fishnet strip is adhered first then the sailboat and stripes papers are stuck down so just one row of fishnet ‘circles’ shows. Since the image of the border is small, I can’t tell exact color of the cardstock that these 3 strips are on top of. On my monitor it looks beige. However, white cardstock is listed in supplies not beige. The strip of cardstock appears to be cut using the pinking blade. The stickers used are the Crab, Driftwood, Dune Grass, and Coastal Living and probably with some foam squares. The base border strip appears to be ~same as the others so 3″-3.50″ x 12″, and the sailboat strip seems to take up 2/3 and the stripes & fishnet is ~1/3. I find that issuu to look up the digital artwork pdf and the flip-thrus of papers, etc – very helpful. I’ve bookmarked it and have saved it right next to the CM website/blog. Hope this helps!
Thanks for updating blog post with the instructions for the Coastal Living border!