March 17, 2025
Celebrate the Class of 2025 With This Graduation Layout
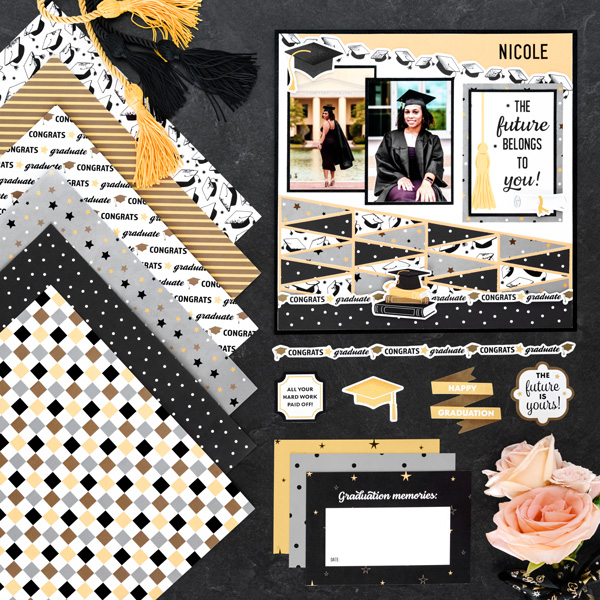
Graduation season is upon us and you can commemorate this year’s grads with this graduation layout! Filled with golds, silvers and sparkles, the Hats Off! collection is the perfect way to celebrate finishing years of hard work — plus it pairs well with all schools’ colors. Keep reading to see how.

To create this layout you will need:
- Hats Off! Designer Paper or (Shop Canada | Shop Australia)
- Hats Off! Variety Mat Pack or (Shop Canada | Shop Australia)
- Hats Off! Embellishments or (Shop Canada | Shop Australia)
- Bright White Solid Cardstock or (Shop Canada | Shop Australia)
- Black Shimmer & Gold Shimmer Solid Core Paper Packs or (Shop Canada | Shop Australia)
- 12-inch Trimmer or (Shop Canada | Shop Australia)
- Photo Trimmer or (Shop Canada | Shop Australia)
- Micro-Tip Scissors or (Shop Canada | Shop Australia)
- Tape Runner or (Shop Canada | Shop Australia)
- Repositionable Tape Runner or (Shop Canada | Shop Australia)
- Foam Squares Variety Pack or (Shop Canada | Shop Australia)
- Black Dual-Tip Pen or (Shop Canada | Shop Australia)
- Ruler and pencil
- (Optional) Black Sans Serif ABC/123 Letter Stickers or (Shop Canada | Shop Australia)

Step 1: Use a sheet of Black Shimmer Solid Core Paper as the base for this layout. Cut a sheet of Bright White Soldi Cardstock to 11-5/8” x 11-5/8” and adhere on the base.
Step 2: Cut an 11-5/8” x 4” piece of Gold Shimmer Solid Core Paper. Make a mark at 2” on one short side of the piece. Using the 12-inch Trimmer, cut from the top left corner to the 2” mark. Adhere the narrow triangle strip on the top of the layout as shown. Adhere the remaining triangle piece 1-1/2” from the bottom of the layout as shown.
Step 3: Cut a 1” x 5-1/2” strip with a designer paper. Using the 12-inch Trimmer, cut the strip from corner to corner. Keeping the cut strip together, rotate it and cut from the opposite corner to opposite corner. Save the top and bottom triangle pieces (discard the skinny side triangles). Repeat with various designer papers until you have 20 triangles.
Step 4: Using a ruler and pencil, draw a vertical light line on the large gold shimmer piece 1/8” from the left edge. Draw light lines at 2-7/8, 3”, 5-3/4”, 5-7/8”, 8-5/8”, 8-3/4” and 11-1/2”. Using the Repositionable Tape Runner, adhere the triangle pieces along the lines, starting at the first line on the left (1/8”) and alternating colors. Adhere the first column, then move on to the second column until you’ve completed all four columns.
Step 5: Cut an 11-5/8” x 1-1/2” strip with black polka dot paper and adhere on the bottom of the layout. Adhere a “Congrats Graduate” border embellishment along the seam. Adhere a graduation hat border embellishment along the narrow triangle piece at the top of the layout.
Step 6: Crop two photos to 3-1/4” x 4-3/4” and mount on two 3-1/2” x 5” pieces of black shimmer paper. Adhere on the layout as shown. Trim the variety mat that says “The Future Belongs to You!” to 3-1/4” x 4-3/4” and adhere it on a 3-1/2” x 5” piece of black shimmer paper. Mount the piece on a 4” x 5-1/2” piece of gray stars paper. Adhere on the layout.
Step 7: Adhere additional embellishments using Foam Squares for added dimension.
Step 8: Add a title using Black Sans Serif ABC/123 Stickers and/or journal as desired.
Who do you know that’s graduating this year? ?
P.S. Are YOU a member of the Virtual Crop Facebook Group? It’s your go-to place for MONTHLY Virtual Crops, MONTHLY Completed Album Challenges, QUARTERLY Secret Box Openings with project tutorials and so much more! We hope you’ll join our community of more than 45,000 fellow memory-keeping enthusiasts — you’ll feel right at home!

Love that we didn’t have to wait long for this layout and its directions!! And Krislyn Mattei posted a video on her You Tube channel showing how she made it – and excellent instructions on how to cut the small triangle pieces in Step 3. I would not know how to do it without seeing her demonstrate aligning the triangle tips for the 2nd triangle cut! When I try it, I’m going to practice first with scrap paper as I am super clumsy with narrow small paper pieces on the 12″ Trimmer. And I’m thinking “how can the triangle design be recreated for a card?” I think that would be a good-looking card.