December 8, 2015
12 Days of Christmas Ideas: Day 8- Circles & Ovals Blog Hop!

All you had to do was ask! (Several hundred times!) :) One of our top product requests was to bring back the Custom Cutting System Circle and Oval Patterns, and wouldn’t you know it – we did! And, to kick off their intro into our product line in style, our amazing team of Advisors that form our Content Contributors team have put together another sweet blog hop featuring all sorts of fab ideas. We’d also like to welcome our newest contributor, Advisor Noreen Smith, to the team!
Before you send you hopping on your way through the blogs, we wanted to share a couple of fun ideas showcasing the cutest thing on the planet that you can make with the circles – snowmen!
OH, and one other totally fun doodad… because we’re SO excited about these awesome tools being back, we’re giving away one entire Custom Cutting System with all the accessories to one lucky blog hopper! After you’ve visited all the stops along the way in the blog hop, stop back here and leave us a comment on the funnest (yes, that’s a word!) thing you discovered along the way! Friday, December 11 around noon CT, we’ll randomly select one commenter to win this batch of goodies:

Best of luck, and happy hopping!
First up is this totally adorable top-view snowman card. He’s too, too cute!

To create this card, you’ll need:
- Patterned paper from Christmas Joy Paper Pack
- Cardstock – White, scraps of orange, brown and blue
- Custom Cutting System Components: Red Blade, Green Blade, Mat and Circle Patterns
- Scissors
- Paper Trimmer
- Tape Runner
- Black Pen
- Foam Squares
Step 1: Cut a piece of white cardstock to measure 5.5″ x 11″. Fold in half to create a 5.5″ square card.
Step 2: Cut a piece of grey snowflake pattern paper to measure 5.25″ square, then adhere to front of card.
Step 3: Using CCS with red blade, cut circles from white cardstock as follows: (1) using red blade with outside of medium pattern, (1) using red blade with outside of small pattern, and (1) using red blade with inside of medium pattern.
Step 4: Layer and adhere circles as shown using foam squares.
Step 5: Cut two small strips of blue cardstock to measure approximately .5″ x 1.5″. Cut a “V” shape into one end of each strip, then adhere as shown for scarf.
Step 6: Using scissors, trim small “carrot nose” shape from orange cardstock, then adhere to snowman. Add eyes and mouth using black pen.
Step 7: Cut two “stick arms” from brown cardstock that measure approximately 2″ long as shown:
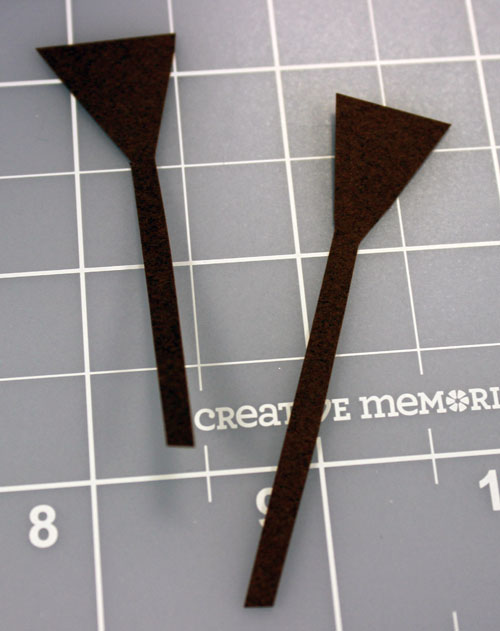
Step 8: Using scissors, trim “fingers” into tops and trim length of each finger until it looks about right. Adhere stick arms to snowman between bottom and middle circles.
Cute, right?
Next up is this totally fun snow day page layout – just in time for the fluffy stuff that’s due to arrive any time now.
The layout shown above (isn’t peeky Mr. Snowman the cutest?) features simple straight cutting with some circle making that’ll make you giddy! How excited are we all that the circles & ovals templates are back? :)
To create this layout, you’ll need:
- White Page
- Patterned paper from Look on the Bright Side Paper Pack
- Cardstock – blue, white, black, scrap of orange
- Black ABC/123 Stickers
- Custom Cutting System Components: Red Blade, Green Blade, Mat and Circle Patterns
- Scissors
- Paper Trimmer
- Tape Runner
- Black Pen
- Foam Squares
Step 1: Adhere blue background piece to white page.
Step 2: Cut a piece of blue cardstock to measure 12″ x 5″ and a piece of white cardstock to measure 12″ x 4.5″. Layer and adhere to page as shown. NOTE: black cardstock was placed where photos would go.
Step 3: Using Custom Cutting System (CCS) and green blade, cut 7 circles from blue cardstock using inside of smallest circle pattern. Using red blade, cut 7 circles from white cardstock using inside of smallest circle pattern. Layer and adhere as shown.
Step 4: Adhere letter sticker to each circle, then adhere across top of page using Foam Squares for added dimension.
Step 5: Using CCS and red blade, cut 1 circle from white cardstock using outside of medium circle pattern. Cut approximately in half, then adhere to bottom of page as shown.
Step 6: Cut a skinny strip and a rectangle, trimming as necessary to fit, for snowman’s hat. Adhere to page.
Step 7: Using scissors, trim small “carrot nose” shape from orange cardstock, then adhere to snowman. Add eyes using black pen.
Step 8: Cut a strip of white cardstock to measure 3″ x 4.5″. Cut a “V” shape into one end to resemble the end of a banner. Adhere to page as shown to finish.
NOW… On to the BLOG HOP! Totally creative inspiration awaits. Here’s the order of blogs you’ll be hopping to – hop right over to Julie’s link, and on each blog you’ll be directed on to the next. Happy hopping!
- Julie Tambrini
- Diana Brinsley
- Stefani Jones
- Lisa Graham
- Fran Smitherman
- Noreen Smith
- Candace Bouldin

The rosettes are wonderful! I love projects that use several tools at once!
My favorite discovery along the way was the snowman page layout!!
Lots of great ideas! I love anything snowmen, so I have to say my favorite is the snowman layout!!
I love all the layouts,the funniest was the circles that were like ornaments!
It’s hard to pick just one thing! I love anything snowman, the rosettes were so pretty, and because I like organization, all the tips for knowing what size each template is, is so helpful.
I like how Julie and Diana jazzed up the Fast2Fab albums. Lisa’s wreath was pretty cool too.
Lots of great ideas, but my favorites were the snowmen right here. I loved the top down snowman – he was the funnest!
Thank you for sharing so many great ideas. I loved the ornaments that can be made from accordion folding the Picked Fence Border.
Loved the gingerbread men!
I loved the gingerbread people. My in-laws have a new tradition to decorate houses and gingerbread cookies. I always take photos and now I have some new layout ideas. Thanks.
All of the ideas were good. I have used most of them previously. I liked the wreath idea the best.
love the Snowman Card… Unique, simple, fun!!!
Theses tools are the greatest. Glad they’re back.
Loved all the ideas. My favorite one was the gingerbread people and her page layouts after it
I love the different ways to make things with the circles! My favorite is the snowman on the square base – it looks like someone is looking down on him and he back up :)
I love the gingerbread men. Looked good enough to eat.
OK, so I commented earlier before realizing that we are suppose to go visit all the blogs – sorry, but I’m a newbie :) But I did visit all of them and love them all! Great ideas using ovals and circles. If I would have to pick a favorite (but they all are), I would have to say the rosettes :) But I loved them all, great job everyone! A must try for them all!!!
I will have fun doing the Christmas tree page.
Definitely a wonderful blog hop – hard to pick just one, but I think the paper Rosettes was the funnest – really neat way to make those beautiful rosetts – would NEVER have thought of that!!
I love D. Brinsley’s ornaments the best, with Scrappin’ Jpegs half snowman a close second!
I loved all the ideas! My favorite is the flat snowman card. Neat idea.
Wow!!! This is a hard decision because they are all great ideas!!! The gingerbread men, the wreath with the ovals, the snowmen – they are all fun but if I have to choose just one of the funnest I would probably pick Diana Brimsley’s ornaments made with the CCS circles. Thanks for all the ideas.
My favorite was also the flat snowman card. Wonderful to see the CCS back!!
I love the ornaments on Diana Brinsley’s blog and the tree and garland on Candace Bouldin’s. Lots of great ideas on all the blogs! Thanks, ladies!
The rosettes were beautiful but not sure i have the patience. Candace’s style is right up my alley, showing how to have fun while saving on paper and/or using scraps- all blogs
were great!
I love the Christmas tree page and the snowman. Also I love all the examples and ideas! It really gets me excited about scrapbooking and being creative!!!
I’m always looking for new layout ideas, and so really enjoyed all the new ideas on the blog, but my favorite was using the circle templates to make ornaments!
I love all the ideas and can’t wait to get started.
Always learn so much from the CM Blog Hop. Thank you all for putting such great ideas.
cute and very useful ideas! thanks so much for making and sharing these!
The funniest thing I read on the blog hop was when Stefanie said to be careful and not burn yourself when hot glueing the rosettes. Are you kidding me. I don’t think I have ever used a hot glue gun with out burning myself.
SO much FUN!! Great to have these cutting patterns available again. Funnest pieces for me: the view from the top snowman, bowl of ice cream scoops and fruit slices, and ALWAYS love the classic ornament look, especially with some including a photo “hanging” on the page.
I love the snowman card. I’m going to use this same idea for a scrapbook layout. It’s just too cute!
I loved visiting all the blogs. I liked how the border maker was used to make the ornaments. The funniest thing to me was the snowman on the very first page
The one I thought was most fun were the circles made into ornaments. Cutting out pictures and then matting them on a larger circle makes for a real cute layout.
Lots of great ideas, thanks! Love the ornament idea.
I always wondered how many sizes it could cut and now I know! I also love the snowmen and layered journal circles!
Thank you for all the great ideas. my favorite is the ornaments
Oh my! It is so very hard to choose. These ladies are sooo talented! I really like Lisa’s gingerbread people and Candace’s “Snow Much Fun” page.
Thank you for all the creative ideas! I think the funnest one was the ornaments on the layouts. Diana Brinsley utilized sticker “trash”. Gotta love a thrifty idea! Made beautiful pages in a relatively easy fashion using the CCS. I love all the ideas however, going to be fun to duplicate!
I learned how many shape sizes it makes which I had always wondered. I also liked the snowmen and layered journal box ideas.
Looks like so much fun it has to go on the must have list the snow man is very cool and I’m sure the possibility are endless with the cutting system!
I Love Lisa’s adorable Gingerbread Boy and Girl and her pretty wreath! Also the ornaments made by Diana are classic.
I appreciated that Lisa Graham gave instructions for labeling the templates! All the ideas were so cute!
Snowmen melt my heart! I love all of them! My favorite is from the last blog. I like that the snowman was on the side and snuck into the page. I also liked the rosettes! Cute ideas! Thanks for sharing!
Fun fun Fun! I liked the gingerbread couple best.
I loved the ideas on ALL the blogs! I think my favorite is the circle wreath!
I also LOVE the snowman on this blog!
So many great ideas, even for organizing our templates and circles and ovals. Loved the gingerbread, wreath, and large ornaments on the page spread. Many great ideas (including how to get us to sit down and go through the whole blog – and I’m so glad I did and will do this more often with the blog hops)! I go for easy/conserving paper and the snowman idea Candace Bouldin gave was darling and quick. Loved using the scraps turned over as ornaments also! Thanks to all –
I really loved the gingerbread men.
Everyone is so very creative. I especially like the top view of the snowman.
Snowman is my favorite :-)
I LOVE the ideas for incorporating circles and ovals with Fast 2 Fab pages!
It’s so hard to choose just one. The funnest thing I found was the adorable paper rosette ornaments on Stephani Jones blog. I can’t wait to make them for family and friends. I alsro really liked the Gingerbread people on Lisa’s blog. Those look fun too.