April 27, 2016
Baby Bath Time Scrapbook Layout Ideas
Babies have so much fun splashing in the water when they are taking a bath! Bath time for them is just another playtime. It’s only natural that we would want to get pictures of them playing in the water for our baby scrapbooks. If you’re looking for some ideas for your own bath time scrapbook pages, here are two baby bath scrapbook layouts that might help.
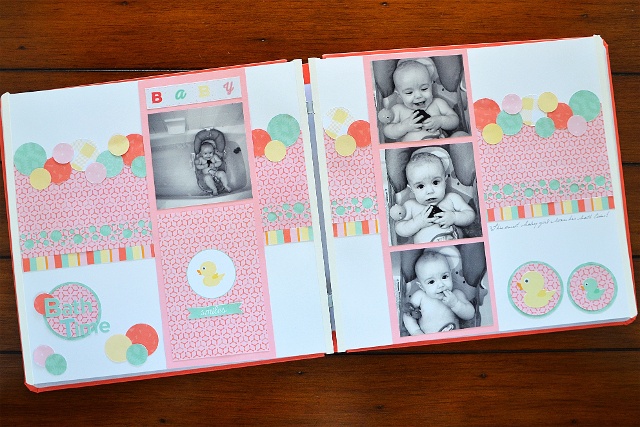
First we’ll start with this layout I created with black and white bath time photos.
Here is what you’ll need to create the bath time scrapbook pages above:
- Hello Baby Girl Paper Pack
- Pink Cardstock
- Hello Baby Girl Slide-in Pack
- Hello Baby Girl Stickers
- Mint ABC/123 Stickers
- Border Maker and Bubbles Cartridge
- Custom Cutting System and Circle Patterns
- 12-inch Straight Trimmer
- Tape Runner
- Silver Metallic Pen
Step 1: Cut 2 pieces pink pattern paper to measure 4 x 12 inches and two strips mint pattern paper to measure 1 x 12 inches.
Step 2: Using the Border Maker and Bubbles Cartridge, punch out bubble on one long edge of each pink pattern piece. Adhere mint strips under bubble cut outs as shown. Adhere to pages as shown.
Step 3: Cut two 1/2″ x 12″ stripe border strips from the pre-designed border sheets. Adhere to pages just below the pink pattern paper.
Step 4: Using the Custom Cutting System and inside track of the small circle pattern, cut 8 circles with the red blade, 7 circles with the green blade, and 16 circles with the blue blade from pink, mint, coral and yellow patterned papers. Solid yellow circles were cut from the pre-designed accent paper. Set aside 4 small, one medium and one large circle.
Step 5: Starting 2 inches from the inner edge of each page, use a pencil to mark a 4 inch space at the top of pink pattern paper. Leaving the 4 inch space free of circles, arrange and adhere circles across the top of the pink pattern paper as shown.
Step 6: Cut 2 pieces pink cardstock to measure 4 1/2 x 12 inches. Adhere to each page as shown. Cut the word baby away from border sticker and adhere sticker, 4″ x 4″ photo and slide-in card to pink cardstock on the left page as shown. Add smiles sticker to slide-in card as shown. Adhere one 4″ x 4″ photo and two 3 1/2″ x 4″ photos to pink cardstock on right page as shown.
Step 7: Using the Custom Cutting System and inside track of the medium circle pattern cut 2 circles from mint pattern paper with the red blade, 1 circle from mint pattern paper with the green blade, 2 circles from pink pattern paper with the green blade and 1 circle from pink pattern paper with the blue blade. Adhere pink pattern circles to mint pattern circles. Add rubber duck stickers to two circles and adhere to right side of right page as shown. Adhere third circle to left side of the left page as shown.
Step 8: To finish, add one small coral circle to mint and pink circle as shown and the remaining circles to right side of the right page as shown. Create a title over the pink and green circle. Journal with silver metallic pen.
My next baby bath scrapbook layouts includes two baby’s in a tub. These two little girls get water everywhere when they are in the bathtub. Might as well keep calm and scrap it!

Here’s what you’ll need to create baby bath scrapbook pages above:
- Hello Baby Girl paper pack
- Pink Cardstock
- Pastel Yellow Cardstock
- Hello Baby Girl Stickers
- Pastel Pink ABC/123 Stickers
- Border Maker and Button Chain Cartridge
- Custom Cutting System and Circle Patterns
- 12-inch Straight Trimmer
- Tape Runner
- Mini Tape Runner
- Foam Squares
- Silver Metallic Pen
Step One: Cut one 4″ x 12″ strip and one 3 1/2″ x 12″ strip from yellow gingham. Using the Border Maker and Button Chain Cartridge, punch a button chain from pink cardstock. Use scissors to cut button chain in half lengthwise. Use a mini tape runner to adhere each half under the edge of one side of each yellow strip as shown.
Step 2: Adhere the 4″ x 12″ strip to the right edge of the right page and the 3 1/2″ x 12″ strip to the left side of the left page. Cut two 1/2″ x 12″ strips from pink cardstock. Adhere one strip to the right edge of the yellow gingham on the right page as shown. Adhere the second strip to the right edge of the yellow gingham on the left page as shown.
Step 3: Using the inside track of the medium circle pattern cut 3 circles from pink pattern paper with the green blade and 3 circles from pink cardstock with the blue blade. Using the inside track of the small circle pattern cut 3 circles from bow pattern paper with the red blade. Use the silver metallic pen to create faux stitching around the bow pattern circles. Arrange and adhere circles to yellow gingham on the left page as shown.
Step 4: Cut one 4 1/2″ x 6 1/2″ mat from pink cardstock and one from yellow cardstock. Adhere two 4″ x 6″ photos to mats and adhere to left page as shown. Adhere two 4″ x 6″ photos and two 3 1/2″ x 4″ photos to right page as shown.
Step 5: Adhere rose sticker and giggles flag sticker to right edge of right page with foam squares. Use Pastel Pink ABC/123 stickers to create a title. Enhance title with border stickers and mint star sticker shown. Journal with the silver metallic pen.
I hope these bath time scrapbook ideas inspires you to create baby bath layouts in your baby’s scrapbook album!
Happy Scrapbooking!
Diana
