September 24, 2016
Virtual Crop: Challenge 2-Creative Uses of ABC/123 Alphabet Stickers
Are you having FUN yet? Isn’t creating with a sketch fun?
We are LOVING all the projects that you are posting on our Facebook Event Page!
Let’s keep moving—so we can get as many projects completed today as possible!
It’s all about the completed project! Keeping those memories alive, in those beautiful scrapbooks of yours!
CHALLENGE #2: Create a layout, highlighting a creative use of the ABC/123 Stickers. Show us how you can use the ABC/123 stickers in a very unique and creative way!
Our Content Contributors have done a beautiful job of showcasing a few ideas, or you can come up with your own ideas to share. Make sure to post to the Facebook Event wall to be eligible to win door prizes.
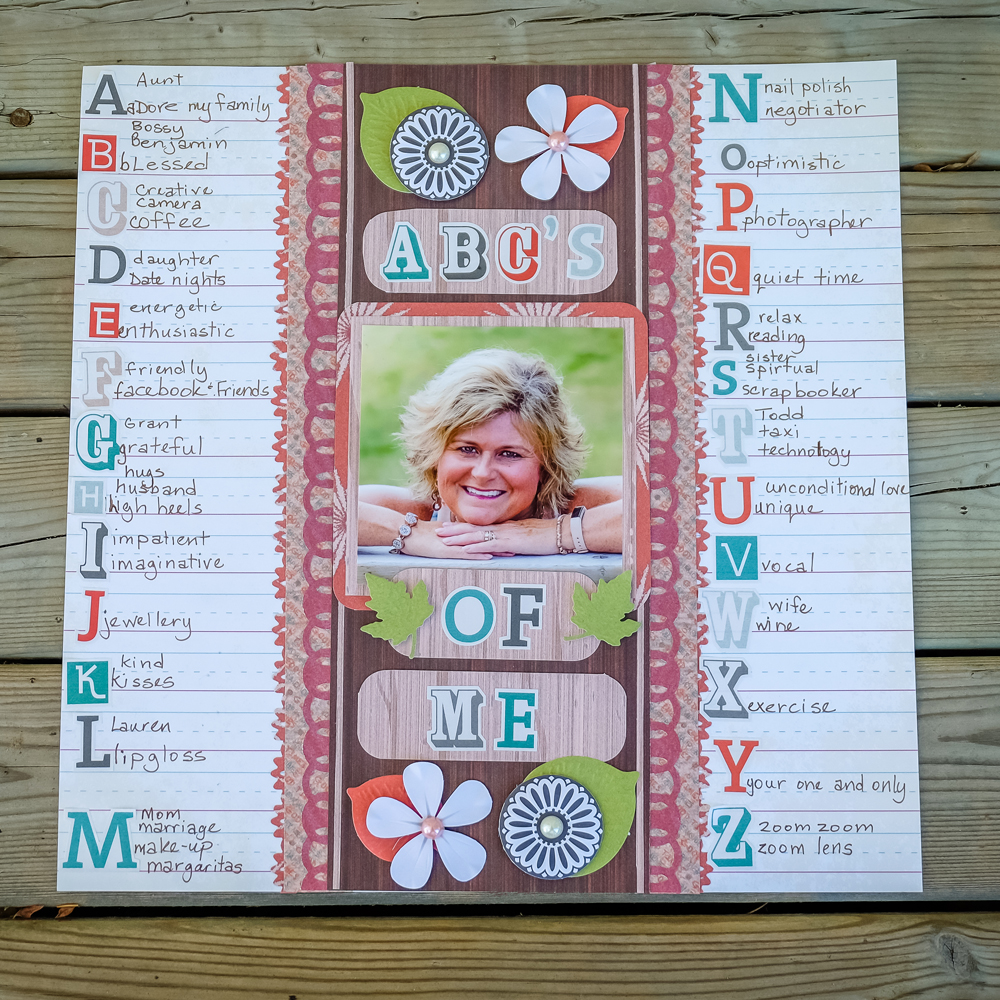
Layout created by Beth Thomander-CAN
To create this layout, you will need:
- School Buddies Paper Pack US CAN
- Croptoberfest Paper Pack-Contact Your Advisor for details…..
- Fall In ABC US CAN
- Fall In Embellishments US CAN
- Black & White Embellishments US CAN
- Foam Squares US CAN
- Border Maker System with Circle Weave and Lace Border Cartridges US CAN
- Corner Rounder US CAN


Use lined paper from School Buddies Paper Pack as background page.
You will need another 5 different papers for this page:
- Paper #1: Cut 2 lace scallop borders
- Paper #2: Cut 2 x 1″ Strips
- Paper #3: Cut 2 x circle weave borders
- Paper #4: Cut 4 1/2″ piece
- Paper #5: Cut 2 x very thin strips
Layer these 5 papers in the order they were cut.
Cut photo into square and mat with paper #5 and #1.
Round corners on outside mat.
Cut 3 x 1-1/4″ strips for title ABC’s in 3″ and 3-3/4″ lengths. Round the corners on each one.
Add embellishments.
Add ABC letters and journal.
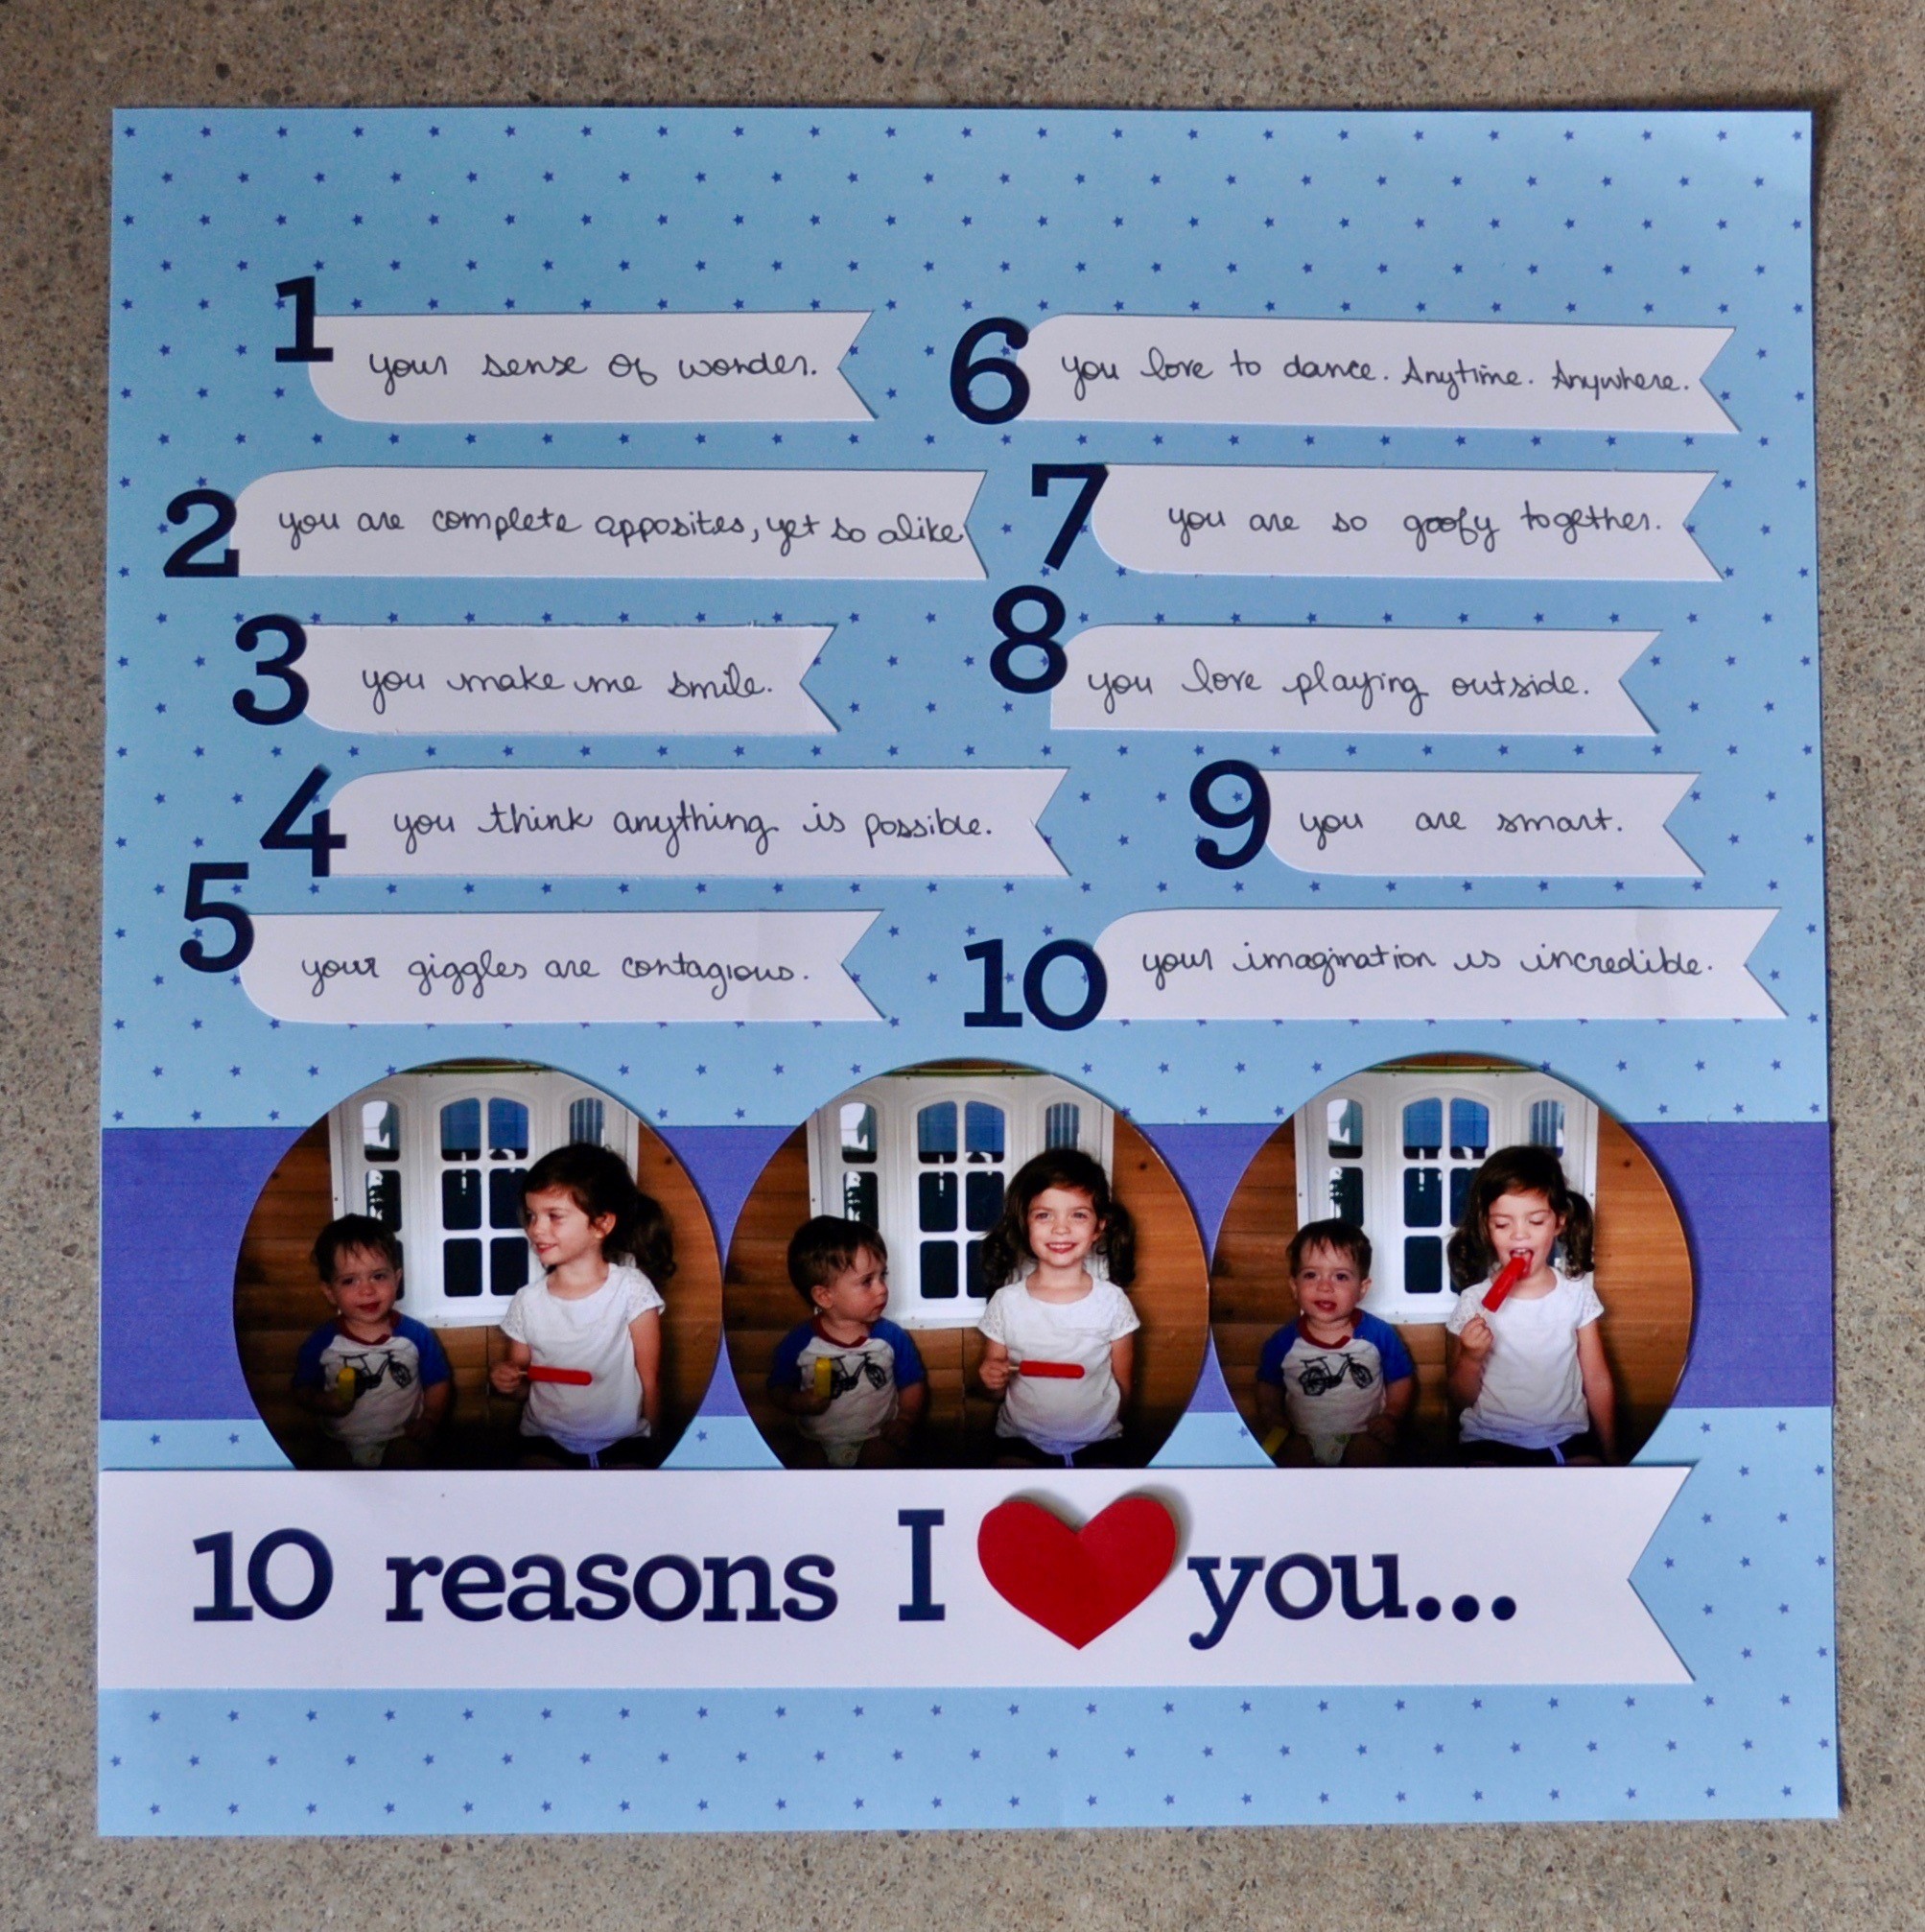
Layout created by Marja Deeth- Canada Home Office
To create this layout, you will need:
- Study Buddies Paper Pack US CAN
- Navy ABC/123s US CAN
- Cranberry 12” X 12” Cardstock US CAN
- White 12”X12” Cardstock US CAN
- Circle CSS Patterns US CAN
- Tape Runner US CAN
- Foam Squares US CAN
- Paper Trimmer US CAN
- Black Dual Tip Pen US CAN
- Two-Way Corner Rounder US CAN
Instructions:
– Use a sheet of 12” X 12” Study Buddies Paper for the base of this layout.
– Cut 10 strips of white cardstock to measure 6” X 3/4”.
– Write 10 phrases and cut a flagged end at the end of your phrase.
– Use the corner rounder on either the top or the bottom left side corner (keep it random!)
– Cut a 2” strip of Study Buddies Paper and adhere it to your layout base.
– Cut 3 photos into 3” circles using the Circle CCS.
– Adhere the photos to the strip of Study Buddies paper using a tape runner.
– Cut a piece of white cardstock to 1-1/2” X 11” and cut a flagged end on the right side. Adhere to the layout.
– Use a ruler or a scrap strip of paper to help keep your title straight as you adhere Navy ABC/123s. Free-hand cut a heart and pop it up using a foam square.
– Adhere the 10 strips of paper in two uneven columns. Add Navy ABC/123s from 1-10 along the left side of each strip.

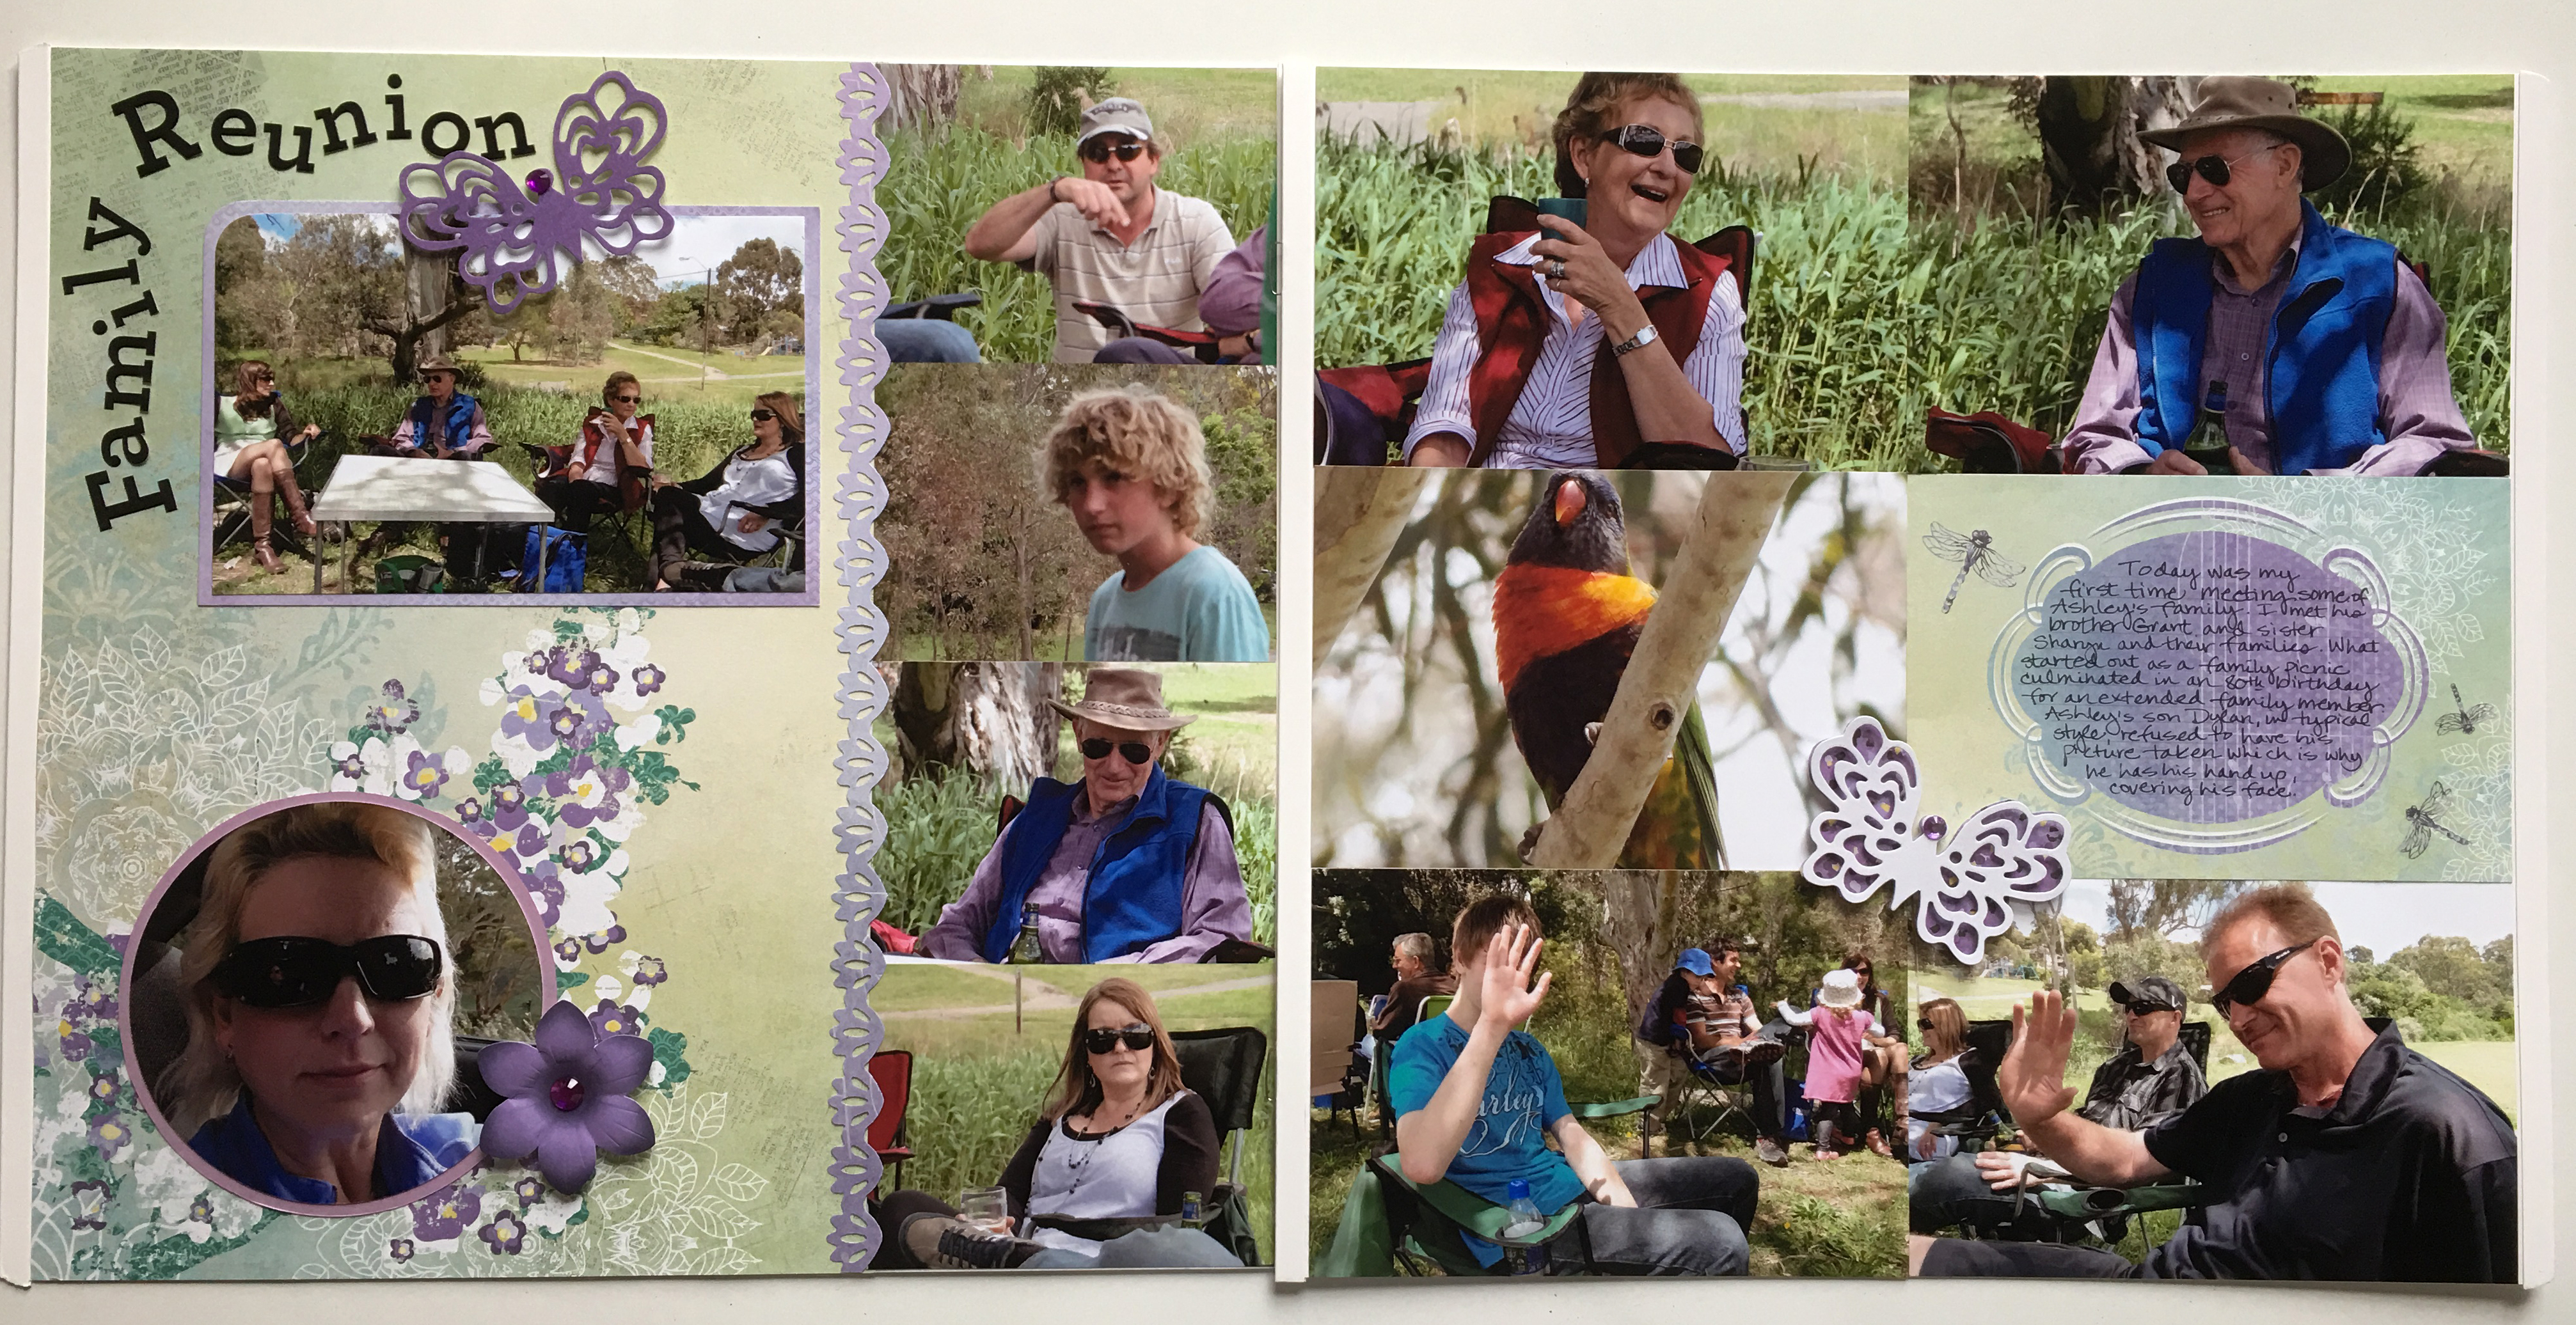
Layout created by Dayna Nelson-AUS
To create this layout, you will need:
- 12-inch Trimmer US CAN
- Personal Trimmer US CAN
- Cool Serenity Fast2Fab album pages US CAN
- Cool Serenity Designer Paper Pack US CAN
- Cool Serenity Embellishments Pack US CAN
- ABC/123 Stickers – Watercolor Green US CAN
- Tape Runner US CAN
- Title Blocks for ABC Title: Select your 2 favorite papers. The outside squares are 1.5”-squared and the inside blocks are 1.25”-squared. Adhere smaller squares on top of larger squares and top with a letter. Note: the top square is an embellishment from the Cool Serenity Embellishments pack.
- Adhere photos to your Fast2Fab page. Notice that photos don’t have to fit perfectly into mats on the page. In this case, 3 photos straddled 2 mats, but still looks great.
- Journaling Box is from the Cool Serenity Embellishments pack.
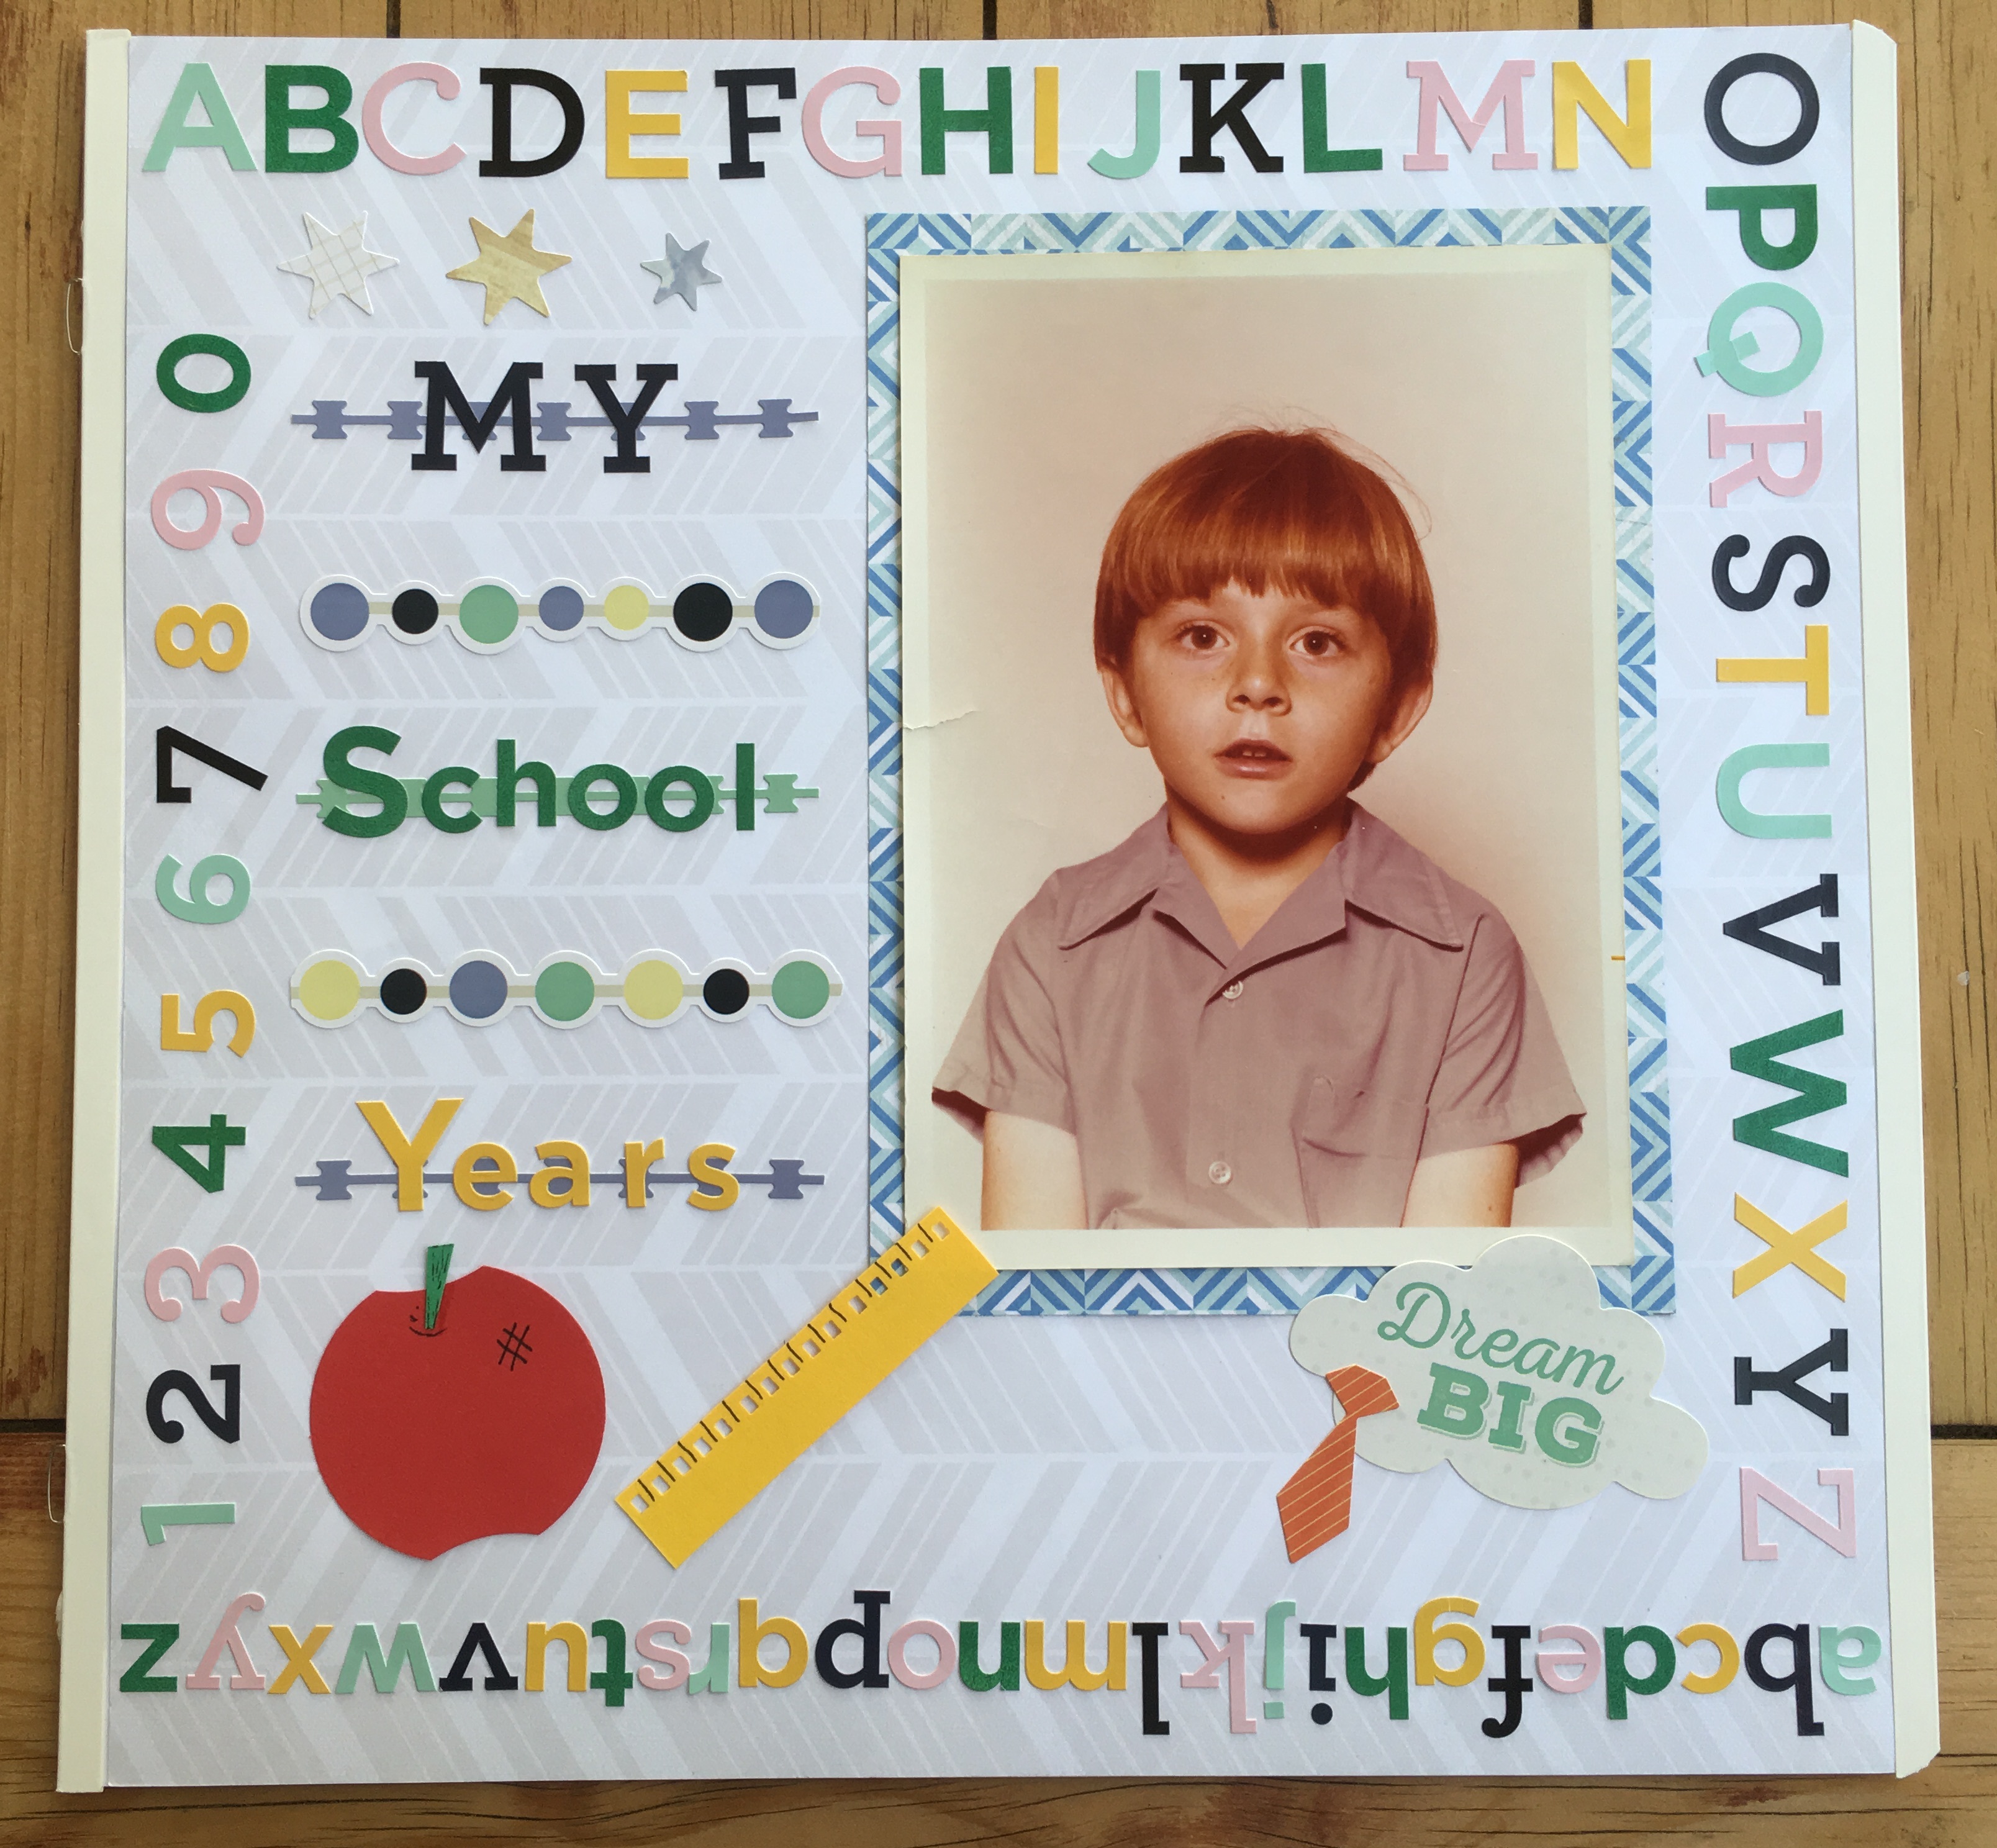
Layout created by Susan Dorrington- AUS
- ABC stickers – various colours US CAN
- Hello Baby Boy Sticker Pack US CAN
- Mint to Be Paper Pack -Sold in Australia only
- Cool Serenity Paper Pack US CAN
- Study Buddies Embellishment Pack US CAN
- Study Buddies Paper Pack US CAN
- 12” Trimmer US CAN
- Tape Runner US CAN
Step 1: Using tape runner, attach your 12” x 12” sheet to your page.
Step 2: Stick your ABC stickers around the outside border of your page. This is a great way to use up letters you haven’t used or won’t use. You could also use a variety of font’s, or sizes. I have run the Capital letters along the top and right hand side. The lower case letter fit along the bottom, and the numerals along the left hand side of your page.
Step 3: Cut your photo mat to 5-1/2” x 7-3/4” and attach your photo to it, and then both to your page as shown.
Step 4: Trim the long stickers from the Baby Boy sticker pack to fit between your photo and the numerals. Using ABC stickers, place over the top of every second border, or every border if you have more wording.
Step 5: Place embellishments such as the Apple from the Study Buddies Embellishments, the ruler from the Study Buddies paper pack, the Dream Big cloud sticker and school tie sticker and stars from the Baby Boy sticker pack.
Layouts created by Dayna Nelson-AUS
To create these layouts, you will need:
- 12-inch Straight Trimmer US CAN
- Border Maker System US CAN
- Lace Scallop Border Maker Cartridge US CAN
- Corner Rounder US CAN
- Custom Cutting System (CCS) w/Circles US CAN
- Fresh Picks Designer Paper Pack US CAN
- Fresh Picks Embellishments US CAN
- Fresh Picks Slide-In Pack US CAN
- Black ABC/123 Stickers US CAN
- Tape Runner US CAN
- Repositionable Tape Runner US CAN
ABC Title: lightly draw a squiggly line with a pencil and adhere your title so that it wraps around the upper corner.
For the photo that is inserted inside the title: This photo was trimmed down to 3.5” x 5.5” so a mat from the Fresh Picks Slide-In Pack could be used as a mat for the photo. Corner round the upper left corner of the photo and mat.
Circle Photo: Use the CCS-small circle with red blade to cut your photo. Mat with your preferred paper, small circle with green blade.
Border Maker System with the Lace Scallop Border Maker Cartridge with lavender paper from Fresh Picks Designer Paper Pack. Adhere with Repositionable Tape Runner.
Butterfly, Flower and jewels are from the Fresh Picks Embellishment pack. Adhere them with Foam Squares to lift them off your page.
Select five 4”x 6” photos.
Select one mat from the Fresh Picks Slide-in Pack to use as your journaling box.
Large butterfly embellishment is from the Fresh Picks Embellishment pack. Two large butterflies were used, white lace butterfly on top of a purple butterfly. Adhere the white butterfly with foam squares. This requires some cutting of the small foam squares in half in order to fit some of the areas so they won’t show.

Layouts created by Krislyn Mattei-US
To create these layouts, you will need:
- Fall In Fast2Fab Pages US CAN
- White Refill Page US CAN
- Fall In Slide-In Cards US CAN
- Travel Cardstock (Gray, Green) US CAN
- Triumph Paper Pack (Aqua chevron stripe) US CAN
- Green and Mint ABC/123 Stickers US CAN
- 12” Straight Trimmer US CAN
- Border Maker System with Evergreen, Grass & Ocean Wave Cartridges US CAN


Create a 2-page spread, adhering photos as desired.
For the “short” page, cut white page to 5” x 12” from stitches side. Trim down remaining piece of page to 5” x 12”, overlap and adhere to stitched piece to make a short page with jeeping on both edges.
Using Border Maker with the Evergreen cartridge, punch the edge of the gray cardstock.
Trim paper to 4-3/4” x 12” and adhere to page.
Punch an Ocean Wave border from aqua chevron stripe paper and trim to 4-3/4” x 2”; punch a Grass border from green cardstock and trim to 4-3/4” x 1”. Adhere to bottom of gray cardstock as shown.
Add “minnesota” title underneath evergreens with green ABC/123 stickers; make “reflection” with mint ABC/123 stickers as shown.
Add photos as desired.
We will be back again in 2 hours with your next challenge! We look forward to seeing what you create with ABC Stickers!
Don’t Forget: If you place a $25 order today during the Virtual Crop (9am-6pm CST), you will get $10 off your purchase! So, if you have had a few things on your wish list, today is the day to fill the cart! Who doesn’t love a FREE $10? Happy Shopping! Make sure you use the code:
See you soon, and Happy Creating!


Really clever and creativeâ?¦
I love the mirror-effect in Krislyn’s layout. I never thought of doing that! Wonderful ideas from all. <3
Love the “reflected” letters!