September 24, 2016
Virtual Crop: Challenge 4-Creative Journaling

Hey!
Oh my gosh–I love that I get to spend my day in my jammies! But, even more than that I love that I am getting to spend the day with all of YOU! It is YOU that inspires ME!
The wheels are always turning! Chocolate always helps too! I have my bag of M&M’s right here! What is your chocolate treat of choice?
CHALLENGE #4: Creative Journaling. Add journaling to your scrapbook layouts in a unique and creative way. It is always so important to journal. Keeping your memories alive isn’t just about the photos, but the story behind them, and unless you write them down–they get lost.
Share your layout on the Facebook Event page to be eligible for door prizes!
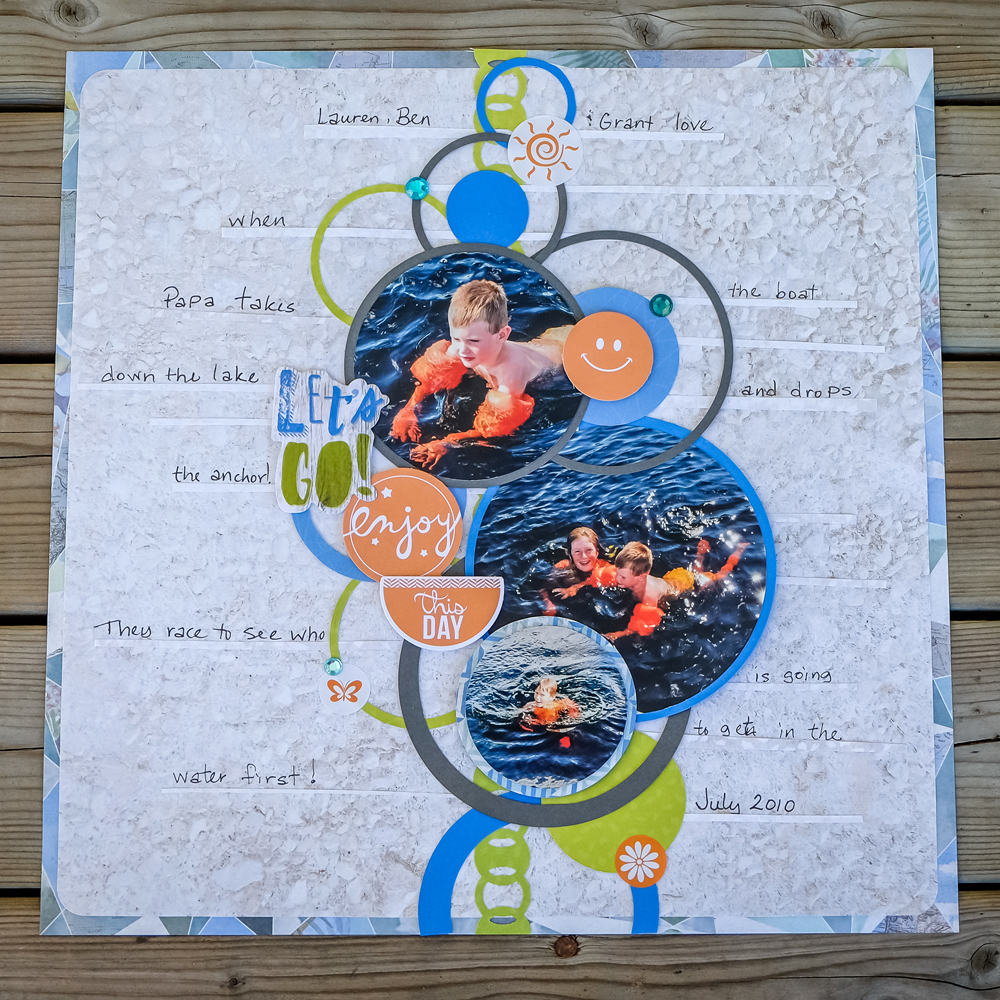
Layout created by Beth Thomander-CAN
To create this layout, you will need:
- Cool Serenity Paper Pack US CAN
- Travel Paper Pack US CAN
- Circle Template/Custom Cutting System US CAN
- Repositional Tape US CAN
- A Year to Remember Stickers US CAN
- Foam Squares US CAN
- A Year to Remember 2 Embellishments US CAN
- Cool Serenity Embellishments US CAN
- Circle Weave Border Maker Cartridge US CAN
- Corner Rounder US CAN
- 12″ Straight Trimmer US CAN


Begin with two sheets of paper or cardstock. Cut 1/2″ off two sides of one of the sheets. Center smaller one over larger one. I used a light coloured paper for my smaller one. Cut narrow strips from the two 1/2″ strips and use repositionable tape to adhere to page. I didn’t line these up, they are staggers working from the center out to the edges of the page.
Cut one border with the Circle Weave Border Maker Cartridge and adhere to center of page vertically.
Cut photos and mats with CCS-circles from desired paper.
Cut a variety of circles and frames with CCS-circles. Layer circles, frames and matted photos over border.
Add embellishments and rhinestones.
Add journaling using the narrow strips of paper as your writing guide.
Layout created by Marja Deeth-Canada Home Office
Tip: Journal along photo mats.
To create this layout, you will need:
- Soiree Paper Pack US CAN
- Soiree Sticker Sheet US CAN
- Navy ABC/123s US CAN
- White 12”X12” Cardstock US CAN
- Circle CSS Patterns US CAN
- Tape Runner US CAN
- Foam Squares US CAN
- Paper Trimmer US CAN
- Black Dual Tip Pen US CAN

Instructions:
– Use black 12”X12” cardstock for your layout base.
– Use the cutting guide to cut your pieces of Soiree Patterned Paper
– Adhere your patterned paper to your layout base in a circle, alphabetically.
– Use the Circle CSS patterns to trim your photo on the top and the bottom with the 4-7/8” circle.
– Cut the Soiree designer paper with the 4-7/8” circle. Adhere your photo using a tape runner.
– Cut black cardstock with the 5-1/8” circle. Adhere your photo layer using a tape runner.
– Cut white cardstock with the 6-1/8” circle. Adhere your photo layer using foam squares.
– Adhere your matted photo to your spread using a tape runner.
– Journal on the white mat circling your photo.
– Add embellishments!
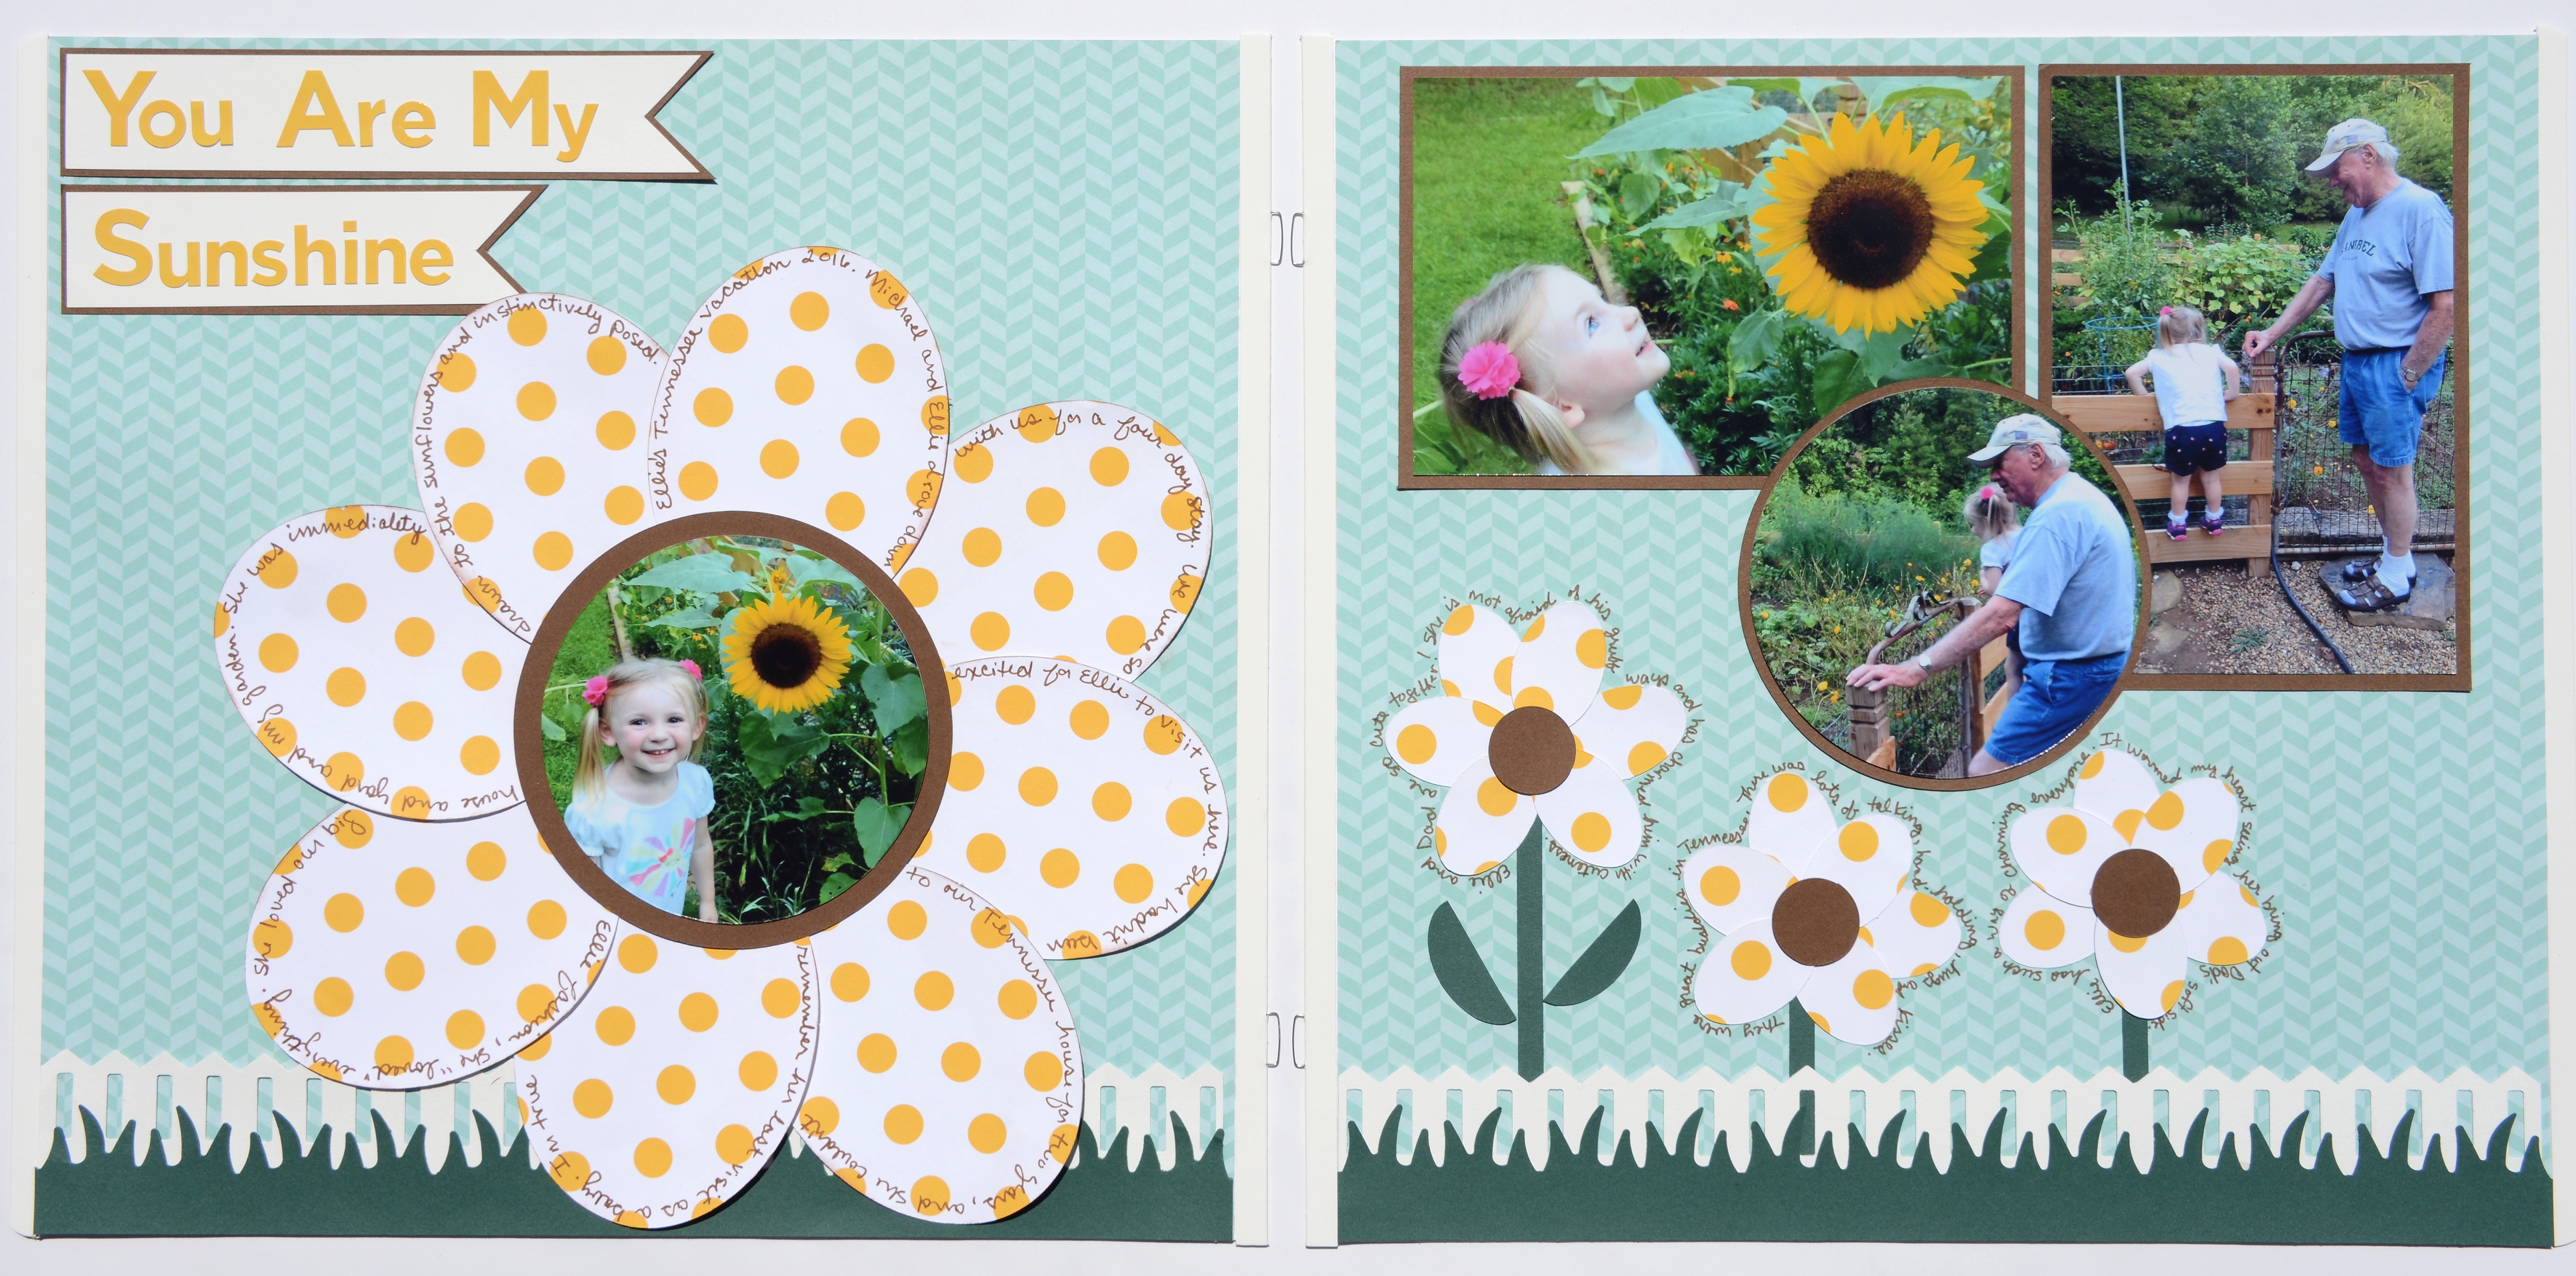
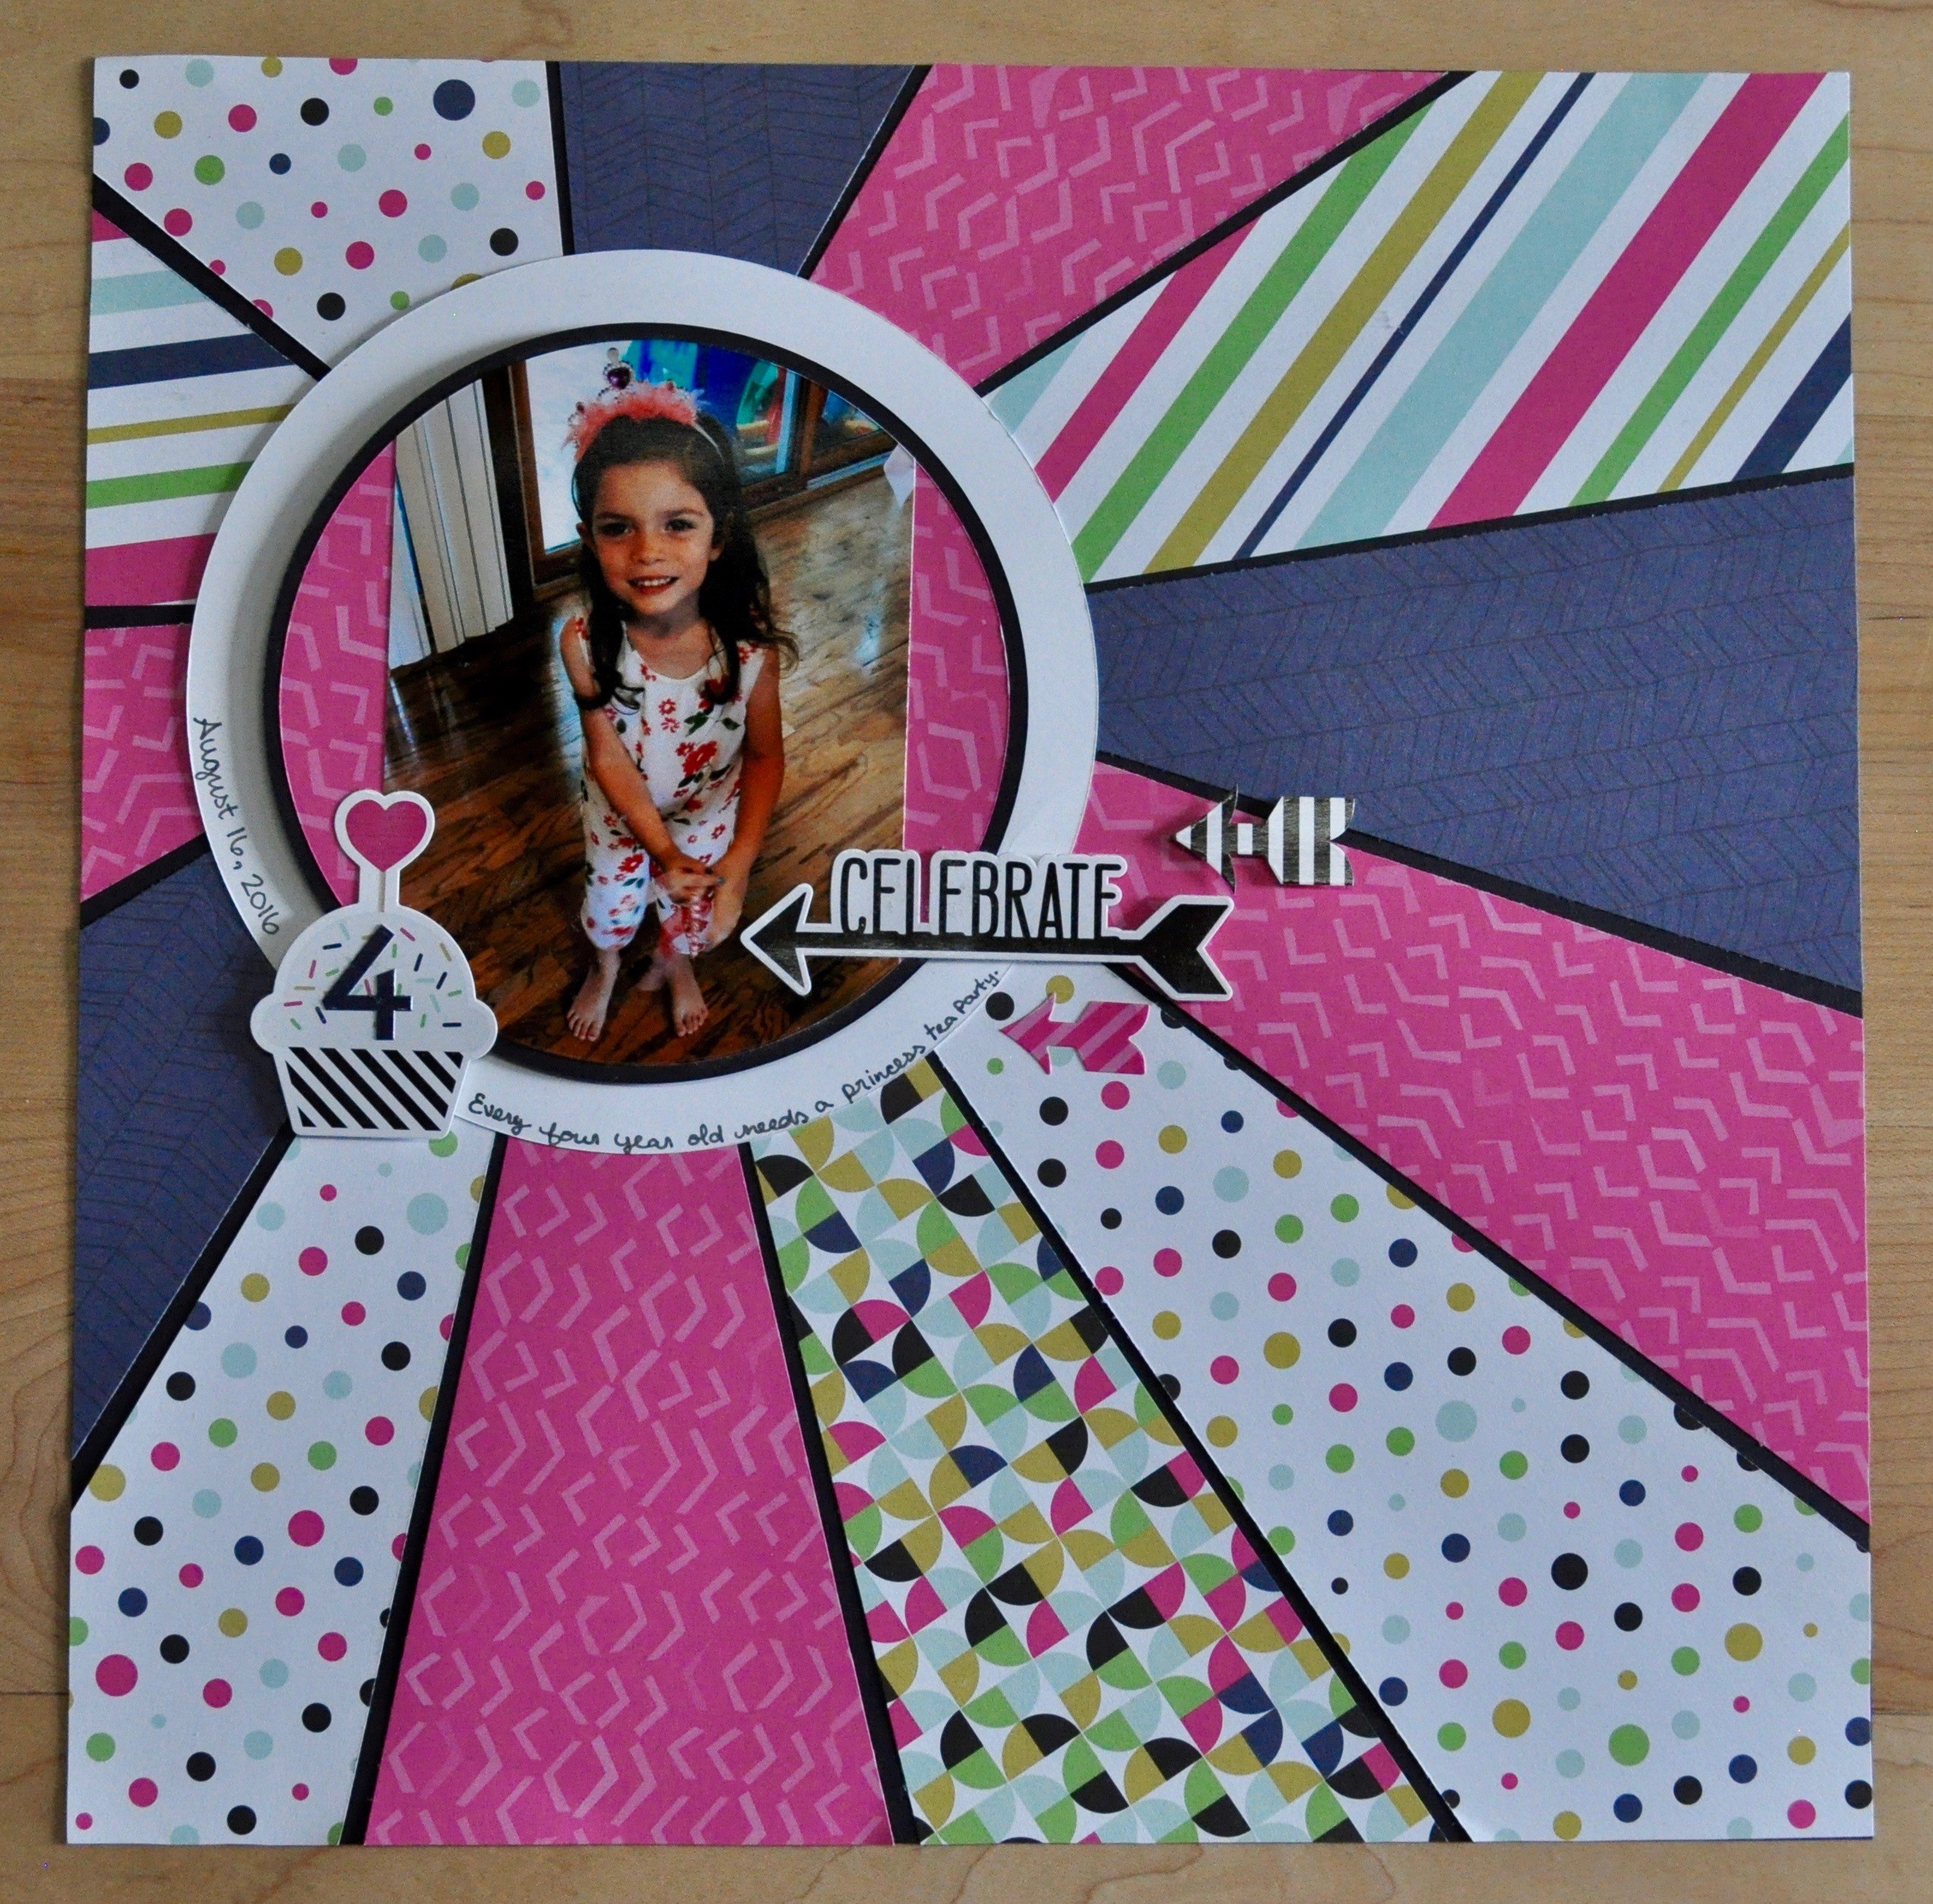
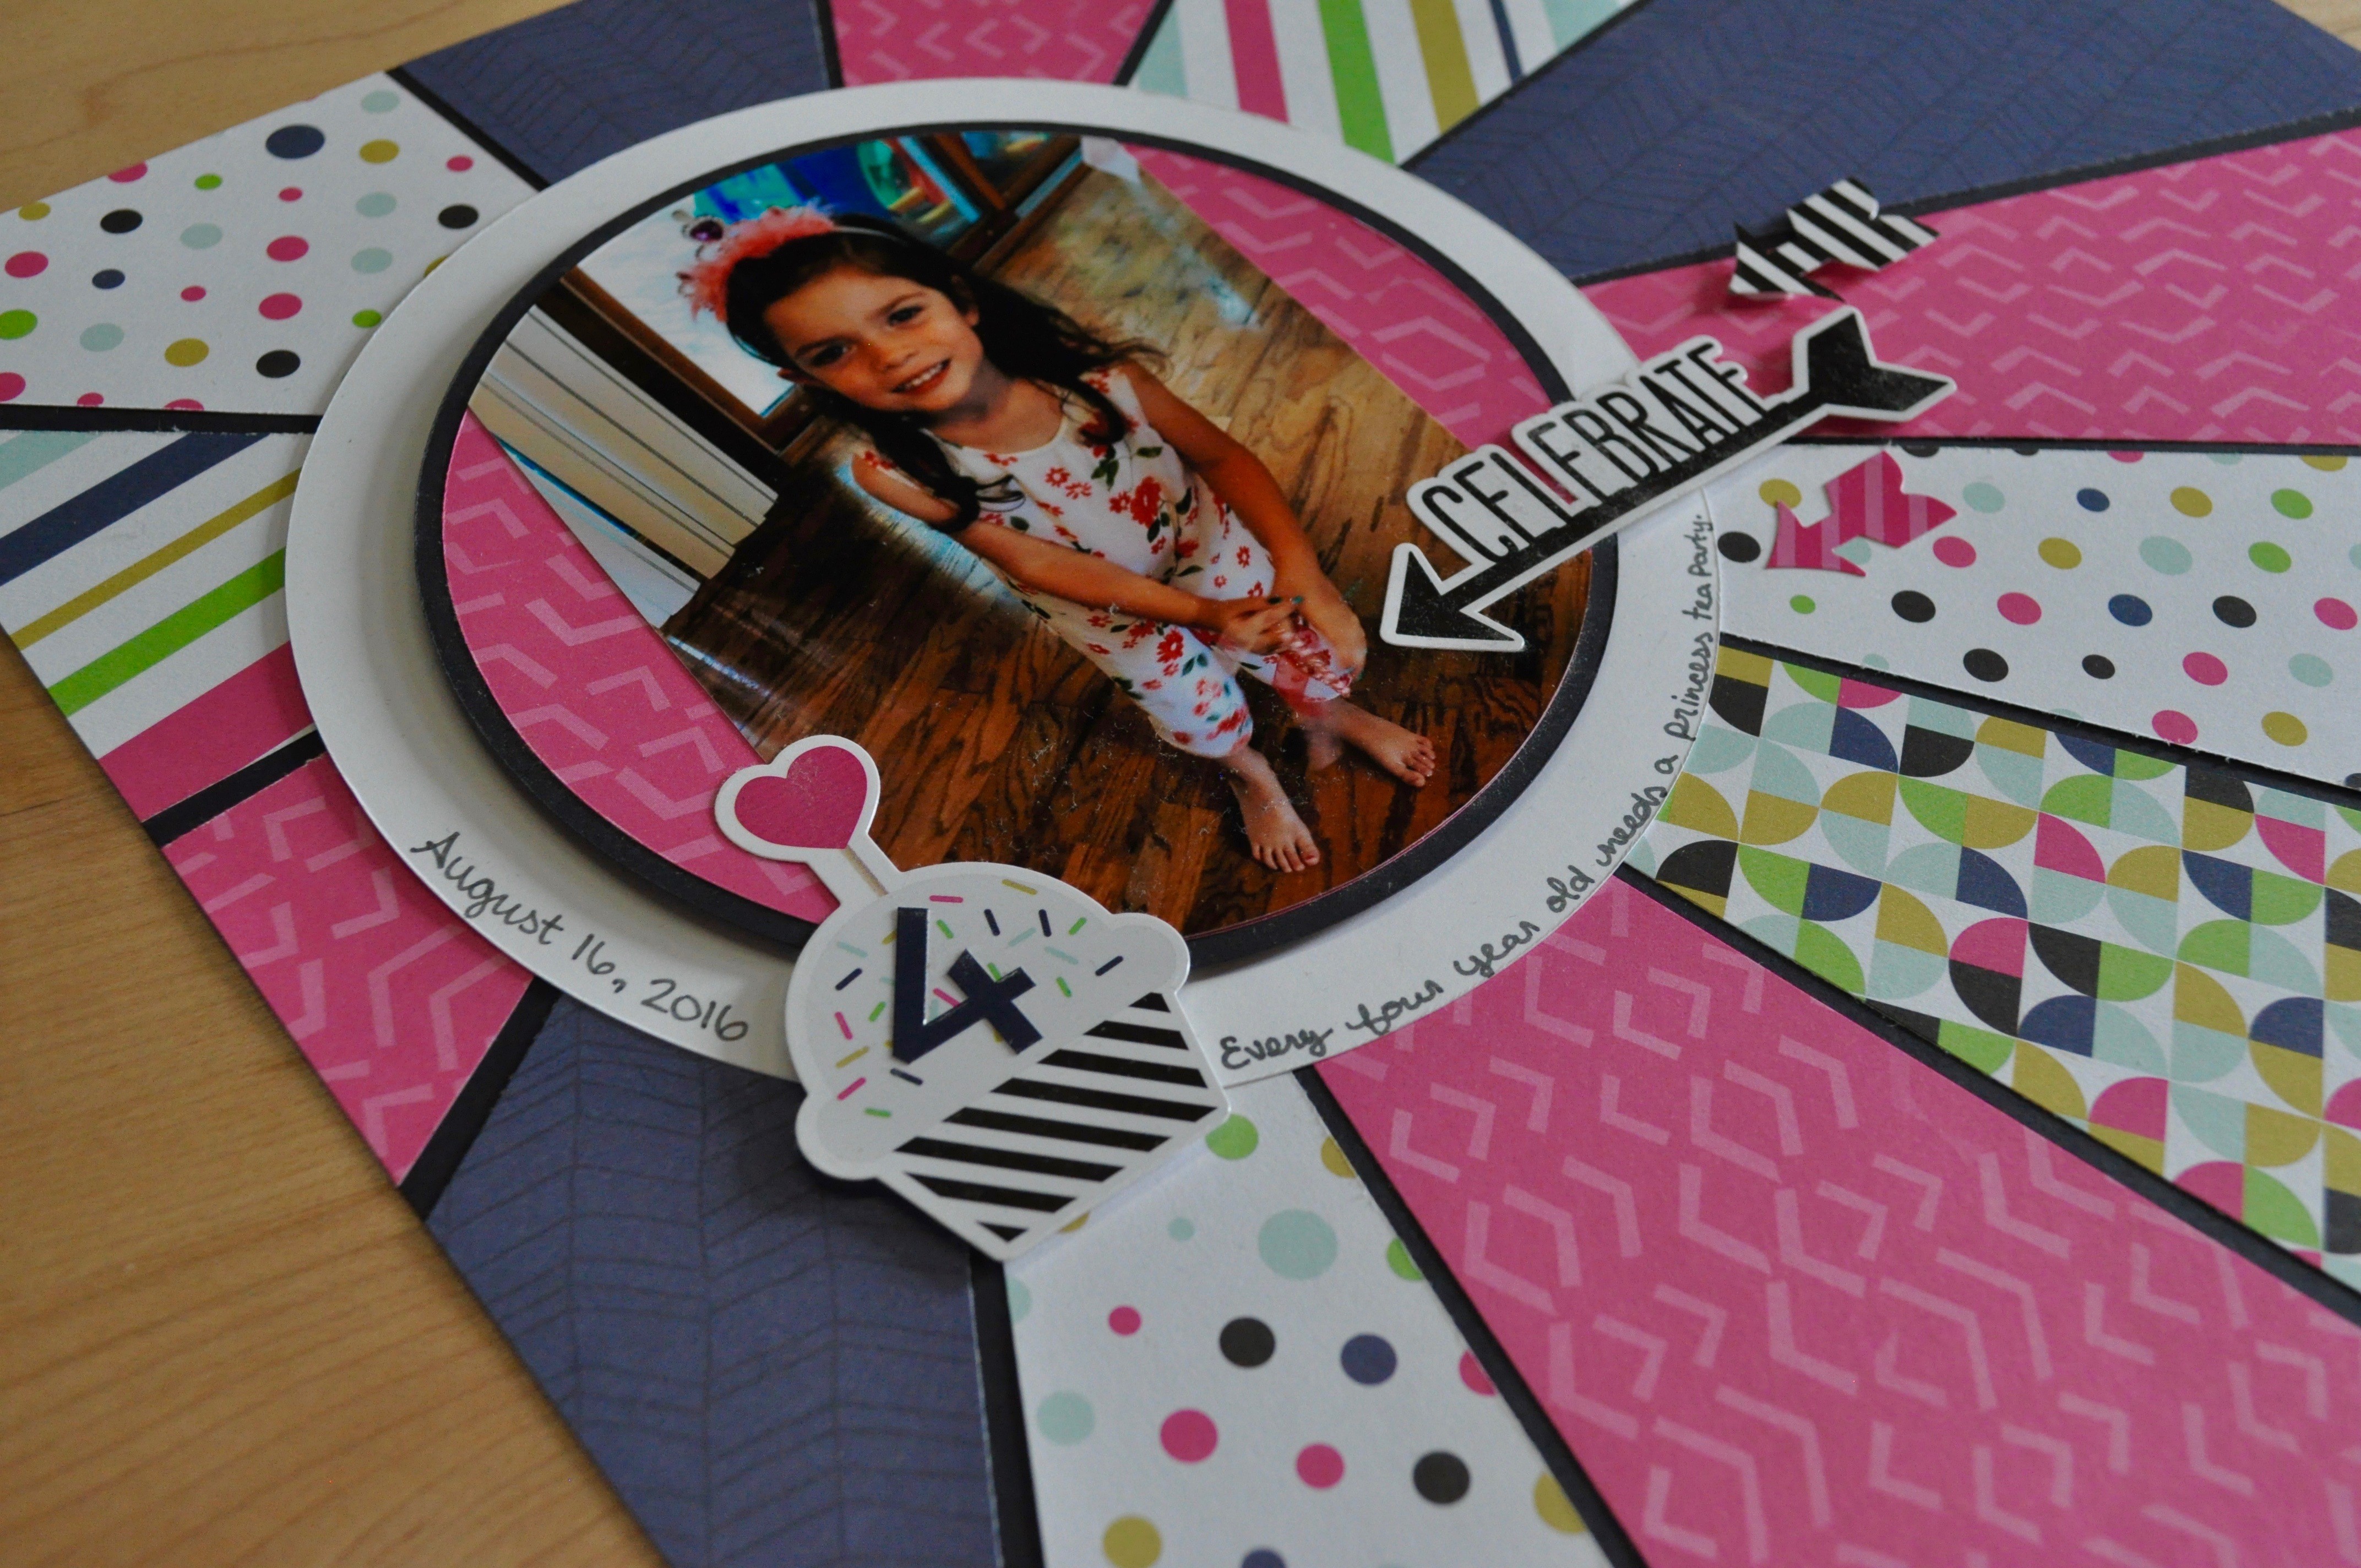
Layouts created by Karyn McDermaid-Rolfe US
Tip: Journal along the outer edge of shapes (circles or ovals).
To create these layouts, you will need:
- Be Bold and Flourish Paper Pack US CAN
- White Solid 12×12 Cardstock Paper Pack US CAN
- Brown Solid 12×12 Cardstock Paper Pack US CAN
- Evergreen Solid 12×12 Cardstock Paper Pack US CAN
- Gold ABC/123 Stickers US CAN
- Original Border Maker with Picket Fence and Grass Cartridges US CAN
- Custom Cutting System with Oval and Circle Patterns US CAN
- 12-Inch Straight Trimmer US CAN
- Tape Runner US CAN
- Foam Squares US CAN
- Brown Dual-Tip Pen US CAN
Using border maker, punch two picket fence borders from white cardstock. Using border maker, punch two grass borders from evergreen cardstock. Adhere borders to bottoms of pages as shown.
Using the red blade on the outside edge of the smallest oval cutting pattern, cut eight ovals from dot paper.
Using the blue blade on the outside edge of the smallest circle pattern, cut a circle from brown cardstock. Cut a photo using the red blade on the outside edge of the smallest circle pattern and adhere to center of the brown circle.
Arrange the oval pieces into a flower shape with the round matted photo as the flower center. Our Repositionable Tape Runner Refill was helpful for this. Try to only apply tape runner to the center part of the ovals.
Cut a second photo into a circle using the red blade on the outside edge of the smallest circle pattern and mat with a brown circle cut with the green blade. Mat a 6” x 4” and a 4” x 6” photo with brown cardstock. Adhere these photos to the second page as shown.
Using the blue blade on the inside edge of the 3 ½” x 5”oval cutting pattern, cut eighteen ovals from dot paper. Cut one oval from the evergreen cardstock and cut this one in half.
Using the blue blade on the inside edge of the smallest circle pattern, cut three circles from brown cardstock.
Cut a ¼” strip from evergreen cardstock and assemble the small flowers as shown.
Adhere title to white cardstock and trim to ribbon shapes as shown. Mat the ribbon pieces with brown cardstock.
Add journaling to the inside edges of the large flower petals and to the outsides of the small flower petals.
After journaling, I added a foam square underneath the outside edge of the large flower petals to give it dimension and the appearance of movement.

Layout created by Tiffany Chittenden-AUS
Tip: Journal with #hashtags.
To create these layouts, you will need:
- 3 sheets Study Buddies paper US CAN
- 1 sheet Black Cardstock US CAN
- Study Buddies stickers US CAN
- Black ABC/123 Stickers US CAN
- Trimmer US CAN
- Custom Cutting System with Circle CCS Patterns US CAN
- Border Maker System with Lace Scallop Cartridge US CAN
- Tape Runner US CAN
- Black Dual-Tip Marker US CAN
Trim the bottom 3 ‘rulers’ from the Ruler paper.
Using the large CCS Circle and the Green Blade on the outside, cut a circle from the Pink ABC paper.
Turn the paper over and from the opposite side, cut a photo mat 3 7/8″ x 5 7/8″. Trim your photo to 3 3/4″ x 5 3/4″ and attach to photo mat.
From your Black Cardstock, cut a 2 1/2″ x 12″ strip, attach the Rulers. Punch a 12″ border using the Lace Scallop BMC. Use the large CCS Circle and the Blue Blade on the outside to cut a circle. Attach the pink circle to this. Cut a 6″ x 4″ photo mat and attach the mounted photo.
Attach the Lace Scallop Border to the bottom of the Ruler piece.
Assemble page as shown adding Stickers, ABC title and journaling as desired.

Layout created by Alison Cole-AUS
Tip: Journal in bullets.
To create these layouts, you will need:
- 12” Straight Trimmer US CAN
- Personal Trimmer US CAN
- Border Maker System US CAN
- Heart Chain Cartridge US CAN
- Denim Blues Paper Pack US CAN
- Denim Blues Embellishments US CAN
- Watercolour Love Embellishments US CAN
- Tape Runner US CAN
- Foam Squares US CAN
- Multi Purpose Tool US CAN
- Dual Tip Pens – Black and Brown US CAN
- Black ABC/123 Stickers US CAN
- Cardstock – Cloud , Royal Blue, Black US CAN
Using colour no 1 cut 2 pieces 12” x 11.5” and adhere 1 piece to each page horizontally approx. 0.5cm from top edge of page.
Using colour no. 2 cut 1 piece 10” x 9.75” and adhere vertically to right hand page approx. 3cm from top edge of page and 0.5cm from inner reinforced edge of page.
Using colour no. 2 cut 1 piece 11.75” x 7.25” and adhere this to right hand page approx. 3cm from top edge of page and 0.5cm from inner reinforced edge of page.
Using colour no. 3 cut 1 piece 11.5” x 6.75” and adhere this piece horizontally on to colour no. 2 previously adhered to right hand page.
Using colour no. 4 cut 1 piece 7.5” x 9.5” and adhere this vertically to left hand page approx. 3.75cm from top edge of page and 1cm from inner reinforced edge of page.
Using colour no. 2 cut 1 piece 9.25” x 7.25”. From the centre of this piece cut out an 8.25” x 6.25” piece. Adhere the “frame” of colour no. 2 to left hand page vertically to the centre of colour no. 4 previously adhered. Trim the remaining piece of colour no. 2 to 8” x 6” and adhere this piece vertically to left hand page in the centre of the frame of colour no. 2 previously adhered. Adhere 5” x 7” photo to this piece.
Using colour no. 4 cut 1 piece 11.25” x 6.25” and adhere this piece horizontally to right hand page on to centre of colour no. 3 previously adhered.
Crop 6” x 4” photos to 6” x 3.5” and mat individually on thin mats of colour no. 2. Adhere these photos evenly to right hand page across piece of colour no. 4 previously adhered.
Using colour no. 3 cut 5 strips 0.25”x 12”.Adhere 1 strip horizontally to right hand page approx. 3.5cm from bottom edge of page. Crop 2 of the remaining strips to 0.25” x 11.75”, adhere horizontally to left hand page one of them approx3.25cm from top edge of page and against outer reinforced edge of page, the other approx. 2.25cm from bottom edge of page and against outer reinforced edge of page. Trim remaining 2 strips to 0.25” x 9.75” and adhere vertically to left hand page – one of them approx. 2.25 cm from bottom edge of page and 5.5cm from outer reinforced edge of page, the other approx. 2.25cm from bottom edge of page and 0.75cm from inner reinforced edge of page.
Using colour no. 4 cut 2 strips 0.25” x 12”. Adhere 1 strip horizontally to right hand page approx. 3cm from bottom edge of page. Trim the other strip to 0.25” x 9.75” and adhere vertically to left hand page approx. 2.25cm from bottom edge of page and 4.75cm from outer reinforced edge of page.
Using colour no. 2 cut 2 strips 0.25” x 12”. Adhere I strip horizontally to right hand page approx. 2cm from bottom edge of page. Trim the remaining strip to 0.25” x 9.75” and adhere this vertically to left hand page approx. 2.25cm from bottom edge of page and 3.75cm from outer reinforced edge of page.
Using the heart chain cartridge in the border maker and colour no. 3 create 1 border strip. Put the strip aside for use on another project and use the hearts as bullet points for your journaling and as embellishments as per the image. Adhere hearts with foam squares. Journal to the left of the photo on the left hand page as per image provided.
Using the heart chain cartridge and the border maker with colour no. 2 create 1 strip. Save the strip for another project and use the hearts on your layout as embellishments.
Using the Denim blue embellishments and the hearts adhere your embellishments as per the image.
Adhere Title using the multi purpose tool and the black ABC/123 stickers.
Don’t Forget: If you place a $25 order today during the Virtual Crop (9am-6pm CST), you will get $10 off your purchase! So, if you have had a few things on your wish list, today is the day to fill the cart! Who doesn’t love a FREE $10? Happy Shopping! Make sure you use the code: SEPTCROP10
See you back here in a couple of hours for our final challenge of the day!
Happy Creating!


Wow wow wow!!! These are the best yet!!! Each challenge is better than the last!!! Getting started NOW!
I know journalling is a pain for most of us, but I really think it’s sooooo important. I don’t consider my layouts completed until it’s down. Love all the examples I”ve seen. I’ll be posting a layout soon.
LOVE the sunburst layout…how can I find it again so I can get the dimensions for cutting, when the time comes?
How can I print the directions for Marja’s layout?
11.5 x 12 white pages and protectors?