January 9, 2018
How to Create the Bee Mine Arrow Border Layout
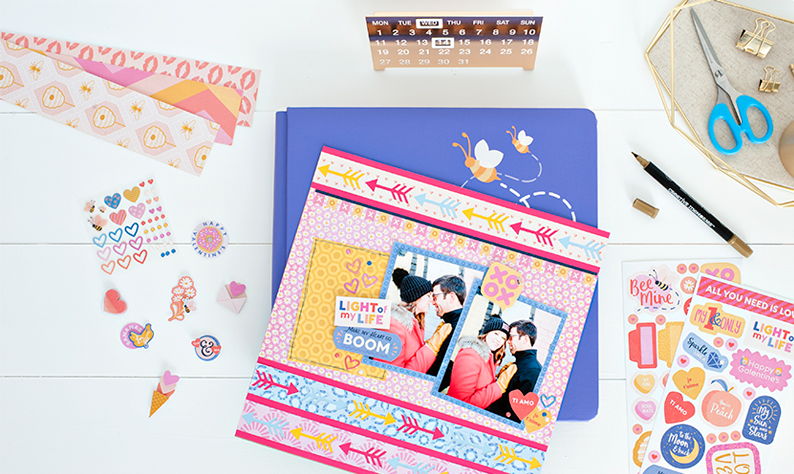
Scrapbook papers and embellishments have personalities, and Bee Mine is energizing! If you’ve been feeling a little rundown after the hustle and bustle of the holidays, get your hands on the Bee Mine collection and you’ll feel ready to create an entire album. When Melissa designed this fun Arrow Border Layout, I had to give it a try. I loved the way that she used three different colors of cardstock behind each arrow in the border design.
I always like to start scrapbook pages and projects by organizing my supplies. Here’s a view of how I started this project, as well as a complete list of ingredients. If you want to match Melissa’s layout exactly as designed, make sure that you match the five Bee Mine scrapbook papers to the images below.
 What You’ll Need to Create This Layout:
- 5 papers from the Bee Mine 12×12 Designer Paper Pack
- Bee Mine Stickers
- Bee Mine Embellishments
- Raspberry 12×12 Cardstock
- Cloud 12×12 Cardstock
- Goldenrod 12×12 Cardstock
- Blue Photo-safe Pen (available in the Pens & Pouch)
- 12-inch Trimmer – Tip: start 2018 with some fresh Replacement Blades
- The Original Border Maker System
- Arrow Border Maker Cartridge
- Tape Runner
- Repositionable Tape Runner Refill
- Foam Squares
- Scissors (not pictured)
- Personal Trimmer (not pictured)
How to Create This Layout:
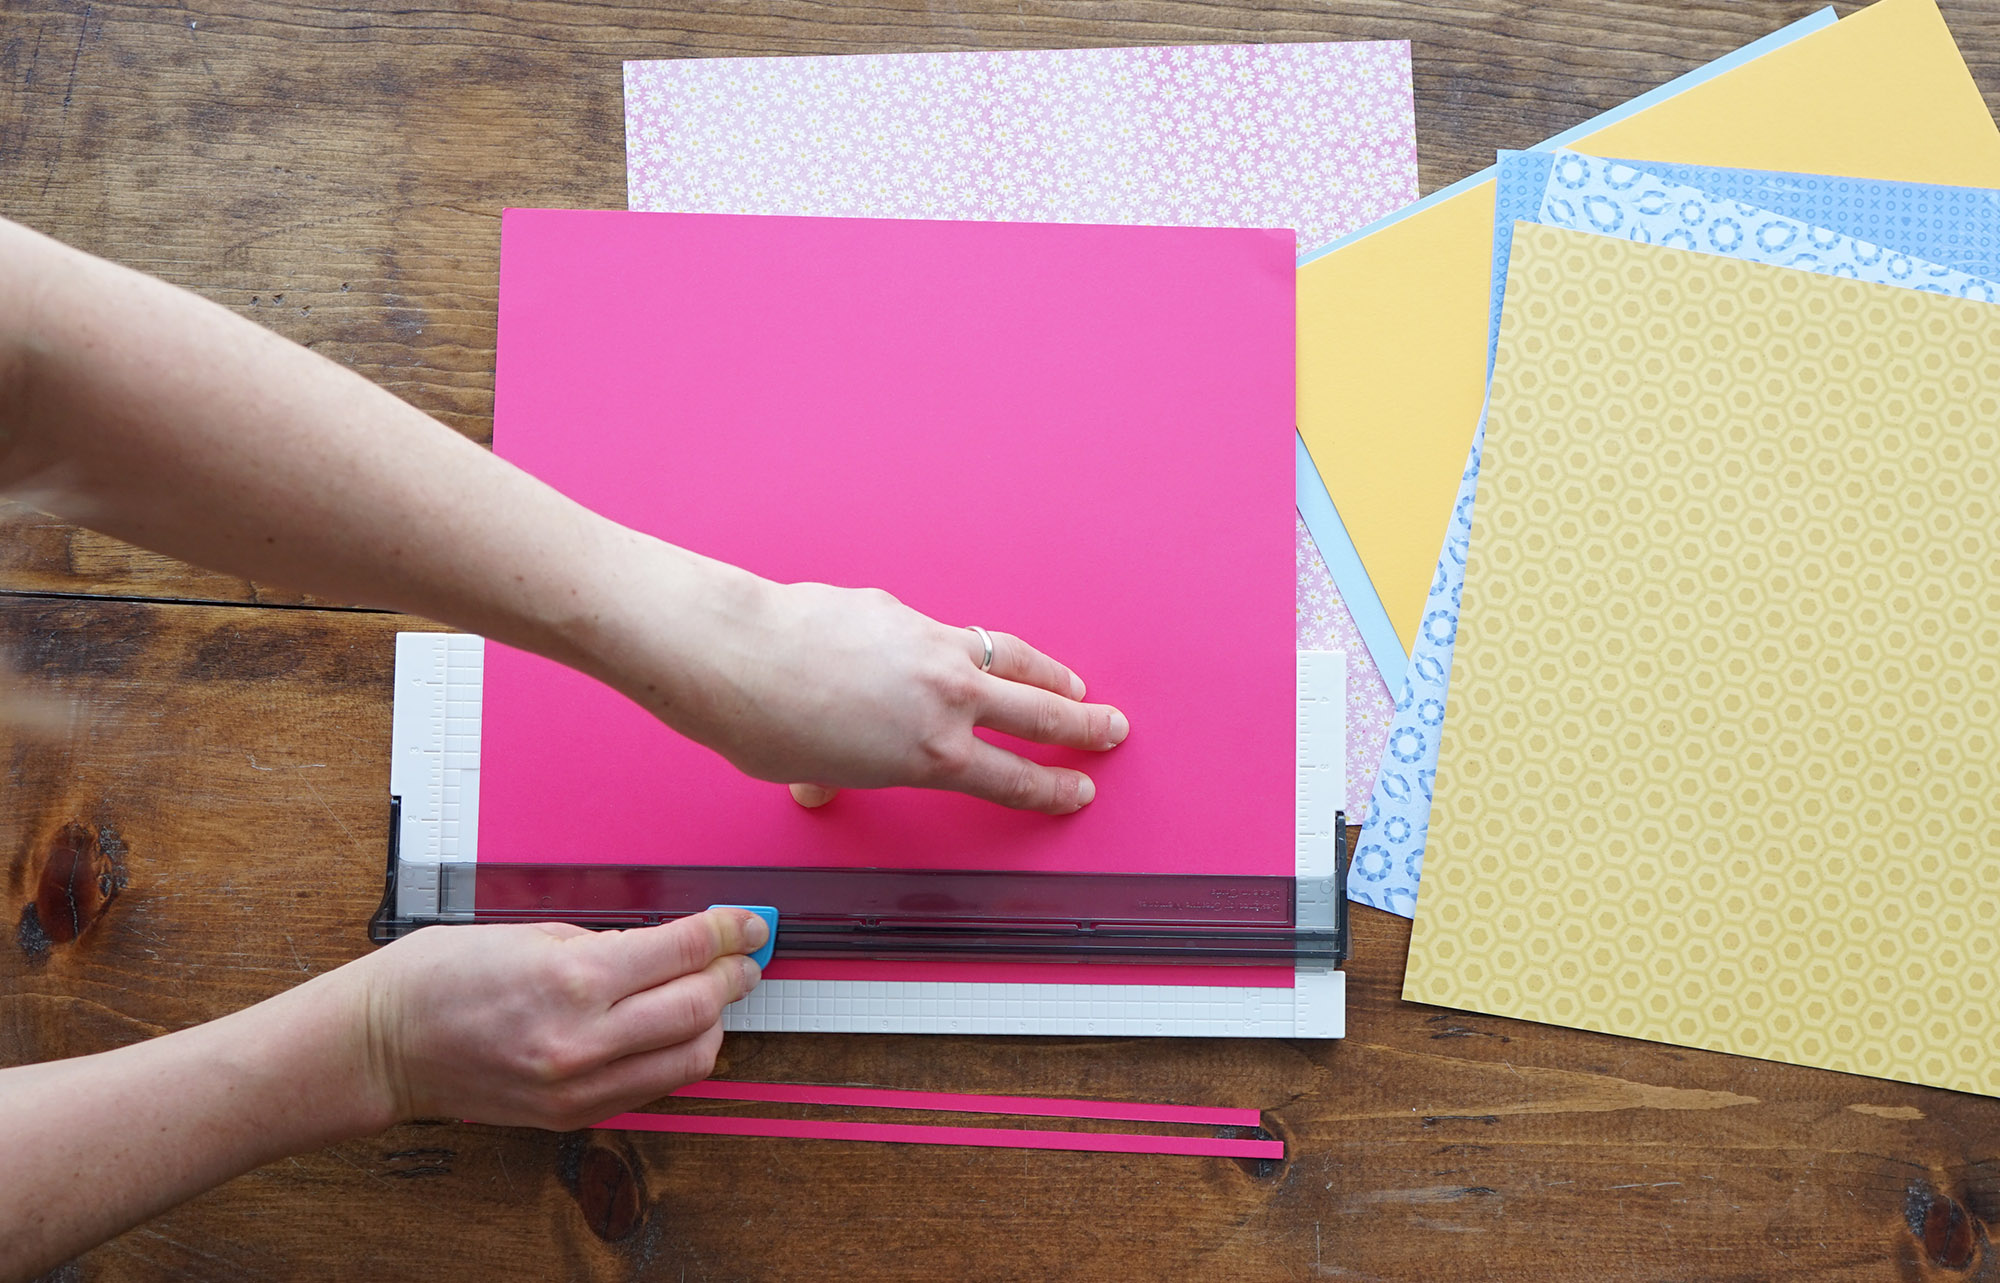
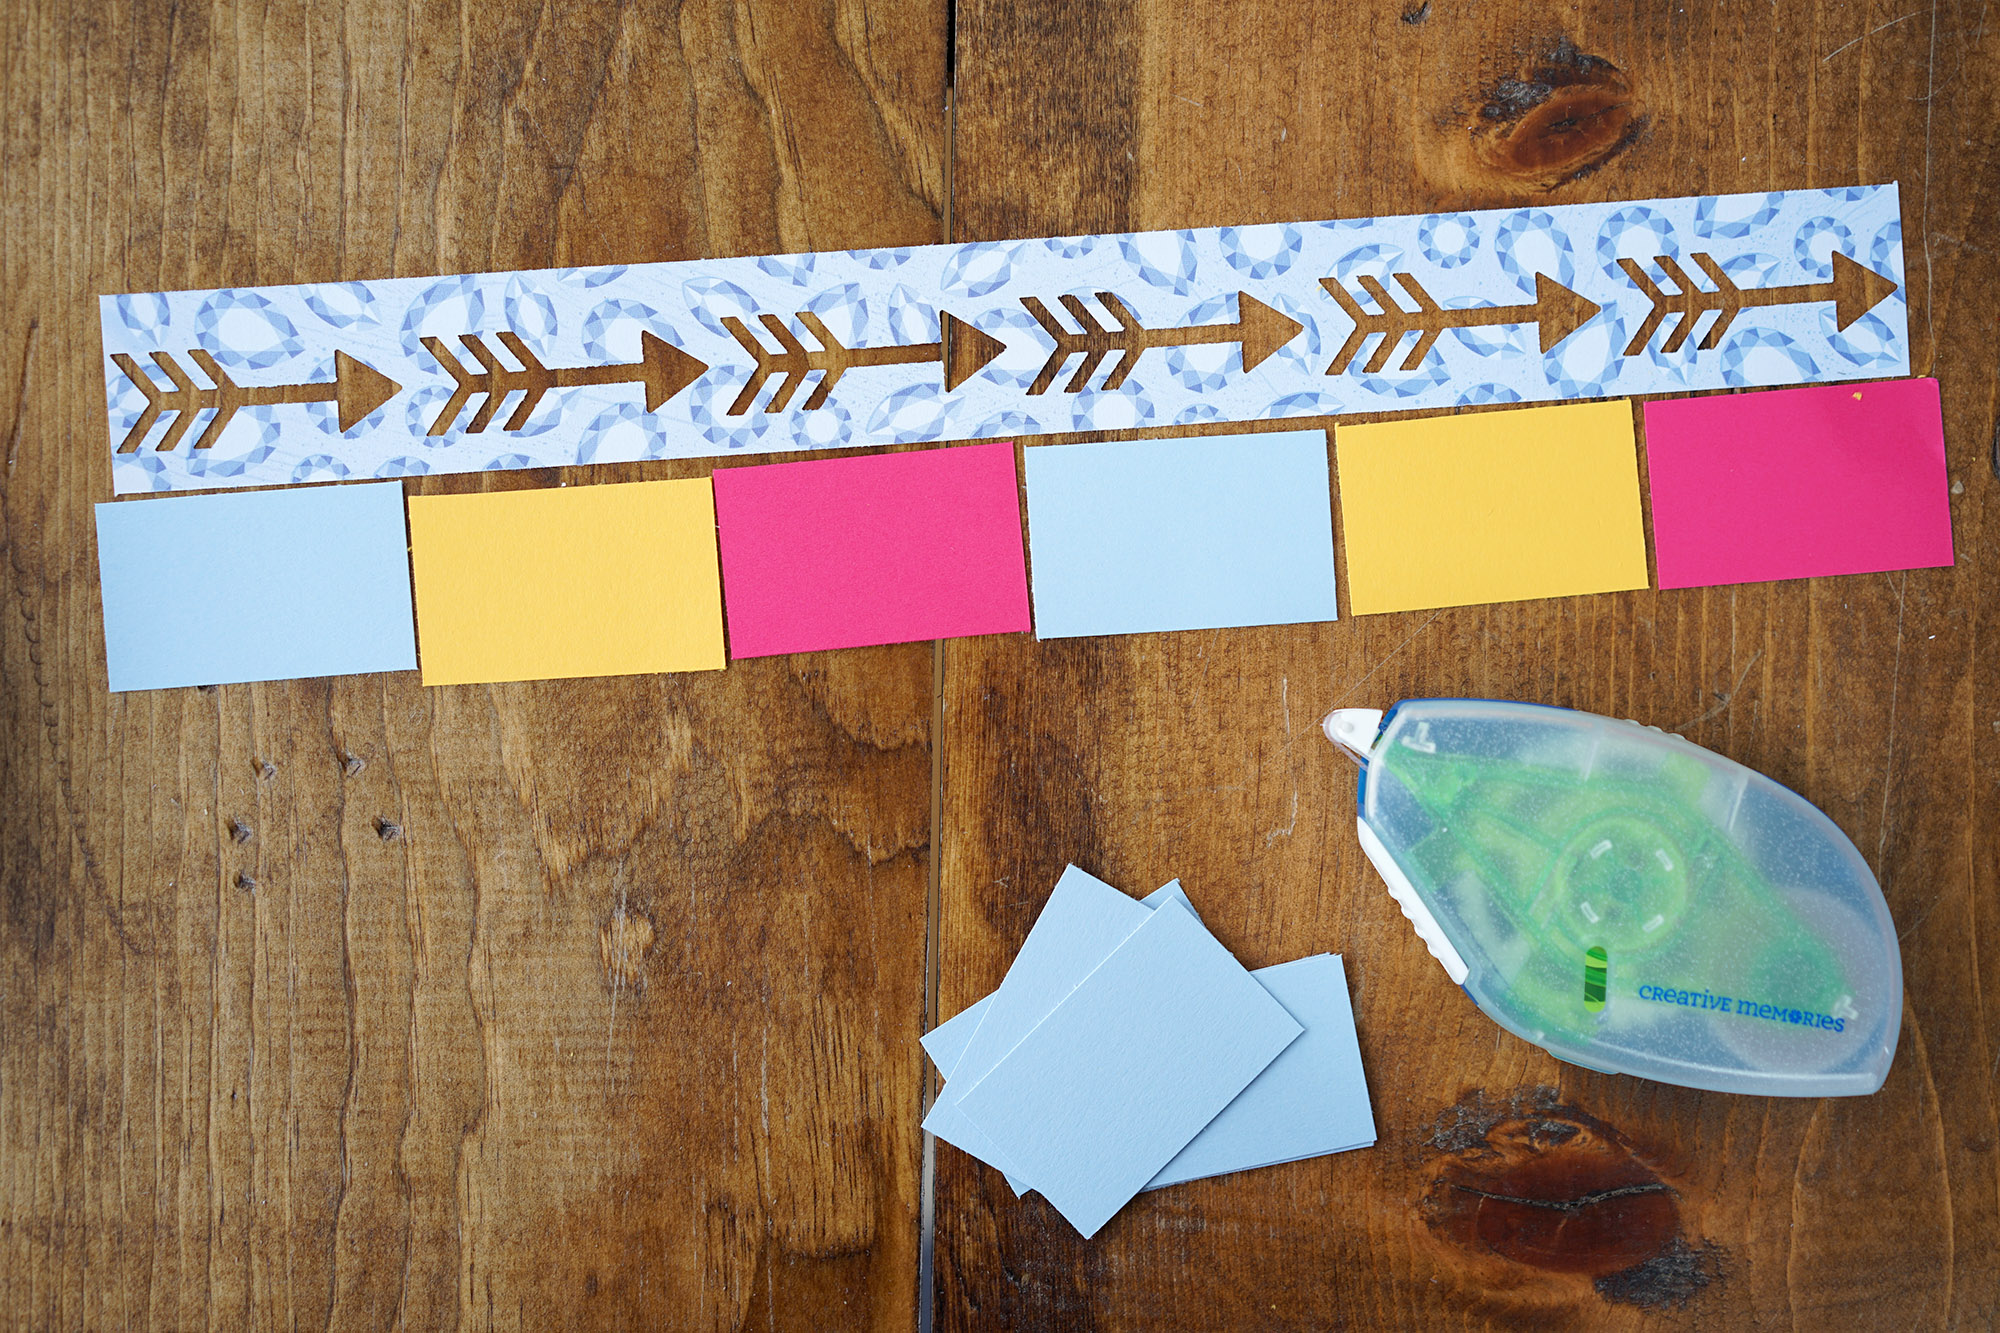
Use the 12-inch Trimmer to cut 5 – 0.25″ x 12″ strips of Raspberry Cardstock.
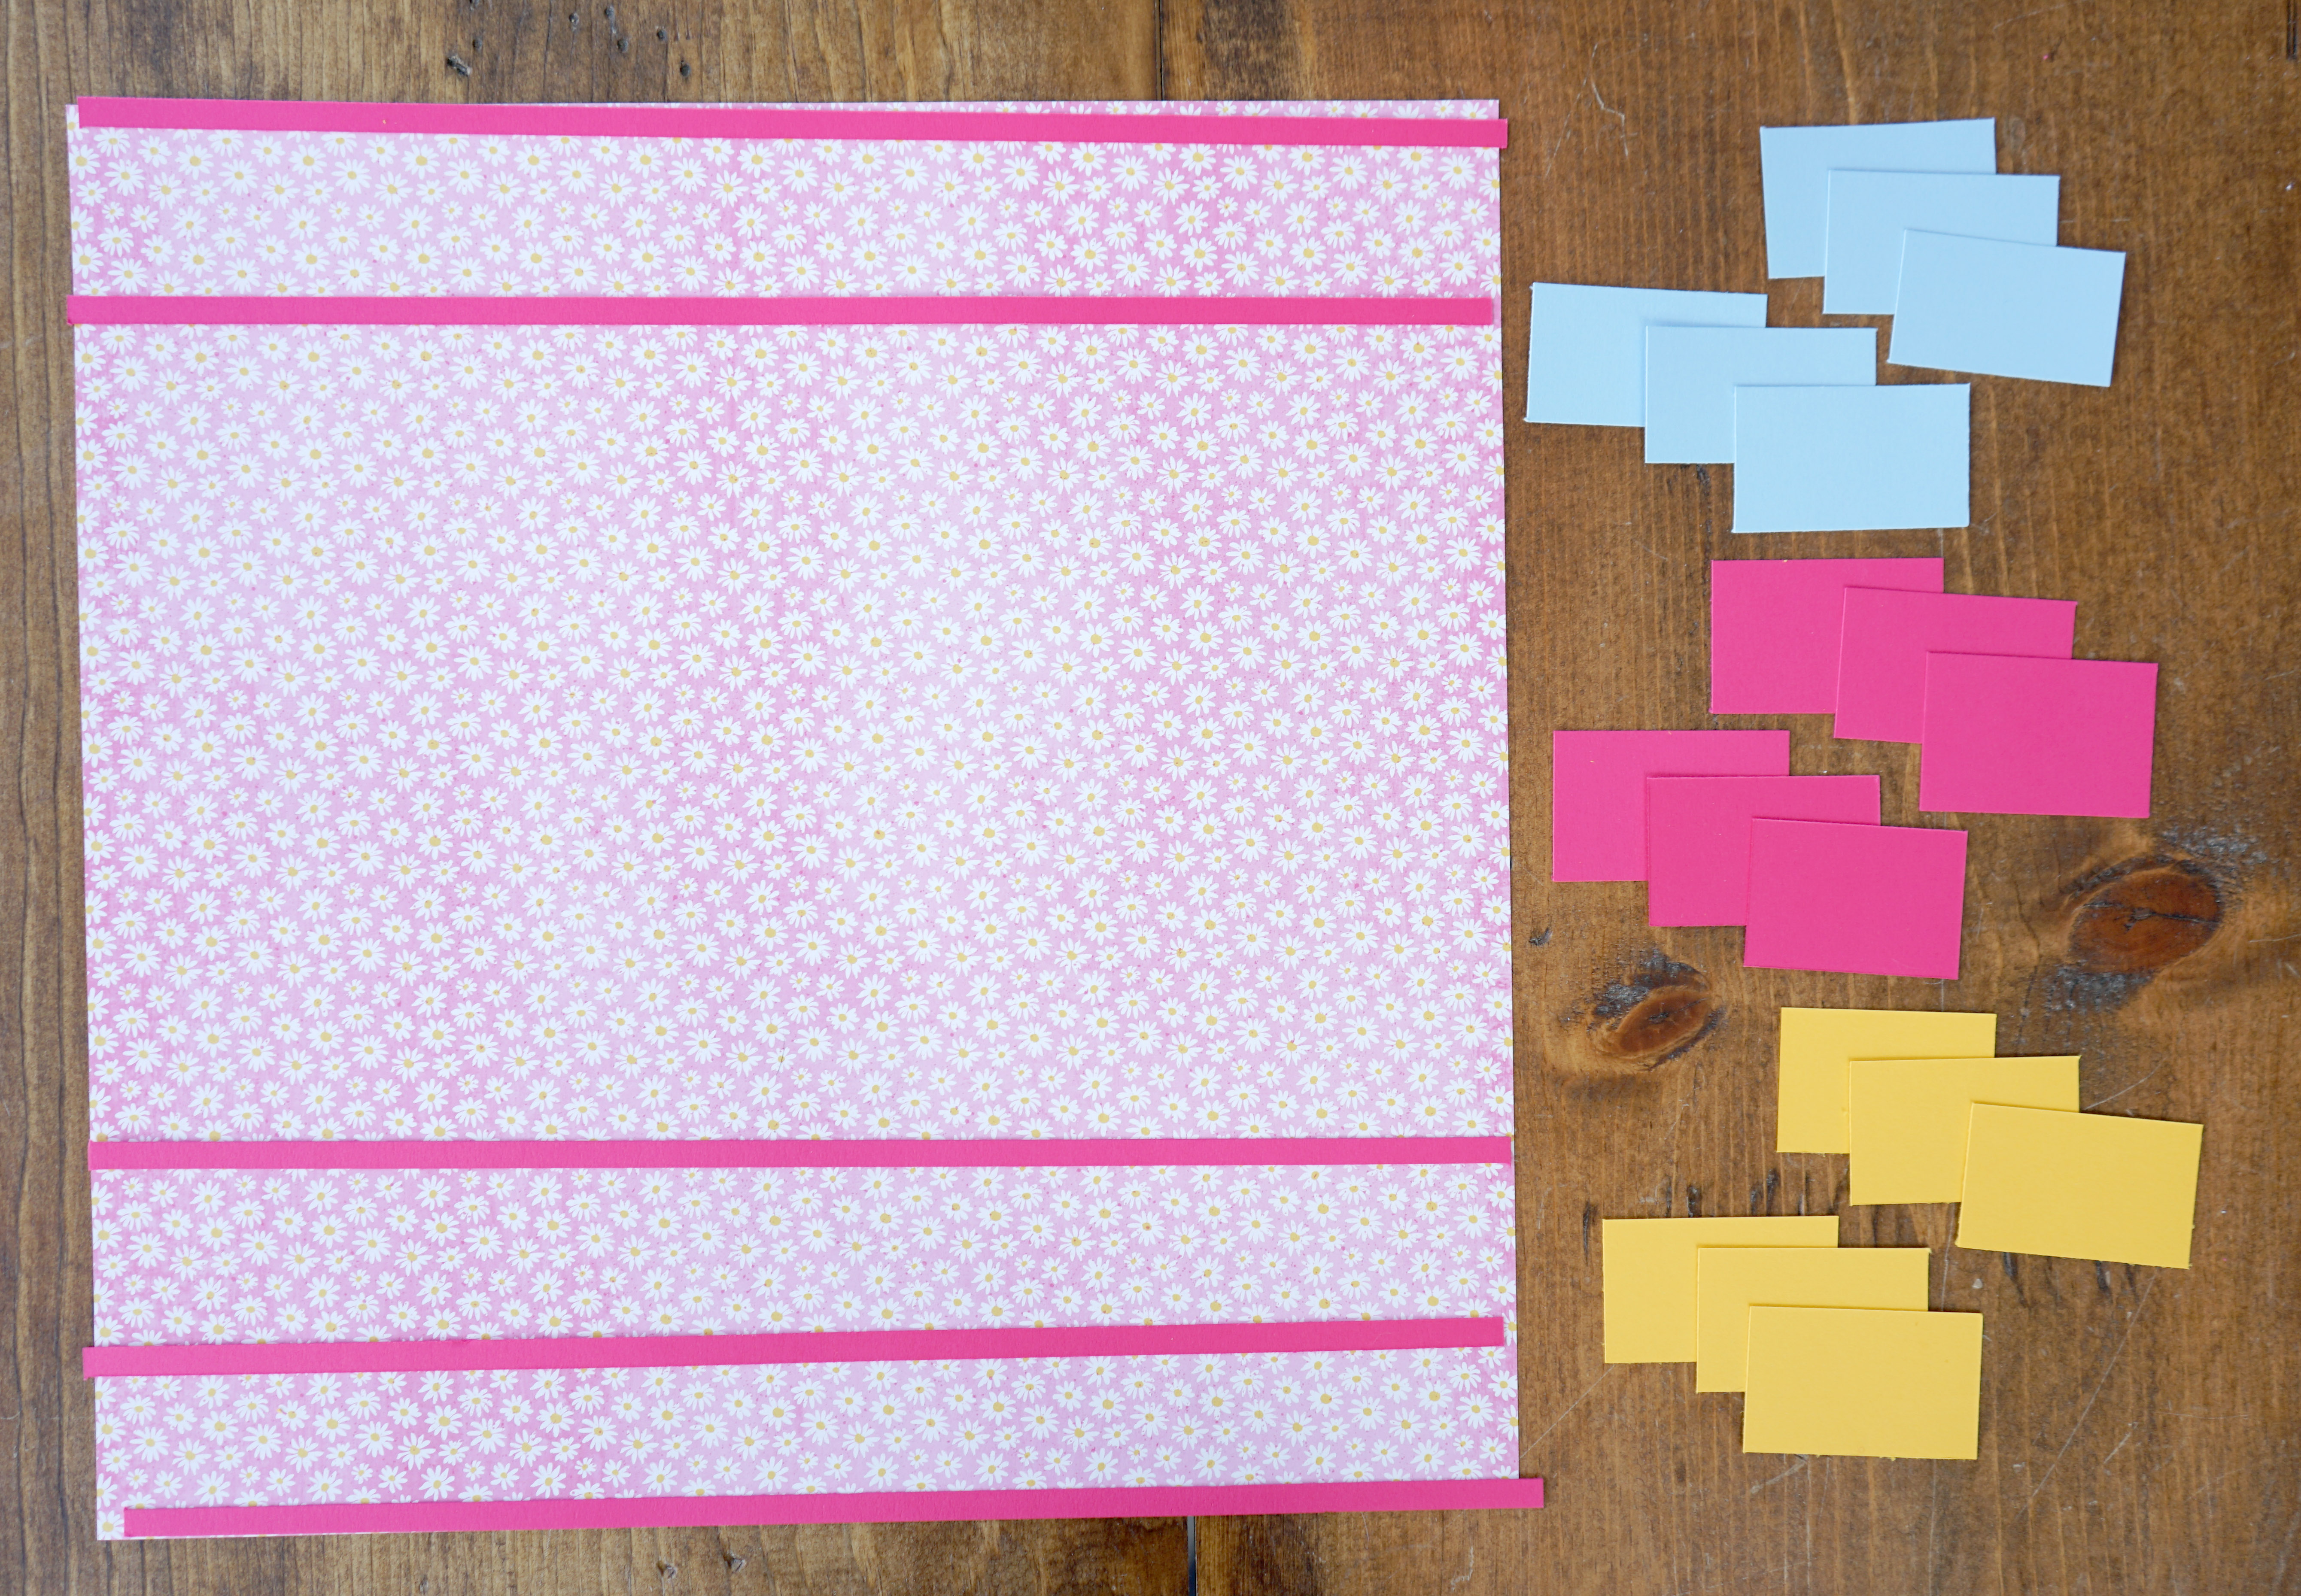
- 5 strips of Raspberry Cardstock in 0.25″ x 12″ strips
Next, use the 12-inch Trimmer to cut a 2″ x 12″ strip in your Goldenrod, Cloud and Raspberry Cardstock. Take each 2″ x 12″ strip and cut it again until you have at least 6 pieces – each 2″ wide x 1.25″ high – in every color.
Okay, it’s time to pick up your Original Border Maker System and Arrow Border Maker Cartridge.
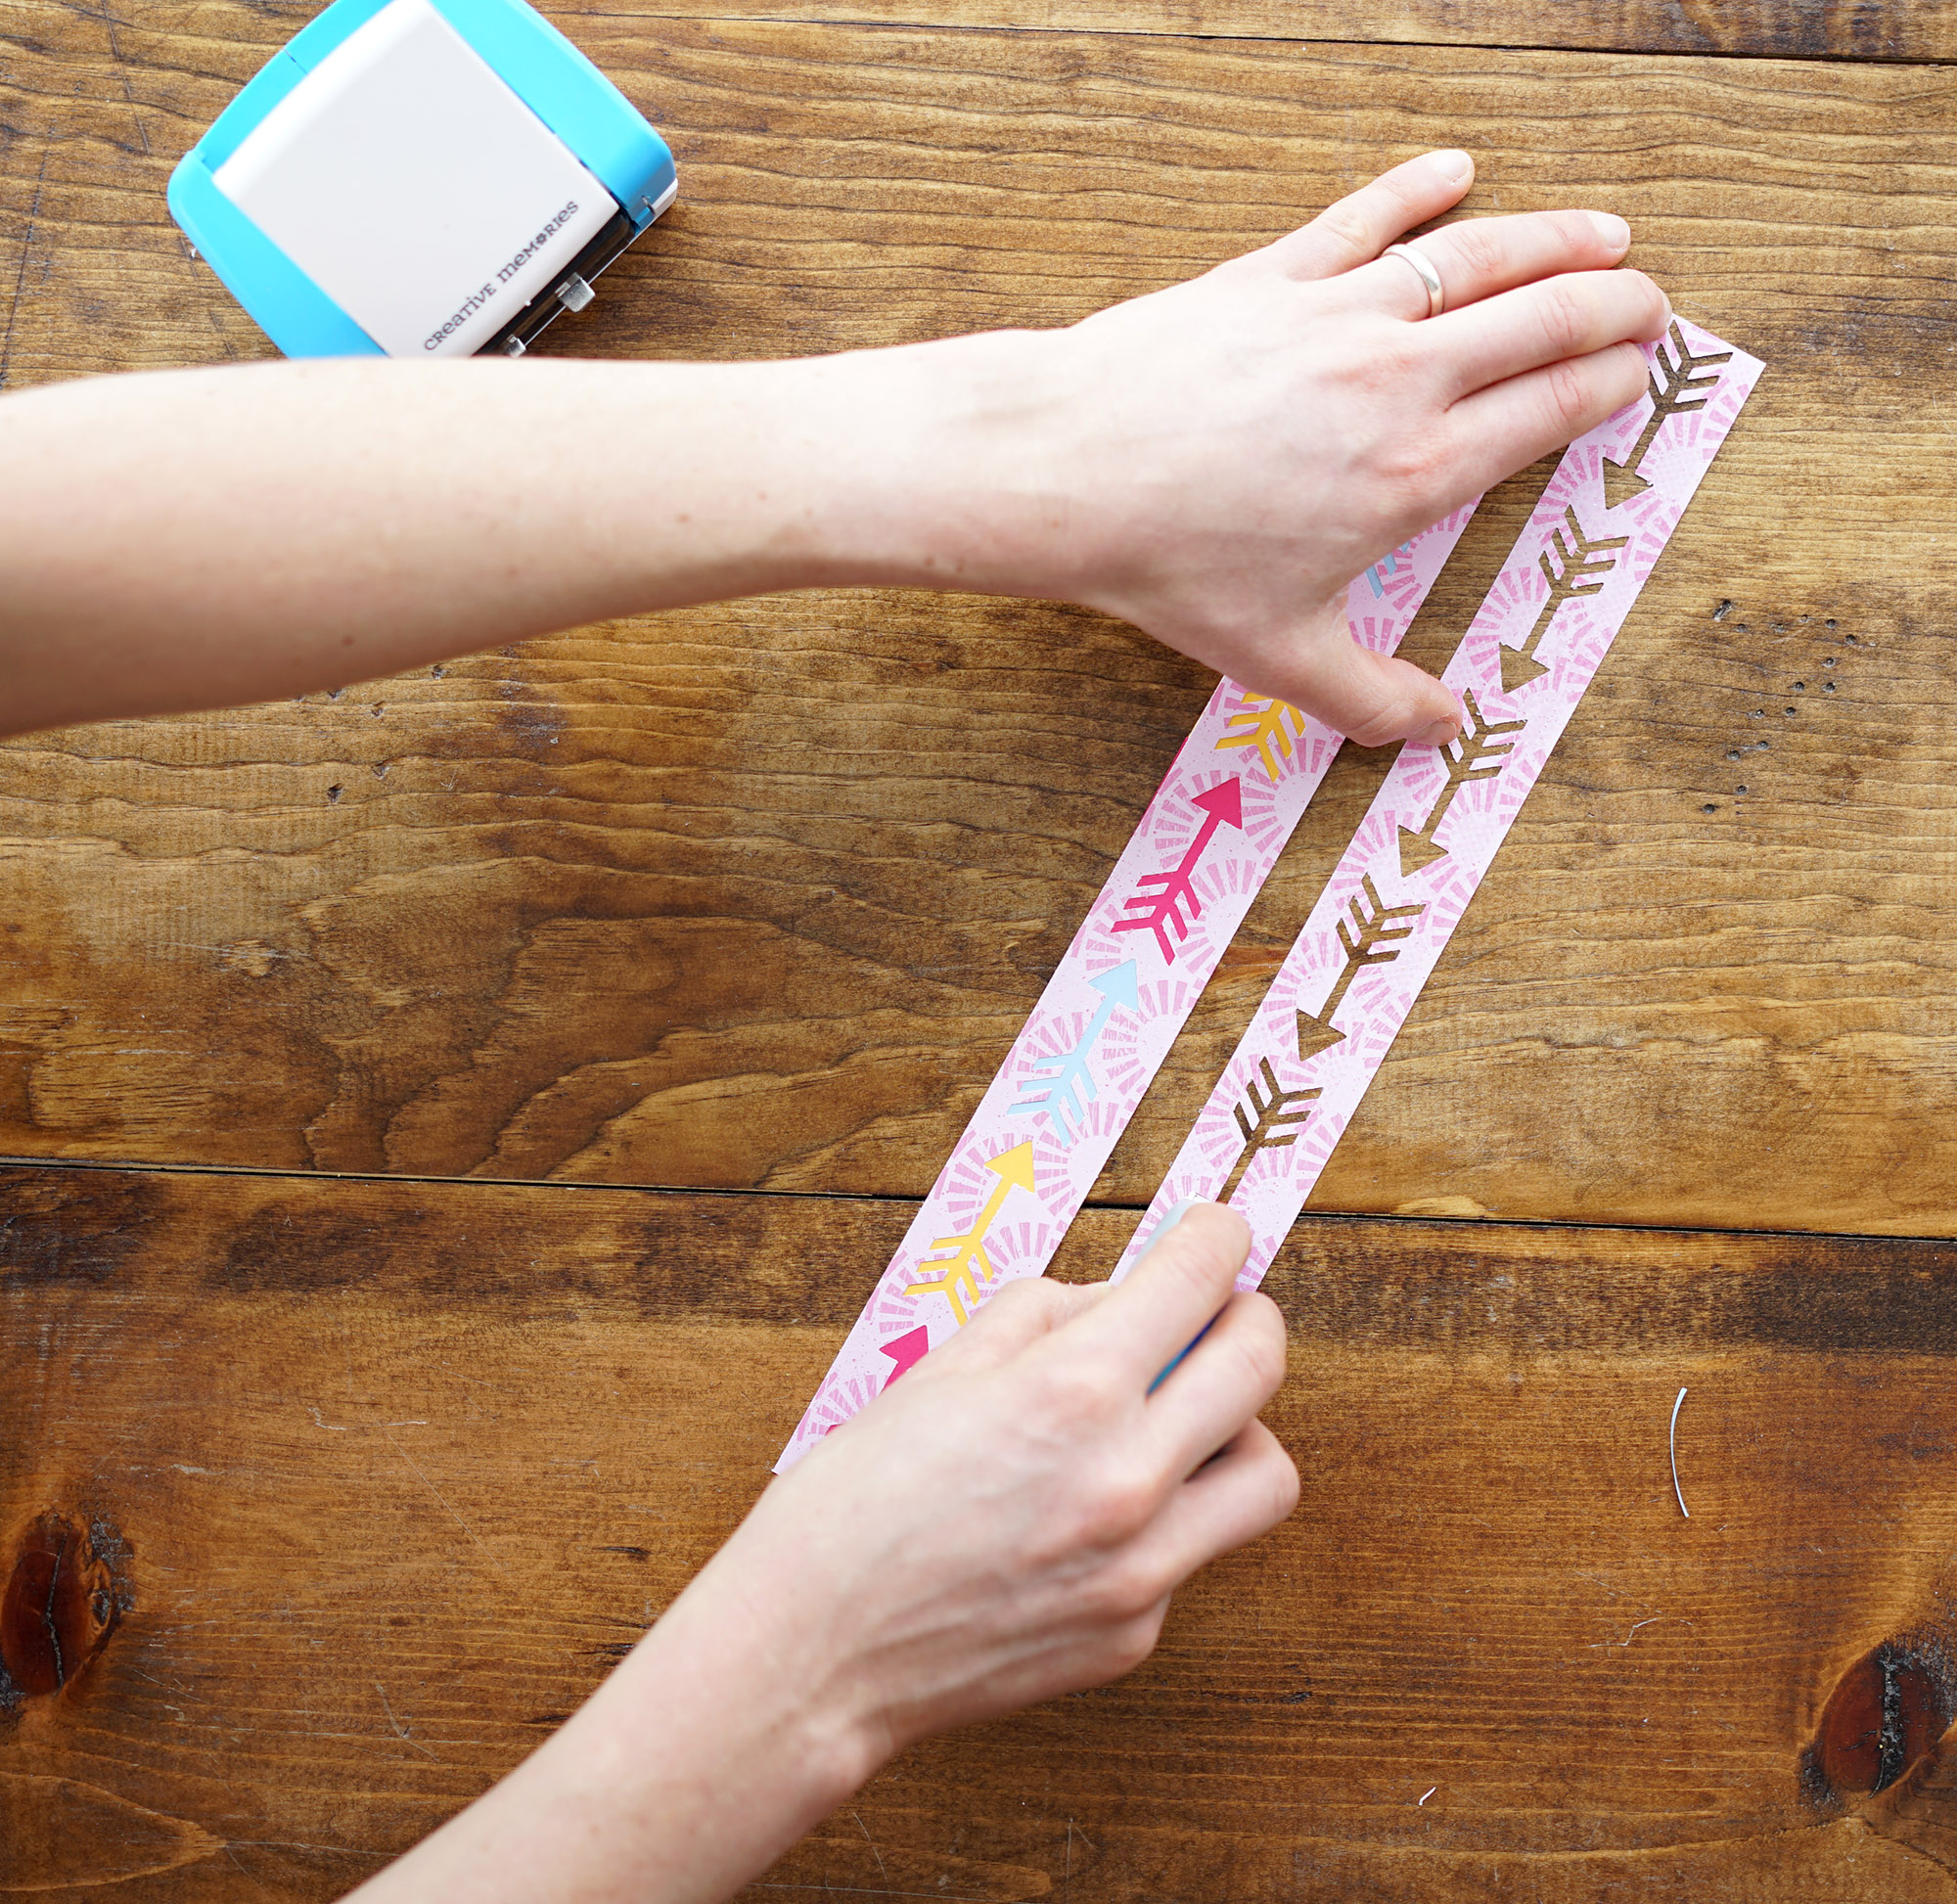
Get your mini heart patterned paper (shown below flipped over so you see the lips) and diamond paper.
Flip the paper with the mini hearts over so that you punch with the lips pattern facing up. You will want to pay attention to the direction of the mini hearts before you punch the border to ensure that the hearts are facing up instead of down when you flip the paper back over.
Punch the full length of the 12″ paper. (Hint: Check out how to use the Original Border Maker System.) Then, flip the paper back over and pick up the 12-inch Trimmer and trim the paper to 1.25″ tall and 12″ wide.
Your diamond paper will have the pink semi-circle pattern on the other side. You can use that one sheet of designer paper to create your two bottom borders.
![]()
Once you have punched and trimmed all three borders, take each border and lay out your cardstock strips in whatever color pattern you would like to follow.
Use your Repositionable Tape Runner Refill to cover the back of the 12″ border. (Hint: Watch how to use your Repositionable Tape Runner Refill). Then, adhere the cardstock pieces to the back of each border.
Each cut out arrow should have a different color behind it. When you have all 6 pieces of cardstock adhered to the border, flip it back over. Use your scissors to trim any excess cardstock away from the edge of the border.
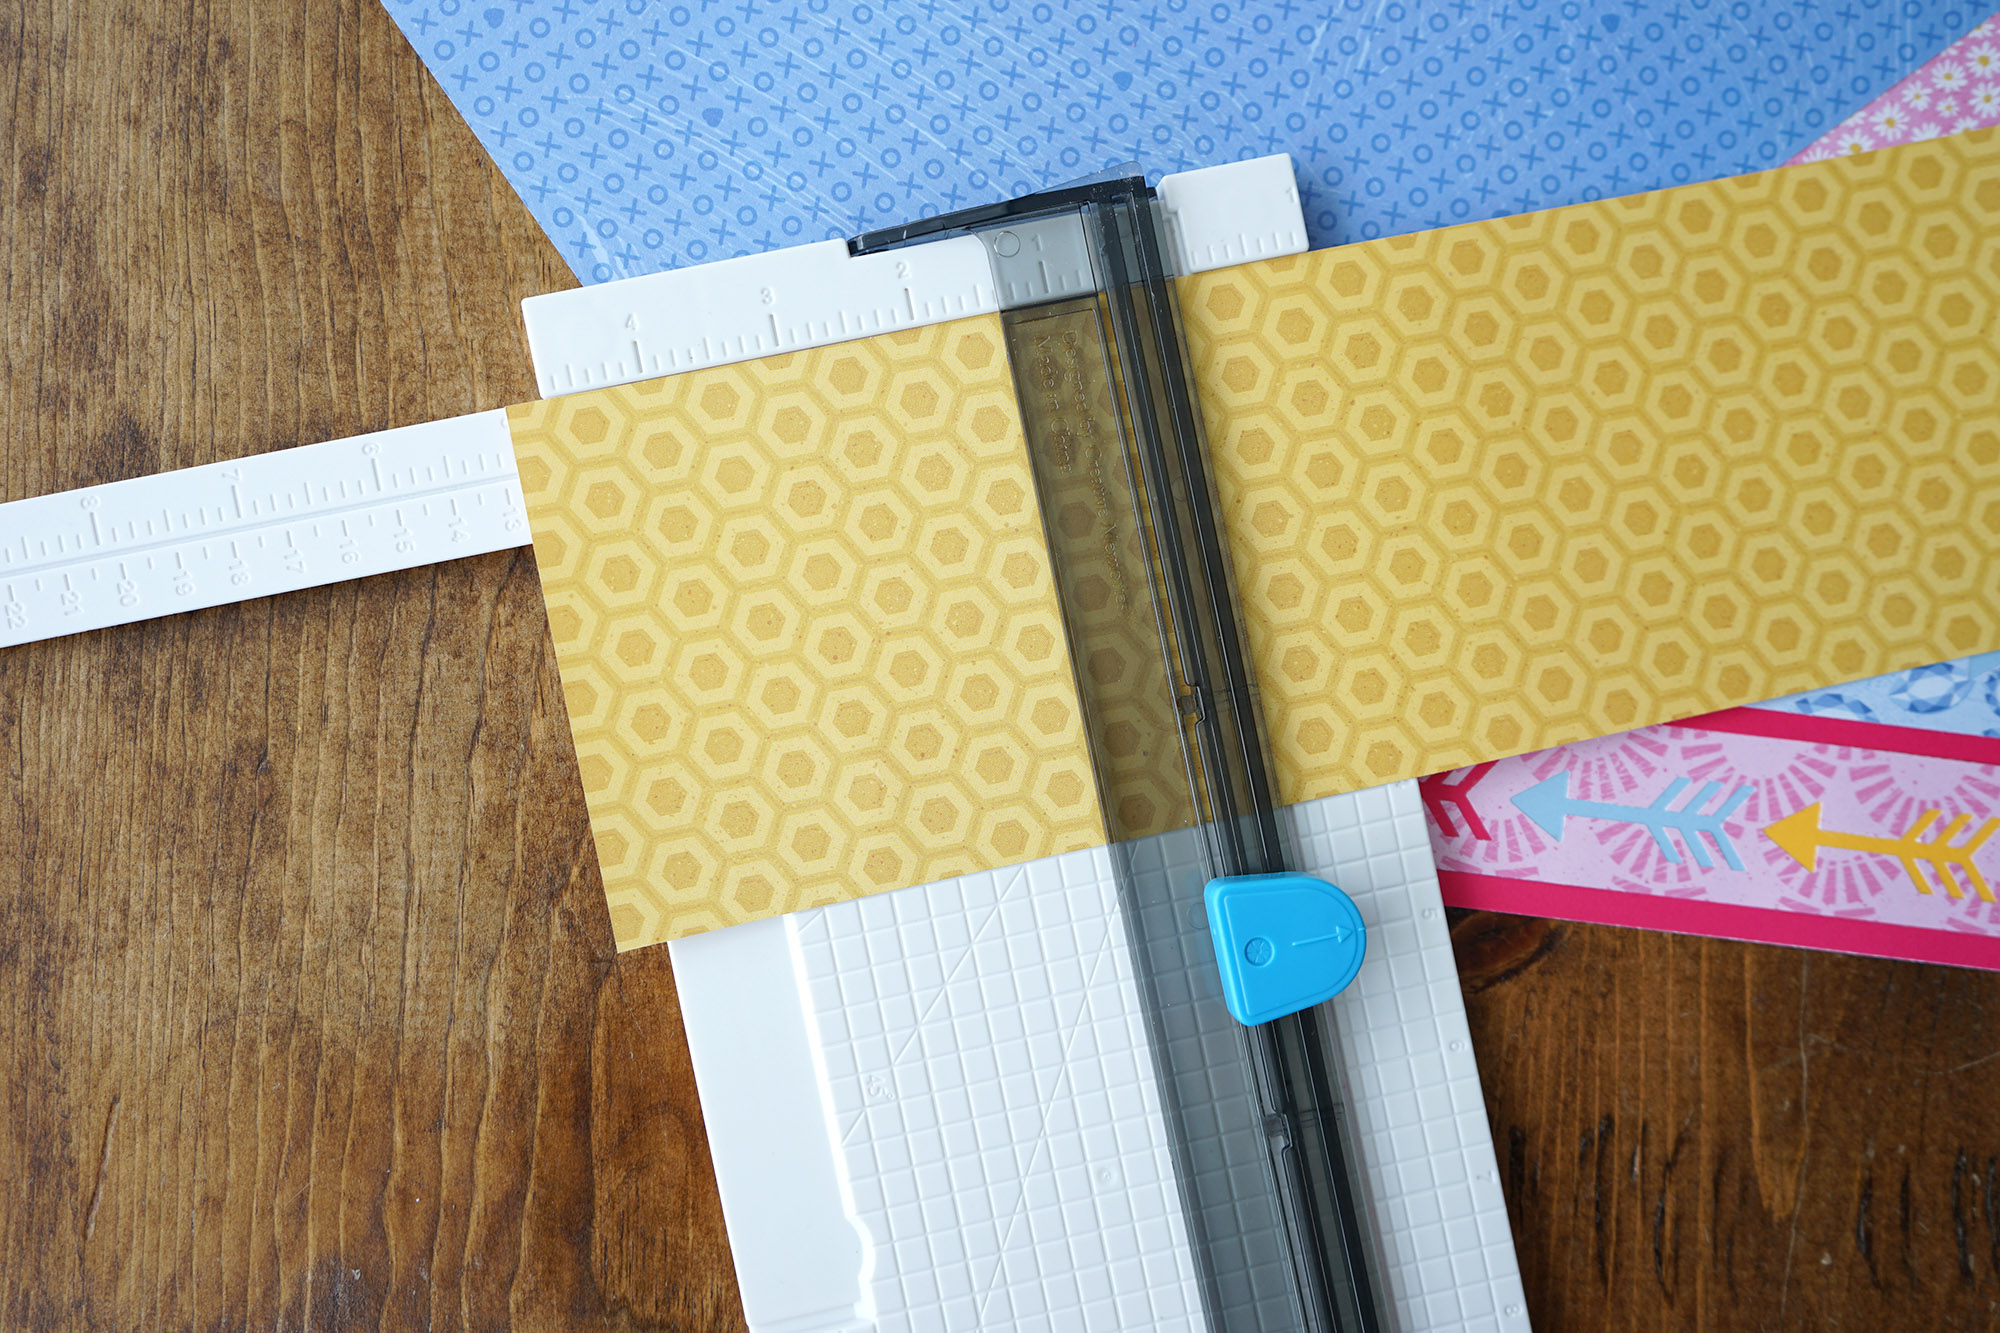
Now, find your yellow honeycomb pattern designer paper and blue XOXO designer paper. Cut 3 – 4″ x 5″ rectangles. You’ll end up with one yellow honeycomb rectangle and two blue XOXO rectangles.
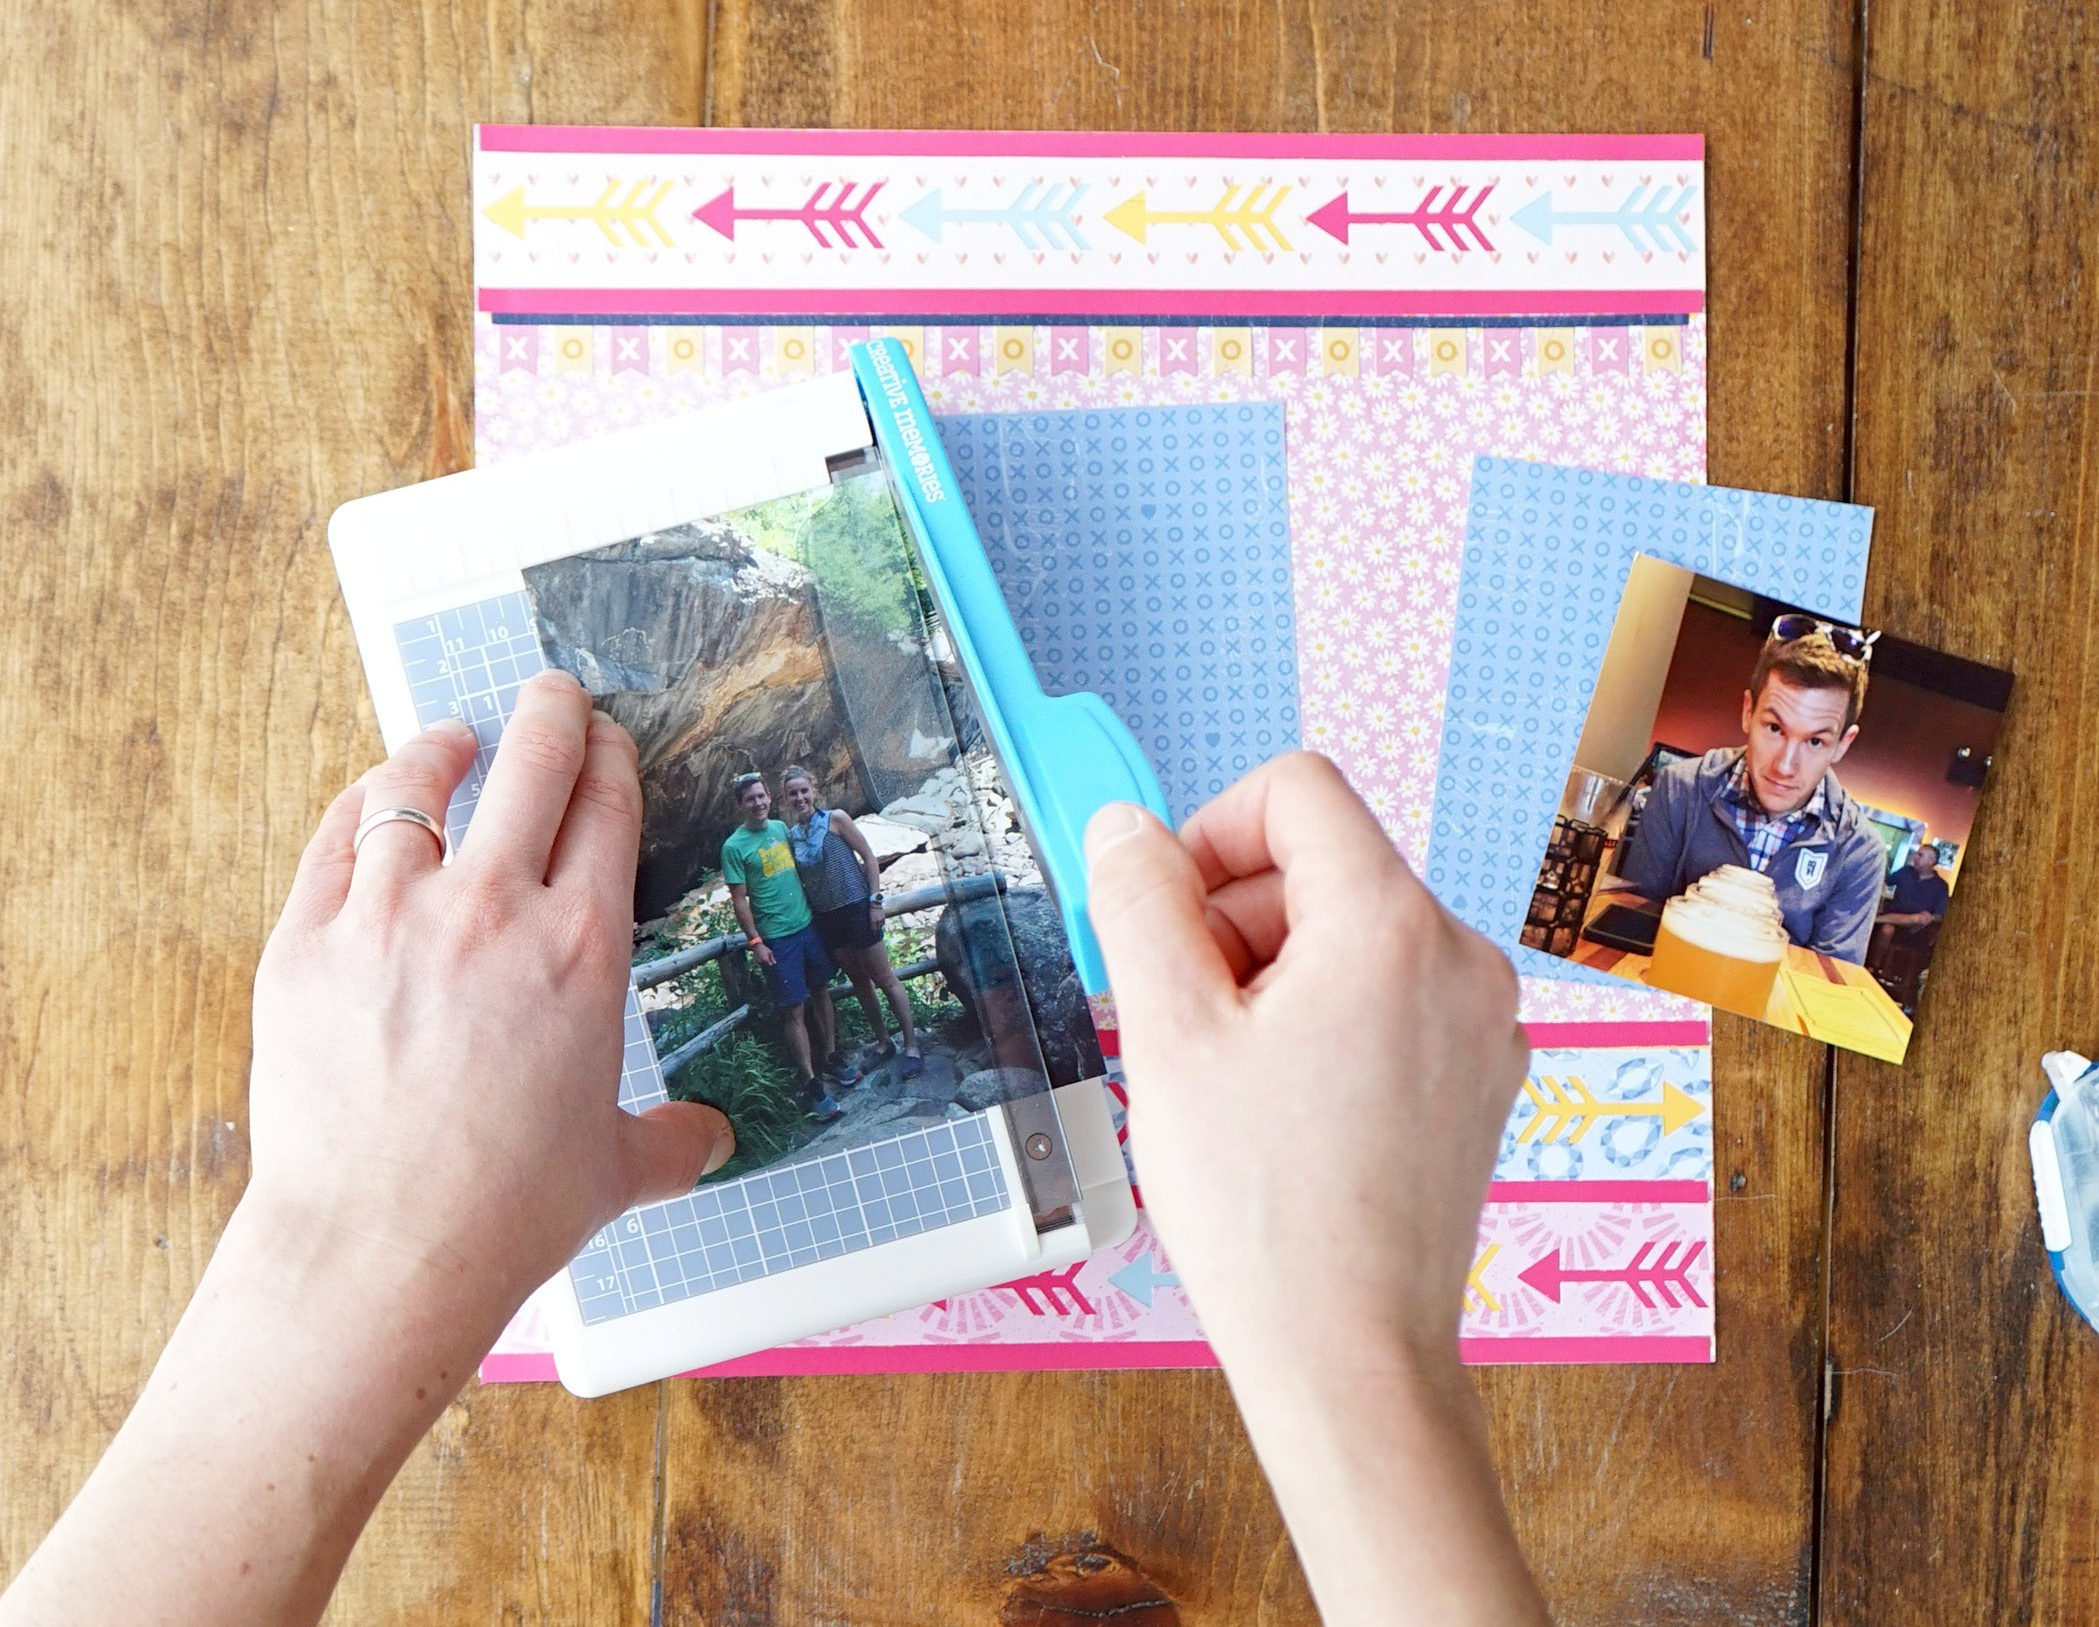
Eventually, you will adhere two photos to these blue XOXO rectangles with a Tape Runner. Before you do that, you will need to choose your two photos and trim them to 3.5″ wide and 4.5″ tall. Depending on which photos you choose to use in your layout, you may need to adjust the size of the blue rectangles. If you do, just make sure that you trim your photos .25″ on the right, left, top and bottom sides so that you end up with a photo that is .5″ shorter in width and height than your blue rectangle.
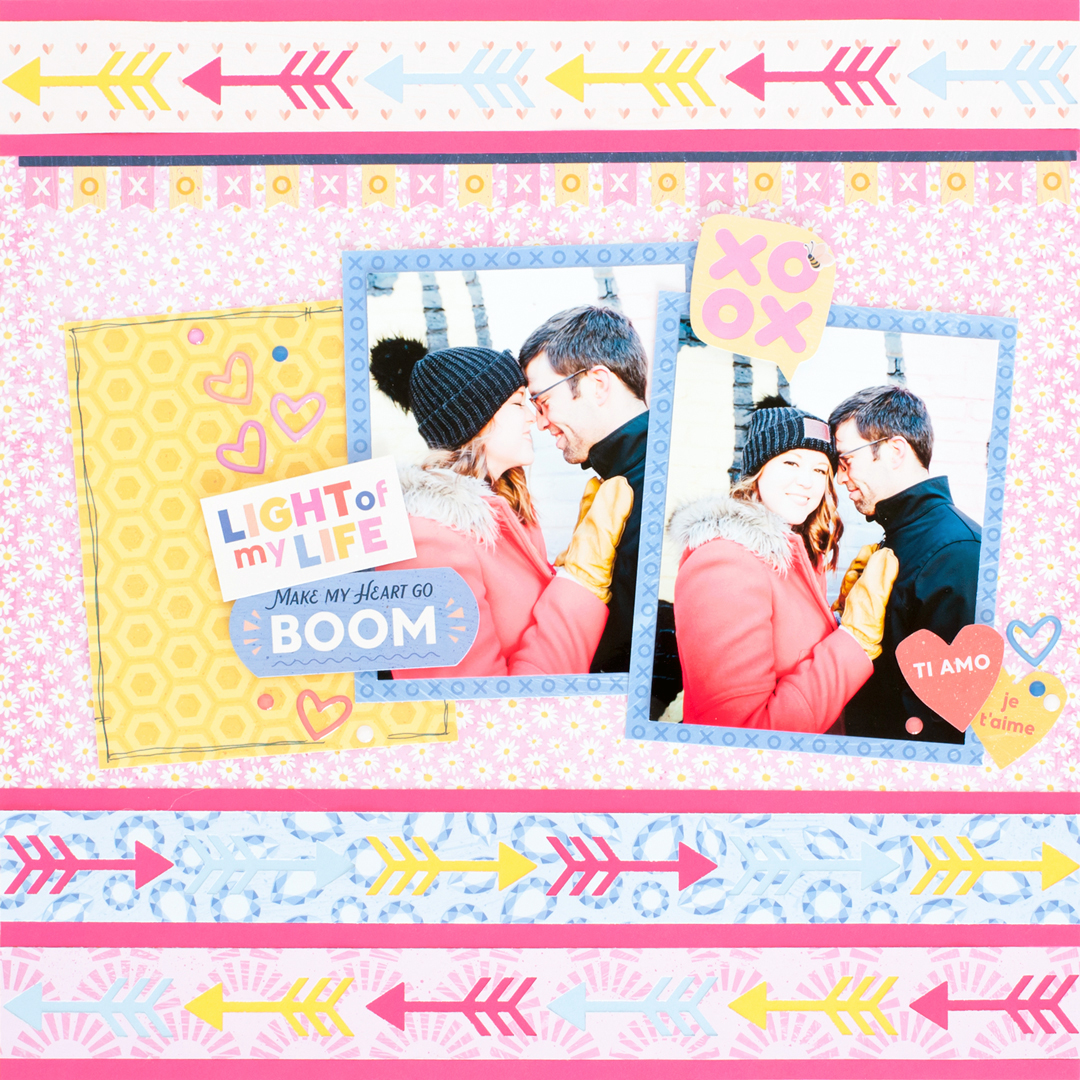
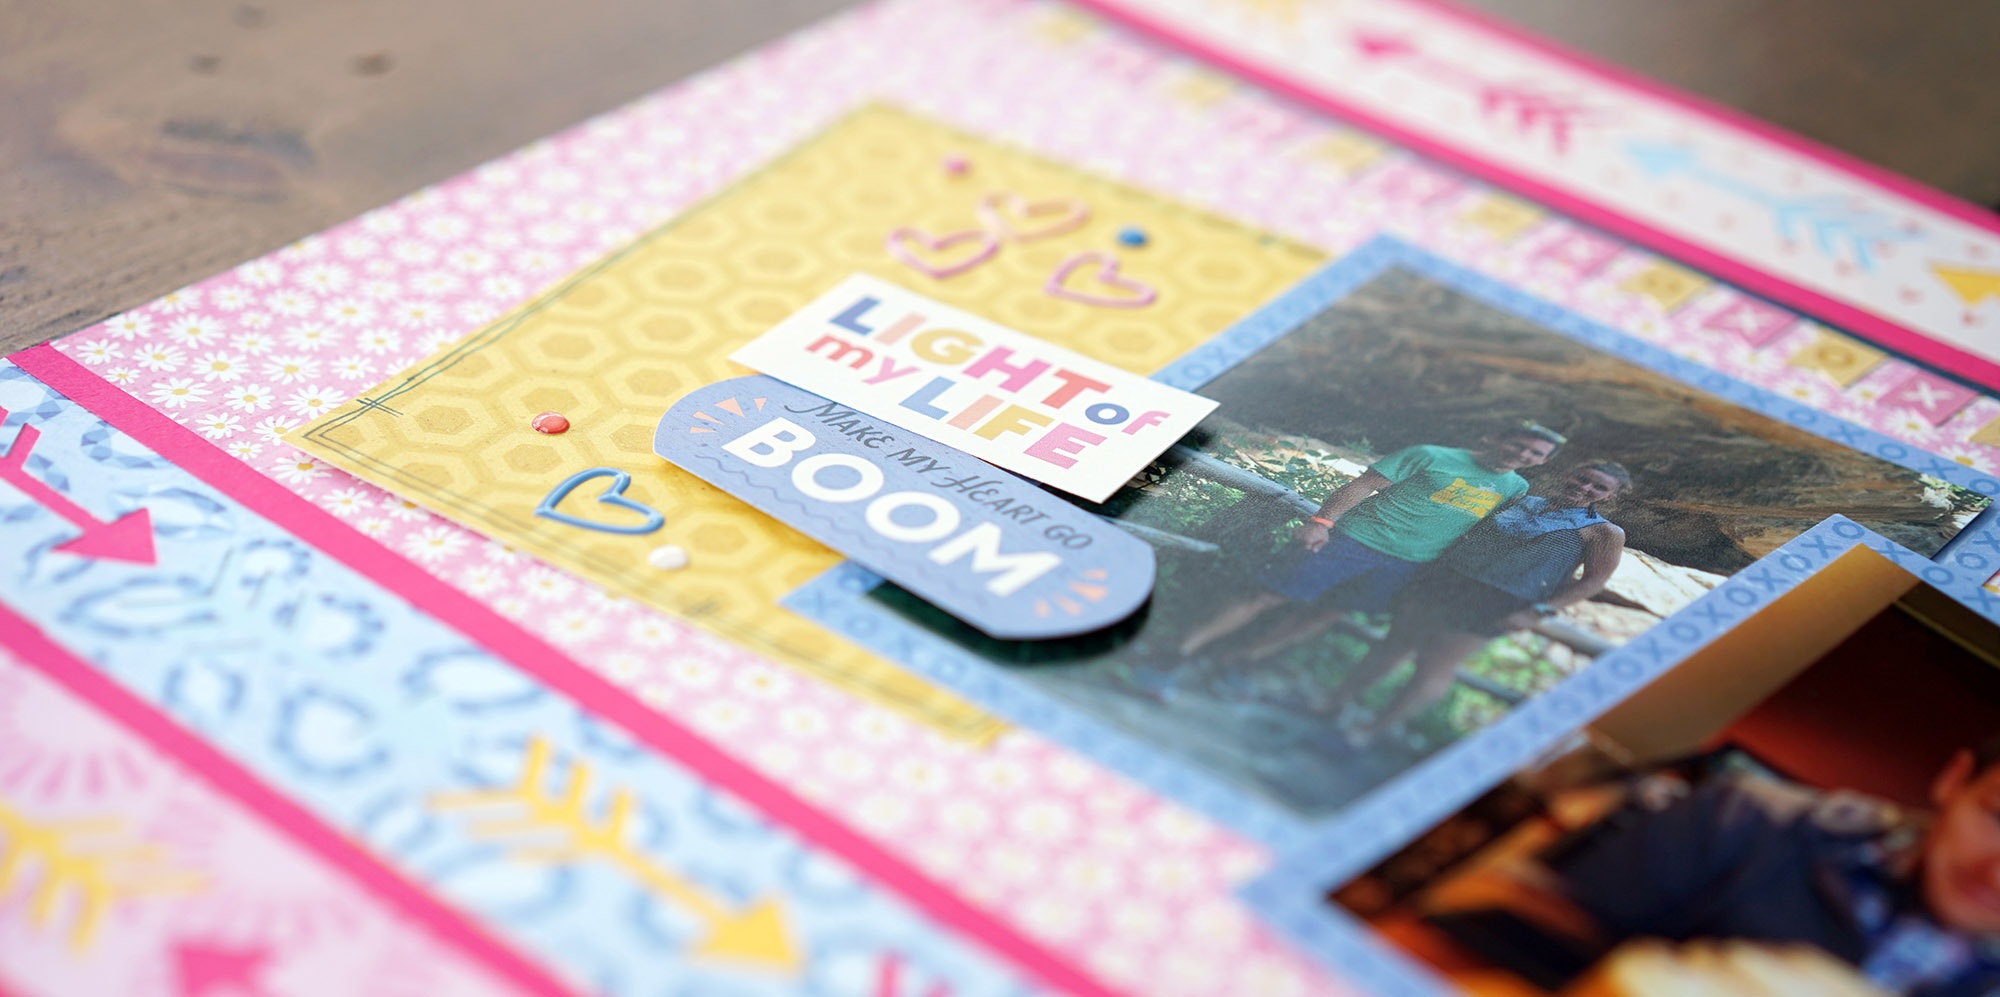
Now that all of your pieces are prepped, use the finished layout at the top of this post as a guide. Start to adhere all of your pieces to the pink daisy designer paper in the following order:
- Adhere one 12″ x .25″ Raspberry Cardstock strip to the bottom of the page. I like to use the Repositionable Tape Runner Refill in the Tape Runner case for small pieces like this because I never lay them down straight the first time.
- Adhere one 12″ finished border above that Raspberry Cardstock strip. If you are following the exact layout Melissa designed, use the pink semi-circle border here.
- Adhere another Raspberry Cardstock strip above this border.
- Adhere your second border with the arrows pointing the opposite direction from the border below it. This will be your diamond border if you are using Bee Mine.
- Adhere another Raspberry Cardstock strip above this border.
- Then, adhere another Raspberry Cardstock strip to the top of the layout.
- Right beneath it, adhere your final arrow border. If you are using the mini heart pattern paper, make sure that the heart pattern has the hearts right-side up.
- Adhere the last Raspberry Cardstock strip beneath the border.
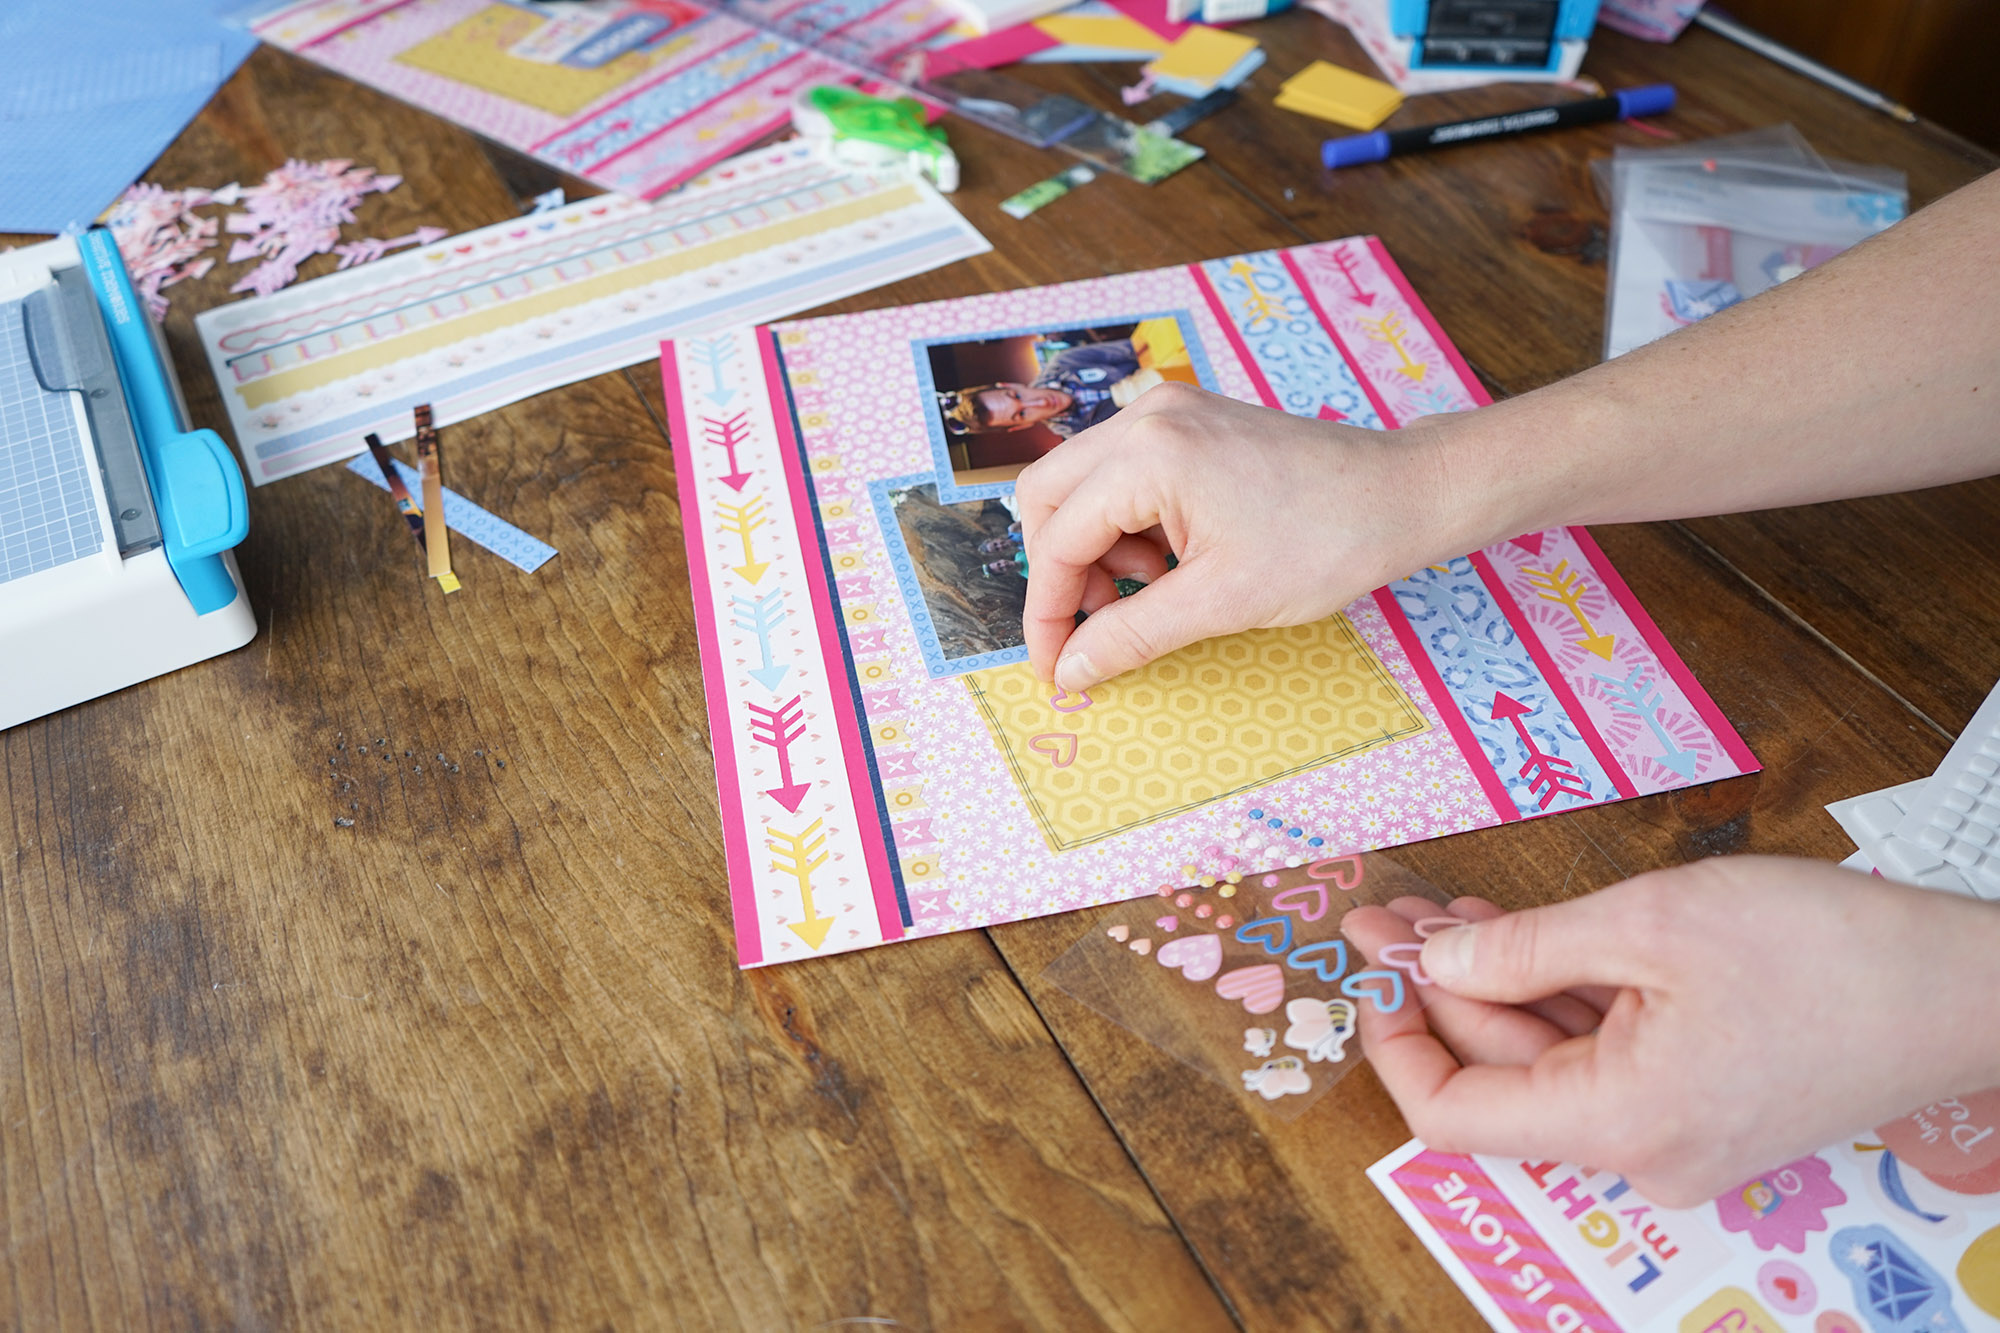
- Lay out the yellow honeycomb rectangle and two blue XOXO rectangles on the sheet. Depending on the photos that you want to use, you may choose to adjust the size of the blue XOXO rectangles to match the size of your photos.
- Before adhering the rectangles to the page, peel the XOXO sticker border and place it under the last Raspberry Cardstock strip that you adhered to the sheet.
- Then, adhere the yellow rectangle with the Tape Runner.
- Then, adhere one blue rectangle overlapping the yellow honeycomb rectangle.
- Adhere your photo to this blue rectangle.
- Adhere the last blue rectangle overlapping your first photo.
- Adhere your last photo to this blue rectangle.
- Now… the best part! Use your Bee Mine Embellishments and Stickers, as well as your Foam Squares to embellish as you would like!


Once you are pleased with your embellishments on the page, step back and enjoy! Make sure that you share your Bee Mine layouts with #CreativeMemories.
![]()

Love these papers! Any layout would bring a smile to my face!
Love it, thanks for the tutorial!
[…] Your special someone will love the Arrow Border Layout with its bright colors, flirty sentiments and playful feel. Find out how to make it now! […]
beaurtiful page