September 6, 2019
Go Out On a Limb with this Fun Leaf Scrapbook Border
Someone once said, “Go out on a limb, that’s where all the fruit is.” This saying reflects the importance of taking some risks in life. And even though it may seem scary, doing so is often rewarding in more ways than one. The same can be said about scrapbooking! Anyone can create a simple layout or border, but when you take some creative risks and try something different, the results often speak for themselves. Check out these three leaf scrapbook borders for proof of just how important it is to truly “go out on a limb.”
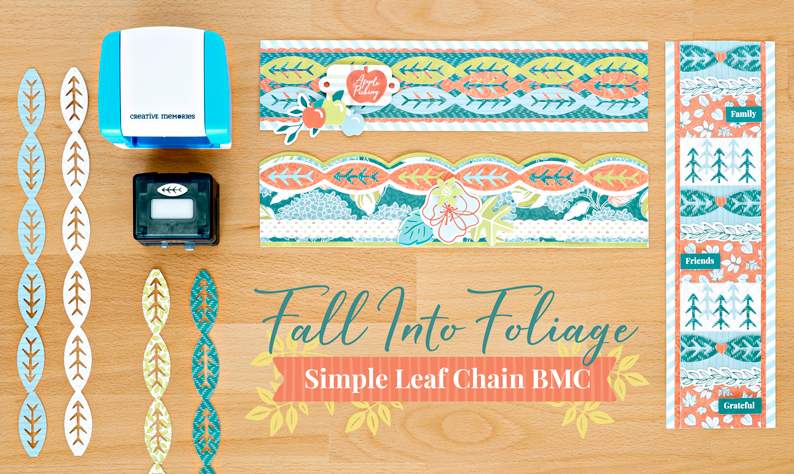
To create these borders you’ll need:
- Harvest Delight Paper Pack or (Shop Canada | Shop Australia)
- Harvest Delight Variety Mat Pack or (Shop Canada | Shop Australia)
- Harvest Delight Foiled & Embossed Embellishments or (Shop Canada | Shop Australia)
- Harvest Delight Stickers or (Shop Canada | Shop Australia)
- White Cardstock or (Shop Canada | Shop Australia)
- Original Border Maker System with Simple Leaf Chain Border Maker Cartridge
- 12-inch Trimmer with Straight and Scallop Blades or (Shop Canada | Shop Australia)
- All-Purpose Scissors or (Shop Canada | Shop Australia)
- Tape Runner or (Shop Canada | Shop Australia)
- Repositionable Tape Runner Refill or (Shop Canada | Shop Australia)
- Foam Squares or (Shop Canada | Shop Australia)
Check out the Simple Leaf Chain Border Maker Cartridge in the video below!
Apple Picking Border
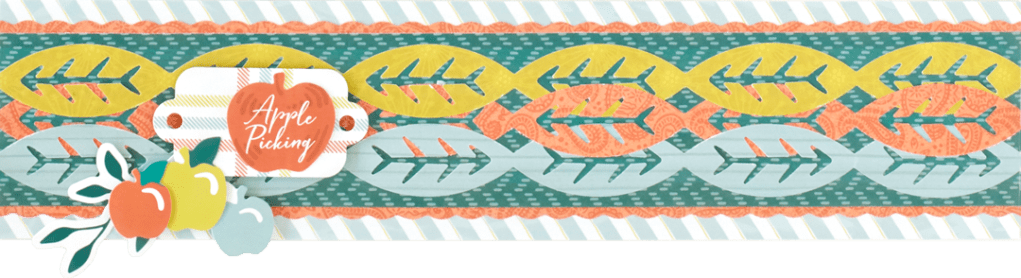
Step 1: Cut a 2-3/4″ x 12″ strip of striped patterned paper for your base.
Step 2: Using the 12-inch Trimmer and the Scallop Blade, cut a 2-1/4″ x 12″ strip of orange patterned paper and mount it on the base. Switch to the 12-inch Trimmer Straight Blade and cut a 2″ x 12″ strip of teal patterned paper. Mount it on top.
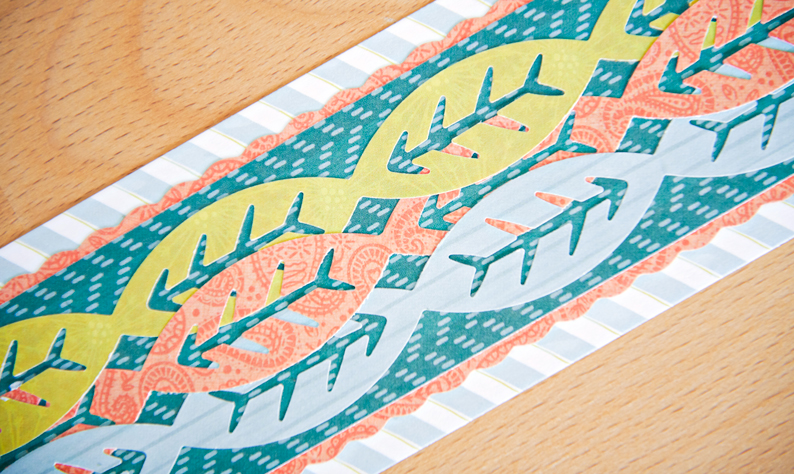
Step 3: Using the Simple Leaf Chain Border Maker Cartridge, punch one border each with green, orange and light blue patterned papers. Weave and overlap them together, as shown, and adhere them to the border.
Step 4: Top with tag, “Apple Picking”, branch and apples stickers, popping some up with Foam Squares as desired.
Leaves and Scallops Border

Step 1: Cut a 2-1/2″ x 12″ strip of green patterned paper for your base. Cut a 2″ x 12″ strip of teal floral patterned paper and adhere it to the base, 1/8″ from the left edge.
Step 2: Using the 12-inch Trimmer and the Scallop Blade, cut a 1/2″ x 12″ strip of white leaf patterned paper and adhere it 1/8″ from the left edge of the floral piece.
Step 3: Using the Simple Leaf Chain Border Maker cartridge, punch two borders from White Cardstock, and one each from green, teal floral and orange patterned papers (reserve some vein pieces). Layer the leaf borders along the right side of the base with the green border first, then the teal floral border. Adhere the orange border to both of the white borders so that white shows on either side. Adhere this on top of the border, as shown. Place vein pieces along the orange border.
Step 4: Add leaf and flower stickers.
Family Friends Grateful Border

Step 1: Cut a 3-3/8″ x 12″ strip of striped patterned paper for the base. Cut a 2-7/8″ x 12″ strip of orange patterned paper and mount it on the base.
Step 2: Cut one 3″ x 1-1/2″ piece each with light blue, orange and white patterned papers. Alternating the papers, adhere them along the border, as shown.
Step 3: Using the Simple Leaf Chain Border Maker Cartridge, punch a border with teal patterned paper and another with light blue patterned paper, reserving the vein pieces. Cut the teal border in 3″ sections and mount them on the blue pieces.
Step 4: Cut a leaf border sticker in 3″ sections and adhere them on the seams between the blue and orange pieces.
Step 5: Trim the lowest “branches” from the vein pieces and adhere ten of them as trees on the white geometric pieces, as shown.
Step 6: Add hearts, “Family”, “Friends” and “Grateful” stickers, as shown.
You can use these leaf scrapbook border ideas to add greenery to all sorts of layouts with outdoor themes, autumn themes and more. How will you use these borders? Comment below and let us know!

Very nice, when I looked at this I thought it would make great fish, by cuting the leaves apart
Actually I see a fish more than a leaf. Should be great with my cat pages!?
I really wasn’t sure what to think about the leaf punch. But seeing these borders has gotten me excited about mine coming tomorrow. Can’t wait to try these, and give them my own little spin.
[…] This is just one example of the lovely leafy borders you can make — read this blog post to see them all! […]
[…] This is just one example of how a leafy border can add fine forestry to any layout — read this blog post to see more! […]
[…] Let this leafy scrapbook border fall onto any layout by reading this blog post! […]