September 23, 2019
Haunt Your Pages with these Halloween Scrapbook Borders

Looking for a way to add a spooky spell to your Halloween spreads? Maybe your photos need one more ingredient to make the perfect page potion? Fret not — this collection of Halloween scrapbook borders is sure to spark some festive inspiration and give you exactly what you need to add some eerie effects to your projects! Check them out!

To create these borders you’ll need:
- Wicked Cute Paper Pack or (Shop Canada | Shop Australia)
- Wicked Cute Stickers or (Shop Canada | Shop Australia)
- Black and Eggplant Cardstock or (Shop Canada | Shop Australia)
- Original Border Maker System with Dips & Diamonds, Pumpkins and Star Banner Chain Border Maker Cartridges
- Medallion Punch or (Shop Canada | Shop Australia)
- On the Vine Border Punch or (Shop Canada | Shop Australia)
- Custom Cutting System with Circle Patterns or (Shop Canada | Shop Australia)
- 12-inch Trimmer with Straight and Wave Blades or (Shop Canada | Shop Australia)
- All-Purpose Scissors or (Shop Canada | Shop Australia)
- Tape Runner or (Shop Canada | Shop Australia)
- Repositionable Tape Runner Refill or (Shop Canada | Shop Australia)
- Foam Squares or (Shop Canada | Shop Australia)
Hocus Pocus Border

Step 1: Cut a 2-3/4″ x 12″ strip of orange diamond patterned paper for the base. With the 12-inch Trimmer Wave Blade, cut a 2-1/4″ x 12″ strip of black star patterned paper and adhere it to the base. With the 12-inch Trimmer Straight Blade, cut a 1-1/2″ x 12″ strip of white grid patterned paper and adhere it in the middle of the border.
Step 2: Using the Dips & Diamonds Border Maker Cartridge, punch a border with Eggplant Cardstock and trim it to measure 5/8″ wide. Punch and trim another border the same way. Cut a 1″ x 12″ strip of aqua patterned paper. Adhere the border strips just behind the aqua strip so that just the waves show and mount the whole thing to the middle of the border. Top it with a bats border sticker.
Step 3: Using the outside of the smallest Custom Cutting System Circle Pattern and the Red Blade, cut a circle with gold patterned paper. Using the inside of the largest Custom Cutting System Circle Pattern and the Red Blade, cut out a portion of the circle to create a moon shape. Adhere it to the border with Foam Squares and top it with the witch, stars and “Hocus Pocus” stickers.
Carving Pumpkins Border

Step 1: Cut a 3″ x 12″ strip of orange plaid patterned paper for the base. Cut a 1-1/4″ x 12″ strip of both aqua dot and candy corn patterned papers. Adhere them to the base, as shown.
Step 2: Punch a border with the On the Vine Border Punch with aqua patterned paper and adhere it to the candy corn patterned strip. Using the Pumpkins Border Maker Cartridge, punch a border with both orange and gold patterned papers. Layer them on the aqua dot patterned strip. Adhere the vine border sticker in the middle of the border.
Step 3: Add pumpkins, vines, “Carving Pumpkins” and candy corn stickers.
Happy Halloween Border
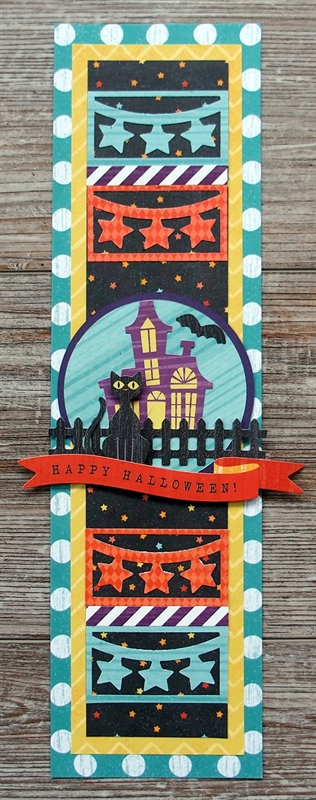
Step 1: Cut a 3-5/16″ x 12″ strip of aqua dot patterned paper (being careful to cut along the rows of dots) for the base. Cut a 2-3/4″ x 11-1/4″ strip of gold patterned paper and adhere it to the base. Cut a 2-1/4” x 10-3/4” strip of black star patterned paper and adhere it to the gold patterned strip.
Step 2: Using the Star Banner Chain Border Maker Cartridge, punch two individual aqua pieces and two individual orange diamond patterned pieces. To do this, skip placing the paper in the Original Border Maker System guide. Instead, insert a piece of paper into the Original Border Maker System and punch once. Trim each piece so that there’s an even border on all sides. Place the four shapes on the black stars patterned strip, as shown. Cut two pieces from the purple striped border sticker to measure 2-1/4″ each and adhere them between the shapes.
Step 3: Using the inside of the largest Custom Cutting System Circle Pattern and the Blue Blade, cut a circle with aqua patterned paper. With the same shape and the Green Blade, cut a circle with Eggplant Cardstock. Layer the circles and place in the middle of the border. Top it with the haunted house, fence (trimmed) and bat stickers. Add the black cat and “Happy Halloween” stickers with Foam Squares.
Boo! Border
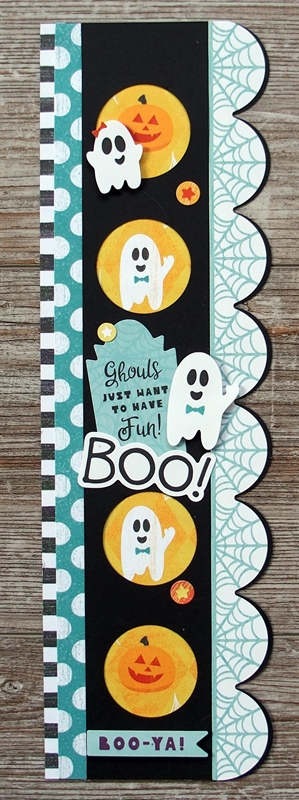
Step 1: Cut a 3″ x 12″ strip of black stripe patterned paper for the base. Cut a 1/2″ x 12” strip of aqua dot patterned paper and adhere it to the left side of the base, about 1/4″ from the edge. Cut a 2″ x 12″ strip of orange ghost-and-pumpkin patterned paper (being careful to arrange the the ghosts and pumpkins in the middle) and adhere it to the right of the aqua dot strip.
Step 2: Cut a 2″ x 12″ strip of Black Cardstock. Using the Medallion Punch, make five punches at regular intervals along the strip. Tip: Punch the top and bottom 1″ from the ends, then punch the middle medallion and then punch the two medallions between. Adhere this piece over the orange ghost-and-pumpkin patterned strip so the images peek out.
Step 3: Cut the medallion shapes in half. Adhere a half circle behind each scallop of the spider web border sticker. Adhere this to the right side of the border.
Step 4: Top with “Ghouls…” and “Boo!” stickers. Add ghosts and “Boo-Ya!” stickers with Foam Squares.
These Halloween scrapbook borders are the tricks you need to add some treats to your spreads. Which border do you want to try out first? Let us know in the comments below!


Beautiful borders that took a lot of thought, energy and creativity to create!! Thanks for sharing!!
These are great, I want to make every one of them. THANKS!
[…] Get into the Halloween spirit and create some of the spooky scrapbook borders in this blog post! […]
Nice Post I loved your Site Thanks For Sharing US. You visit My Halloween website using this :-Halloween Pumpkin Carving Ideas . I think You must like them
[…] Get Directions! […]