August 29, 2020
Gather ’Round and Tell Tales With These Campfire Scrapbook Borders
Ahh, campfires — their crackling sounds and warming embers draw us all together to sit around and share stories, laughs and memories. Plus, they can make for the perfect little scrapbook addition to lots of outdoor and camp-filled layouts or projects. See for yourself and ignite a creative spark by checking out these campfire scrapbook borders!
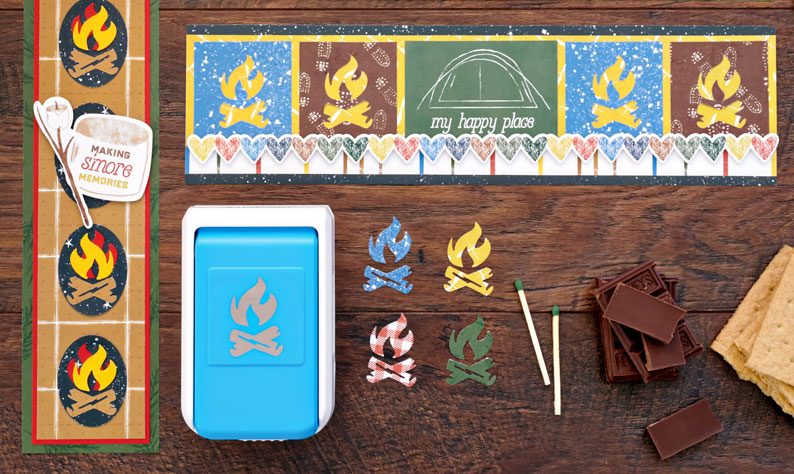
To create these borders you’ll need:
- S’more Memories Paper Pack or (Shop Canada | Shop Australia)
- S’more Memories Stickers or (Shop Canada | Shop Australia)
- Scarlet Solid Cardstock or (Shop Canada | Shop Australia)
- Goldenrod Solid Cardstock or (Shop Canada | Shop Australia)
- Campfire Punch or (Shop Canada | Shop Australia)
- Circle Custom Cutting System Patterns or (Shop Canada | Shop Australia)
- Oval Custom Cutting System Pattners or (Shop Canada | Shop Australia)
- 12-inch Trimmer or (Shop Canada | Shop Australia)
- Tape Runner or (Shop Canada | Shop Australia)
- Repositionable Tape Runner Refill or (Shop Canada | Shop Australia)
- Foam Squares or (Shop Canada | Shop Australia)
Check out the Campfire Punch in action in the video below!

My Happy Place Border

Step 1: Cut a 12″ x 3-1/4″ strip of night sky paper for the base. Cut a 12″ x 2-7/8″ strip of gold dragonfly paper and adhere on top. Cut a 12″ x 5/8″ strip of striped paper and adhere to the bottom of the gold strip.
Step 2: Trim out the “My happy place” piece and adhere to the middle of the gold strip. Cut two 2″ x 2″ squares each of blue enamelware and brown boot papers. Punch each with the Campfire Punch. Place each square as shown on the border.
Step 3: Adhere the heart border sticker with Foam Squares.
Around the Fire Border
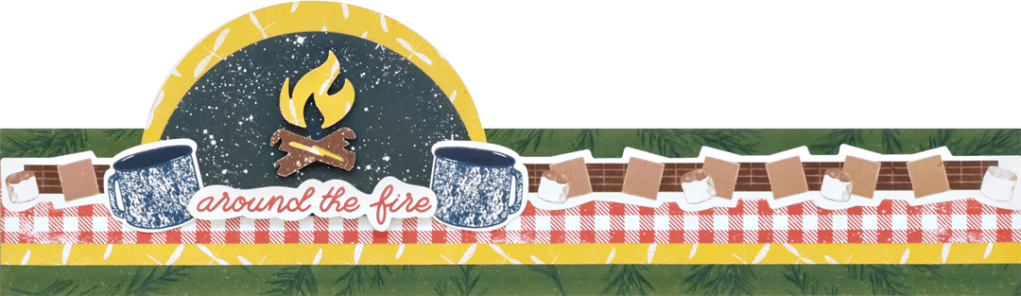
Step 1: Cut a 12″ x 2″ strip of evergreen paper for the base. Cut a 12″ x 1-1/4″ strip of gold dragonfly paper and adhere to the base. Cut a 12″ x 3/4″ strip of red picnic tablecloth paper and adhere to the gold strip. Top with a s’mores border sticker.
Step 2: Using the outside of the small Circle Pattern and the Red Blade, cut a semi-circle with gold dragonfly paper. Cut another with night sky paper. Layering and offsetting them, adhere to the border on top of the s’mores sticker as shown.
Step 3: Punch a campfire with both brown and gold papers. Mount the gold flames and brown logs to the semi-circle with Foam Squares.
Step 4: Add stickers as desired.
Making S’more Memories Border

Step 1: Cut a 2-3/4″ x 12″ strip of evergreen paper for the base. Cut a 2-3/8″ x 11-5/8″ strip of Scarlet Cardstock and mount on top. Cut a 2-1/8″ x 11-3/8″ strip of Graham cracker paper and adhere on top.
Step 2: Using the inside of the second-smallest Custom Cutting System Oval Pattern and the Red Blade, cut four ovals with night sky paper. Using the inside of the third-smallest Custom Cutting System Oval Pattern and the Blue Blade, cut one oval with night sky paper. Adhere, evenly spaced, along the border, with the largest oval in the middle.
Step 3: Punch four campfires with each Goldenrod Cardstock, Scarlet Cardstock and Graham cracker paper. “Build” campfires inside each small oval as shown.
Step 4: Adhere stickers to the middle oval with Foam Squares.
Which one of these campfire scrapbook borders gives you a warm feeling? Comment below and let us know!

[…] Visit their blog for a tutorial. […]
[…] Visit their blog for a tutorial. […]