September 2, 2020
Celebrate Fall Foliage With These Autumn Scrapbook Borders and Card
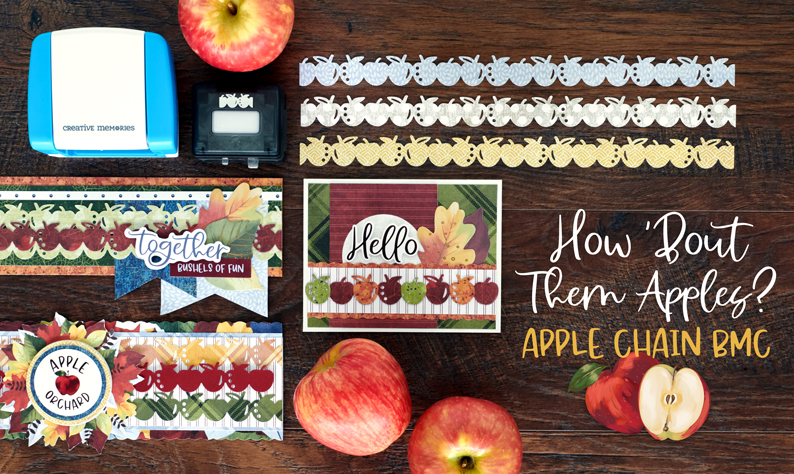
The shades and imagery of autumn are sight to admire and adore — the air gets crisp and trees undergo the spectacular transition to richly vibrant reds, oranges and yellows. And the Hello, Autumn collection definitely salutes to the fantastic season that is fall! Snuggle down and take a look at these autumn scrapbook borders (and bonus DIY autumn card!) and start thinking about how you can use the aesthetic of autumn to your advantage in your projects!
To create these borders and card, you will need:
- Hello, Autumn Paper Pack or (Shop Canada | Shop Australia)
- Hello, Autumn Tone-on-Tone Paper Pack or (Shop Canada | Shop Australia)
- Hello, Autumn Variety Mat Pack or (Shop Canada | Shop Australia)
- Hello, Autumn Foiled Embellishments or (Shop Canada | Shop Australia)
- Hello, Autumn Stickers or (Shop Canada | Shop Australia)
- Crimson & Rich Brown Solid Cardstock or (Shop Canada | Shop Australia)
- Blank Card Kit or (Shop Canada | Shop Australia)
- Original Border Maker System with the Apple Chain Border Maker Cartridge or (Shop Canada | Shop Australia)
- Circle Custom Cutting System Patterns or (Shop Canada | Shop Australia)
- 12-inch Trimmer with Straight, Deckle & Scallop Blades or (Shop Canada | Shop Australia)
- All-Purpose Scissors or (Shop Canada | Shop Australia)
- Tape Runner or (Shop Canada | Shop Australia)
- Repositionable Tape Runner or (Shop Canada | Shop Australia)
- Foam Squares or (Shop Canada | Shop Australia)
Check out the Apple Chain Border Maker Cartridge in action in the video below!

Autumn Fest Border
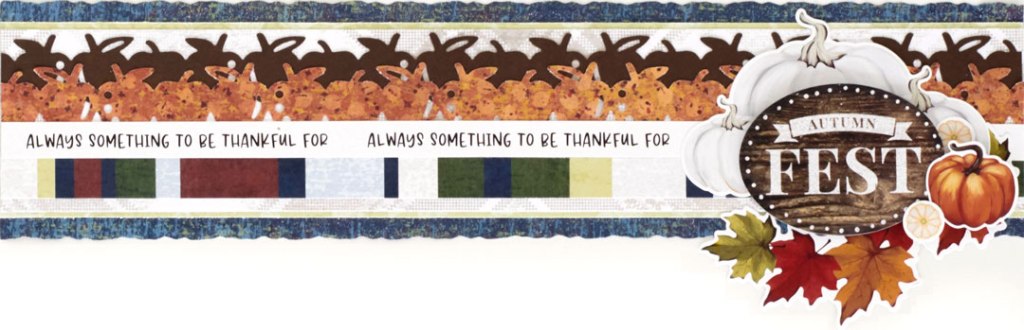
Step 1: Using the 12-inch Trimmer with the Deckle Blade, cut a 12″ x 2-3/4″ strip of navy designer paper for the base.
Step 2: With the 12-inch Trimmer with the Straight Blade, cut a 12″ x 2-1/4″ strip of light green designer paper and adhere to the base. Cut a 12″ x 2″ strip of beige plaid tonal paper and mount on top.
Step 3: Cut a 12″ x 1/2″ strip of multi-hued striped designer paper and adhere near the bottom of the beige strip. Mount a border sticker just above it.
Step 4: Punch a border with the Apple Chain Border Maker Cartridge with both Rich Brown Solid Cardstock and orange designer paper. Flip the brown border over and overlap the orange border on top. Adhere both to the border as shown.
Step 5: Add stickers, popping some up with Foam Squares for added dimension.
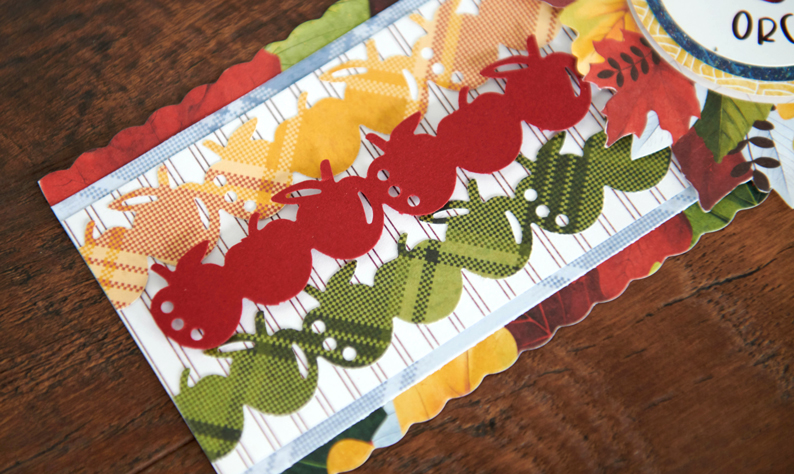
Together Border

Step 1: Cut a 12″ x 2-3/4″ strip of orange designer paper for the base. Cut a 12″ x 2-1/4″ strip of dark green designer paper and adhere on the base.
Step 2: Punch two borders using the Apple Chain Border Maker Cartridge — one with light green designer paper and one with crimson designer paper. Layer and mount on the border as shown.
Step 3: Cut a 2-1/4″ x 3″ piece of navy designer paper and a 3″ x 3-1/2″ piece of light blue designer paper. Using scissors, cut a V shape from one short end of each piece. Adhere to the right side of the border as shown. Mount a dots border sticker near the top of the border.
Step 4: Adhere stickers and foiled embellishments.
Apple Orchard Border

Step 1: Using the 12-inch Trimmer with the Scallop Blade, cut a 12″ x 3-1/4″ strip of large leaves designer paper for the base. Cut a 12″ x 2-3/4″ strip of light blue plaid tonal paper and adhere on the base. Cut a 12″ x 2-1/2″ strip of white striped designer paper and mount on top.
Step 2: Punch borders using the Apple Chain Border Maker Cartridge with both gold and green plaid tonal papers. Adhere to the top and bottom of the white striped strip. Punch a border using the Apple Chain Border Maker Cartridge with Crimson Cardstock. Trim out two 4″ sections and adhere to the border using Foam Squares as shown.
Step 3: Cut out the wreath of leaves from the variety mat. Adhere to the middle of the border. Using the inside of the medium-sized Custom Cutting System Circle Pattern and the Red Blade, cut a circle with gold leaf tips tonal paper. Using the Green Blade, cut a circle with navy designer paper. Layer and mount on the wreath of leaves piece. Top with the “Apple orchard” sticker.
Hello Card
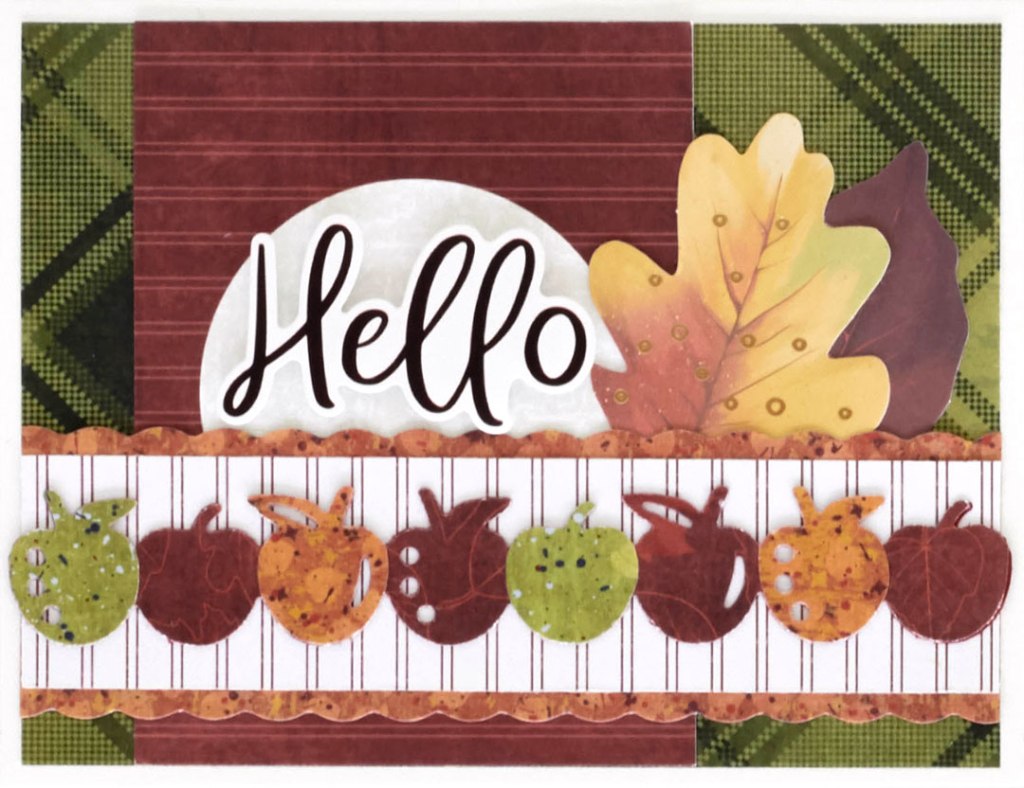
Step 1: Use a card from the Blank Card Kit for your base. (Or cut an 8-1/2″ x 5-1/2″ piece of White Cardstock. Using the 12-inch Trimmer with the Scoring Blade, score along the long edge at 4-1/4″ and fold in half.)
Step 2: Cut a 5-1/4″ x 4″ piece of green plaid tonal paper and adhere to the card. Cut apart a 3″ x 4″ section of the crimson-with-circle variety mat and adhere to the card.
Step 3: Using the 12-inch Trimmer with the Scallop Blade, cut a 5-1/4″ x 1-5/8″ strip of orange designer paper. With the 12-inch Trimmer with the Straight Blade, cut a 5-1/4″ x 1-1/4″ strip of white striped designer paper. Adhere on the orange strip and mount on the card.
Step 4: Punch a border using the Apple Chain Border Maker Cartridge with crimson designer paper. Trim to measure 5-1/4″ and adhere to the card. Punch borders using the Apple Chain Border Maker Cartridge with green and orange designer papers. Trim out two apples from each and adhere over the crimson apples, as shown.
Step 5: Add foiled embellishments and the “Hello” sticker.
Which one of these autumn scrapbook borders do you like the most? Will you be trying out the DIY autumn card? Let us know in the comments below!

Your border ideas and card are beautiful
I love these ideas.
[…] Learn how to create this a-peel-ing border by checking out this blog post! […]
[…] If you want to make a border that is a bushel of fun, then this is it for you! Check out the step-by-step instructions in this post! […]
[…] If you’re on a quest for an autumnal fest, then this blog post of borders (like this beauty!) and a card is it for you! Here are the instructions! […]
The ideas for the Borders are so pretty with the Fall colors, and the card is beautiful. Thank you for all you do to keep us all on the creative mindset, and showing us different ways that we can make the borders for our layouts, I believe that the BMC is one of my favorite tools that Creative Memories have designed and developed. Here are some more suggestions – a Cornucopia, a sleigh. I do know you had a Gingerbread man or lady out awhile ago (several years) why not bring back some of the older ones? Even the plain
pine trees? Thank you for all that you all do.