January 25, 2021
Send Your Heart Aflutter With These Valentine’s Day Scrapbook Projects
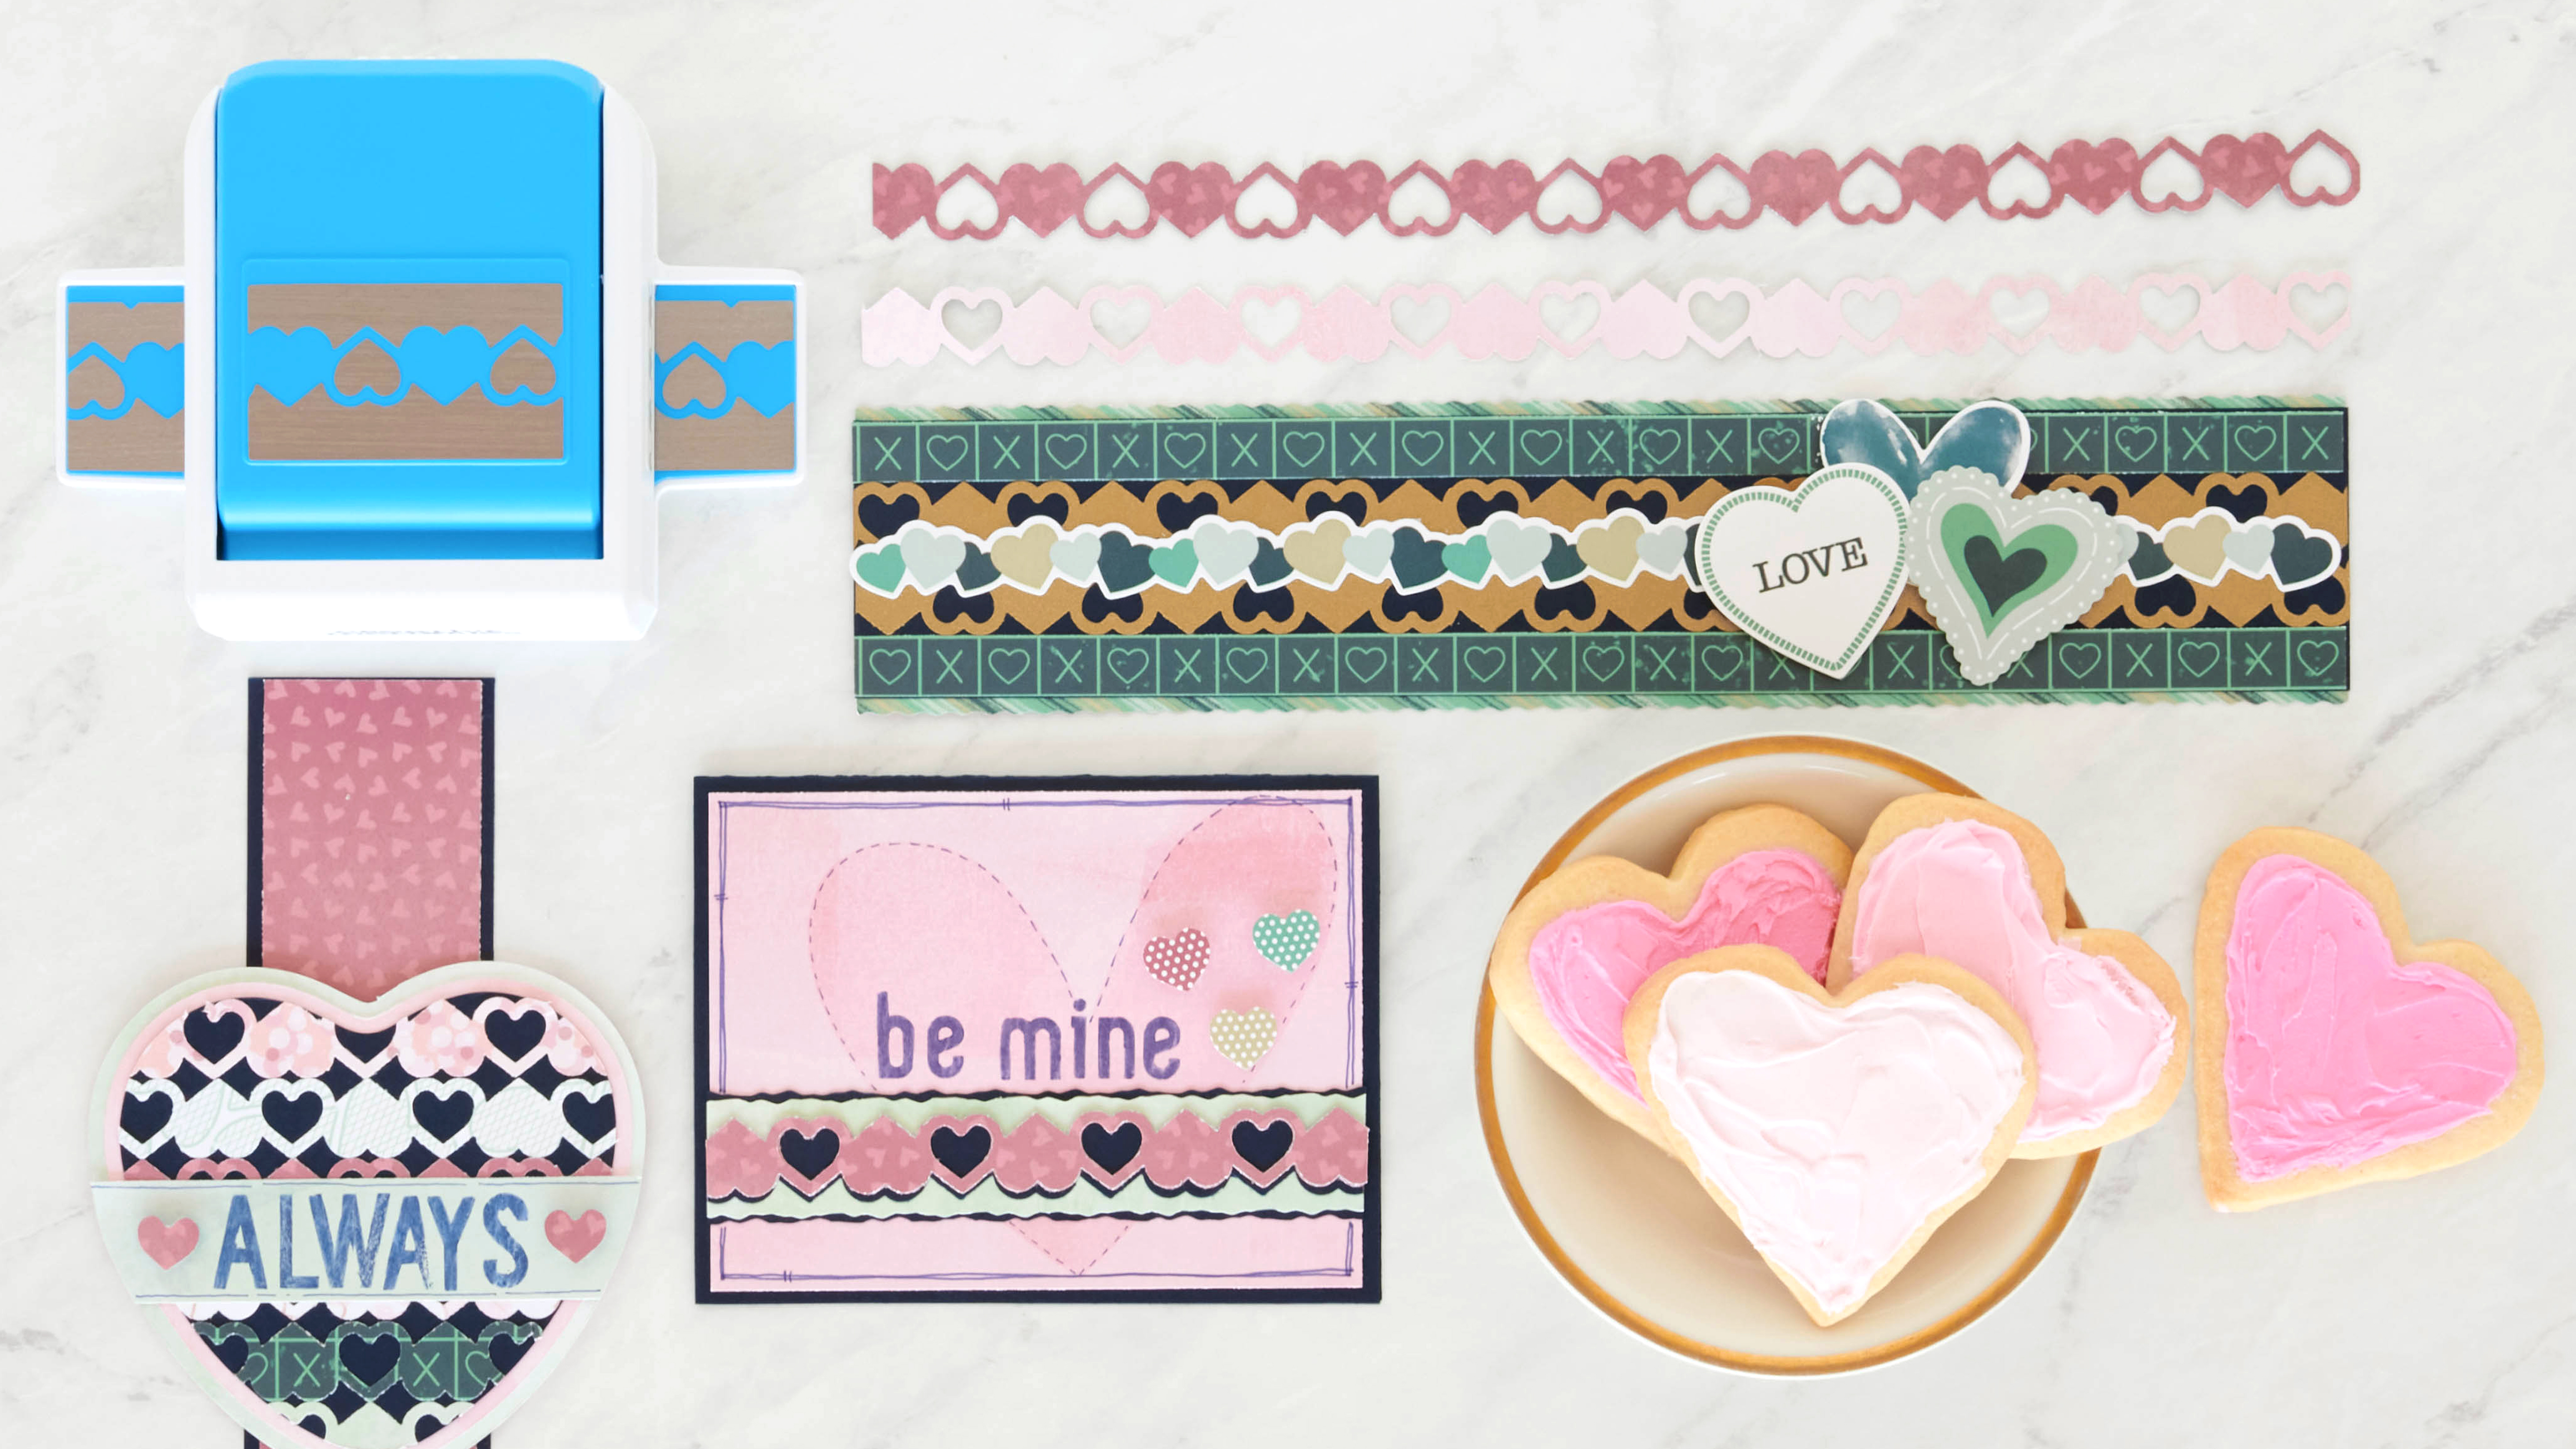
Did you know that roughly 145 million Valentine’s Day cards are exchanged each year, making that mid-February day the second most popular occasion of the year for giving cards? (Now that’s a lot of love!) Here’s something else to boost those sweet sentiments — two borders and a card to surely give your tummy butterflies and make your heart pitter-patter! Check them out below and say “be mine” to their beauty!
To create these borders and card, you will need:
- Love Wins Paper Pack or (Shop Canada | Shop Australia)
- Love Wins Stickers or (Shop Canada | Shop Australia)
- Bronze Shimmer & Navy Solid Cardstocks or (Shop Canada | Shop Australia)
- Heart to Heart Border Punch or (Shop Canada | Shop Australia)
- Custom Cutting System with Gemstone Patterns or (Shop Canada | Shop Australia)
- Alphabet Stamp Kit System or (Shop Canada) | Shop Australia)
- 12-inch Trimmer with Straight, Deckle & Wave Blades or (Shop Canada | Shop Australia)
- All-Purpose Scissors or (Shop Canada | Shop Australia)
- Tape Runner or (Shop Canada | Shop Australia)
- Repositionable Tape Runner or (Shop Canada | Shop Australia)
- Foam Squares or (Shop Canada | Shop Australia)
- Navy Dual-Tip Pen or (Shop Canada | Shop Australia)
Check out the Heart to Heart Border Punch in action in the video below!

Always Border

Step 1: Cut a piece of Navy Solid Cardstock to measure 2″ x 12″.
Step 2: Cut a piece of magenta hearts patterned paper to measure 1-3/4″ x 12″. Adhere to the cardstock base.
Step 3: Cut a piece of Navy Solid Cardstock to measure 5″ x 5″.
Step 4: Using the Heart to Heart Border Punch, punch several borders from a variety of hues and patterned paper. Adhere the borders using adhesive to the cardstock. Making sure that the whole surface of the back of the border is covered with adhesive.
Step 5: Using the Custom Cutting System and small Gemstone Pattern, cut from the outside using the Red Blade, with the bordered covered cardstock.
Step 6: Using the Custom Cutting System and small Gemstone Pattern, cut from the outside with the Green Blade on the light pink paper.
Step 7: Using the Custom Cutting System and small Gemstone Pattern, cut from the outside with the Blue Blade on the light green paper.
Step 8: Cut a piece of mint green paper to measure 5″ x 1″.
Step 9: Using the Alphabet Stamp Kit System, place desired letters on the acrylic block. Use the bold tip of your Navy Dual-Tip Pen, go over the letters. Stamp onto the mint green paper as shown. Adhere to the front of the heart. Use a scissors to cut away the ends of the paper strip to make flush with the edge of the heart.
Step 10: Adhere two hearts that were punched from the border onto the sides of the title with Foam Squares.
Step 11: Adhere the heart to the base of the border using Foam Squares.
Love Border

Step 1: Using the 12-inch Trimmer with the Wave Blade, cut a piece of green stripes patterned paper to measure 12″ x 2-1/2″.
Step 2: Cut a piece of Navy Solid Cardstock to measure 12″ x 2-1/4″ and adhere on top of the green stripes paper with adhesive.
Step 3: Cut two strips from the navy grid of X’s and O’s patterned paper. Adhere one strip on the top edge and one on the bottom edge of the cardstock.
Step 4: Using the Heart to Heart Border Punch, punch two borders from Bronze Shimmer Solid Cardstock. Adhere between the X’s and O’s papers, so the hearts are facing each other.
Step 5: Adhere sticker border to the middle of the punched borders.
Step 6: Layer and adhere stickers using Foam Squares for added dimension.
Be Mine Card

Step 1: Cut a piece of Navy Solid Cardstock to measure 8-1/2″ x 5-1/2″. Fold in half to create the card base.
Step 2: Cut a piece of the pink paper, cutting out the large heart shape, to measure 5-1/4” x 4” as shown. Adhere to the front of the card.
Step 3: Using the 12-inch Trimmer with the Deckle Blade, cut a piece of Navy Solid Cardstock to measure 5-1/4” x 1-1/8”. Adhere to the front of the card.
Step 4: Using the 12-inch Trimmer with the Deckle Blade, cut a piece of light green paper to measure 5-1/4″ x 1″. Adhere to the previous strip.
Step 5: Using the Heart to Heart Border Punch, punch a border using Navy Solid Cardstock. Cut to measure 5-1/4″, and adhere to the previous strip.
Step 6: Using the Heart to Heart Border Punch, punch a border using magenta hearts patterned paper. Cut to measure 5-1/4″, and adhere slightly offset on the Navy Solid Cardstock.
Step 7: Using the Alphabet Stamp Kit System, place desired letters on the acrylic block. Use the bold tip of your Navy Dual-Tip Pen to go over the letters. Stamp onto the card as shown.
Step 8: Using the Navy Dual-Tip Pen, doodle along the outer edges of the pink paper and draw faux stitches along the heart shape.
Which one of these Valentine’s Day scrapbook projects will you be trying out first? Tell us in the comments below!

The card and the borders are so adorable for Valentine’s Day layouts or even just a layout that is showing a lot of love. They are not difficult to do either.
I will be making the card for valentine’s day.
[…] Let this cute card be yours (or for someone special you know!) by reading this blog post! […]
I used the new Heart to Heart Border punch and Double Heart punch to make some Valentine cards. Love the new punch ??. Faysie
[…] the love for scrapbooking by crafting this border! Prep it now by following this blog post so you’re ready come Valentine’s […]
[…] Border Instructions Border Instructions Card Instructions […]