February 19, 2021
Throw Your Own Party With This DIY Birthday Card and Birthday Scrapbook Borders

Birthdays come but once a year, but with the Party Time! collection, you can turn any day into a big-time celebration — especially when that moment is spent crafting and scrapbooking! Balloons and banners, streamers and sparklers, the Party Time! collection is always ready for a good time. Ready to unwrap some of its magic? Burst forth brilliance with these birthday scrapbook borders and delightful DIY birthday card and let your crafting be the life of the scrap-tastic party!

To create these borders and card, you will need:
- Party Time! Bright Paper Pack or (Shop Canada | Shop Australia)
- Party Time! Blue Paper Pack or (Shop Canada | Shop Australia)
- Party Time! Variety Mat Pack or (Shop Canada | Shop Australia)
- Party Time! Stickers or (Shop Canada | Shop Australia)
- Party Time! Border Stickers or (Shop Canada | Shop Australia)
- Party Time! Embellishments or (Shop Canada | Shop Australia)
- Aqua, Blue, Goldenrod, Navy, Scarlet & White Solid Cardstocks or (Shop Canada | Shop Australia)
- Double Balloon Punch or (Shop Canada | Shop Australia)
- 12-inch Trimmer or (Shop Canada | Shop Australia)
- Tape Runner or (Shop Canada | Shop Australia)
- Repositionable Tape Runner or (Shop Canada | Shop Australia)
- Foam Squares or (Shop Canada | Shop Australia)
Party Time Card
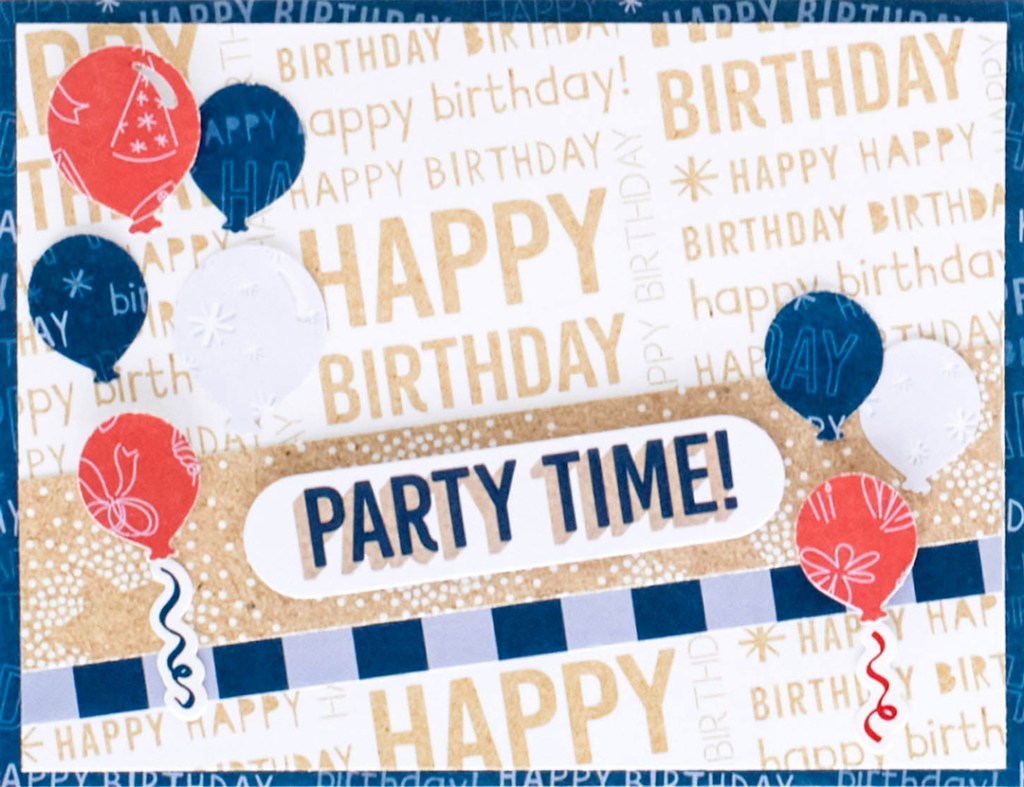
Step 1: Create the card base — cut an 8-1/2″ x 5-1/2″ piece of White Solid Cardstock. Using the 12-inch Trimmer with the Scoring Blade, score along the long edge at 4-1/4″ and fold in half.
Step 2: Cut a 5-1/2″ x 4-1/4″ piece of blue Happy Birthday wishes paper and adhere to the front of the card.
Step 3: Cut a 6″ x 5″ piece of white and kraft Happy Birthday wishes paper. Cut a 6″ x 1″ strip of kraft dotted stars paper. Tuck a 6″ x 1/2″ strip of blue and periwinkle stripes paper behind it. Mount on the Happy Birthday wishes piece. Place in the 12-inch Trimmer at a slight angle and cut one edge. Turn and cut the remaining edges to create a 5-1/4″ x 4″ piece that’s angled slightly. Mount this piece on the card.
Step 4: Punch several balloons from red party icons, blue Happy Birthday wishes and periwinkle sparkles papers. Mount them on the card, popping some up with Foam Squares for added dimension. Add the “Party time!” title embellishment with Foam Squares.
Happy Birthday Border
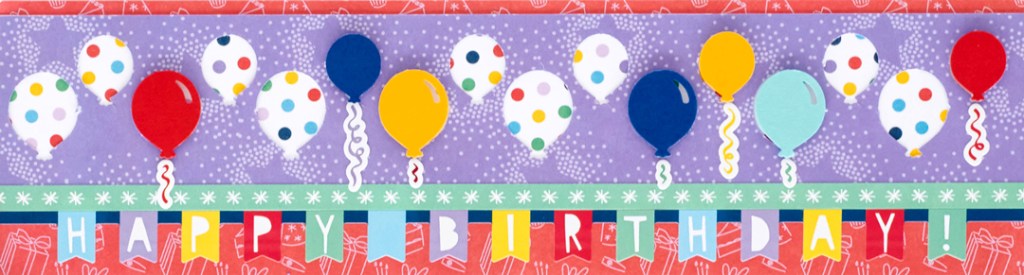
Step 1: Cut a 12″ x 3-1/4″ strip of red party icons paper for the base. Cut a 12″ x 2″ strip of bold polka dots paper and adhere to the base, about 1/8″ from the top edge.


Step 2: Punch a row of balloons from a 12″ length of purple dotted stars paper. Start with the corner of the paper aligned with the second “ridge” inside the punch. Punch and slide the paper over so that just the edge of the larger balloon is showing and punch again. Continue until you’ve punched eight times along the length of the strip. Trim the piece to measure 12″ x 2″ and adhere on top of the bold polka dots strip.
Step 3: Punch balloons from Goldenrod, Scarlet, Blue and Aqua Solid Cardstocks. Adhere several over the balloon cutouts, popping them up with Foam Squares for added dimension.
Step 4: Add additional stickers as shown.
Here’s to You Border
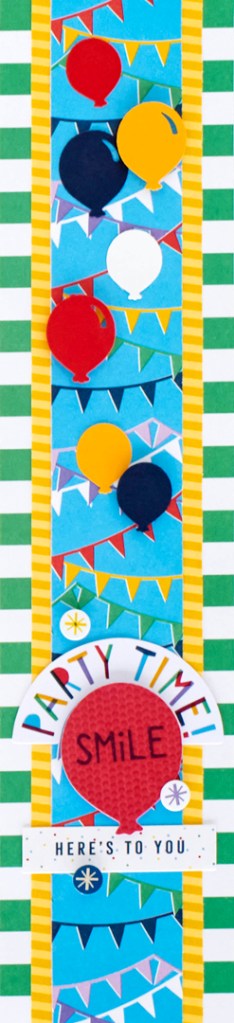
Step 1: Cut a 2-3/4″ x 12″ strip of green and white stripes paper for the base.
Step 2: Cut a 2″ x 12″ strip of yellow chevron paper and adhere on top. Cut a 1-1/2″ x 12″ strip of bunting banners paper and mount on top.
Step 3: Punch balloons from Scarlet, White, Goldenrod and Navy Solid Cardstocks. Adhere several to the border as shown, popping some up with Foam Squares for added dimension.
Step 4: Add stickers as shown.
Will you be creating these birthday scrapbook borders or the DIY birthday card first? What is an upcoming (or previous!) celebration you would use these for? Tell us in the comments below!

Super cute borders! The banner paper is perfect for that vertical border!
Great ideas! I haven’t received my CM order including Party Time! products yet, but I’m hoping that the colors will coordinate with some of the Rainbow packs from last summer. Then I can stretch the products in both packs for more pages! Thanks, Krislyn.
My order is on its way. I’m making the birthday card as soon as it arrives. Love it.
[…] Speaking of partying, it’ll be DIY celebration in your craft room when you make this card! Find the step-by-step instructions for it here in this blog post! […]