May 25, 2021
Crafting with Fringe: DIY Cards and Scrapbook Borders

Wowza, the Fringe Border Punch and Fun in the Sun Texture Paper Pack bundles from the current spend/get promo have been flying off the shelves here at CM HQ! (Hurry before they are gone for good!) With this much promo excitement, it only makes sense to show you a few projects that showcase the fringed, frilled fêtes of the punch! See how crafting with fringe — two DIY cards and two scrapbook borders — add an eye-catching dimensional look!
To create these borders and card, you will need:
- All My Love Paper Pack or (Shop Canada | Shop Australia)
- All My Love Variety Mat Pack or (Shop Canada | Shop Australia)
- All My Love Stickers or (Shop Canada | Shop Australia)
- All My Love Foiled Flower Embellishments or (Shop Canada | Shop Australia)
- White Solid Cardstock or (Shop Canada | Shop Australia)
- Fringe Border Punch or (Shop Canada | Shop Australia) — Exclusive punch in the spend/get promo
- 12-inch Trimmer with Straight, Scoring & Victorian Blades or (Shop Canada | Shop Australia)
- All-Purpose Scissors or (Shop Canada | Shop Australia)
- Tape Runner or (Shop Canada | Shop Australia)
- Precision Point Adhesive Pen or (Shop Canada | Shop Australia)
- Foam Squares or (Shop Canada | Shop Australia)
- Embroidery needle or long pointed tool

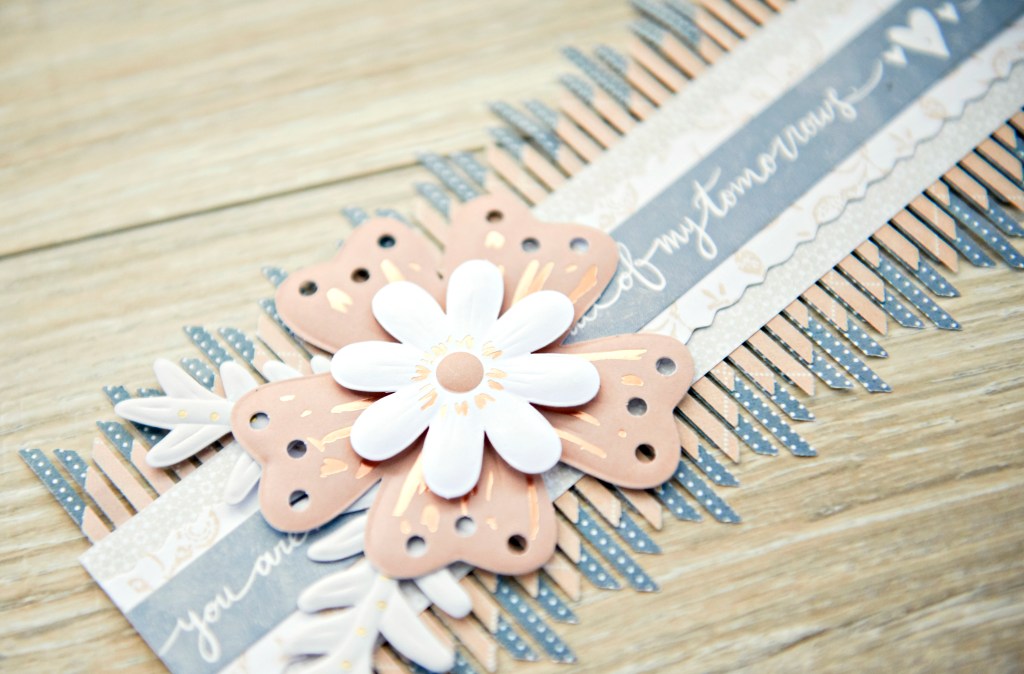
Floral Fringe Border
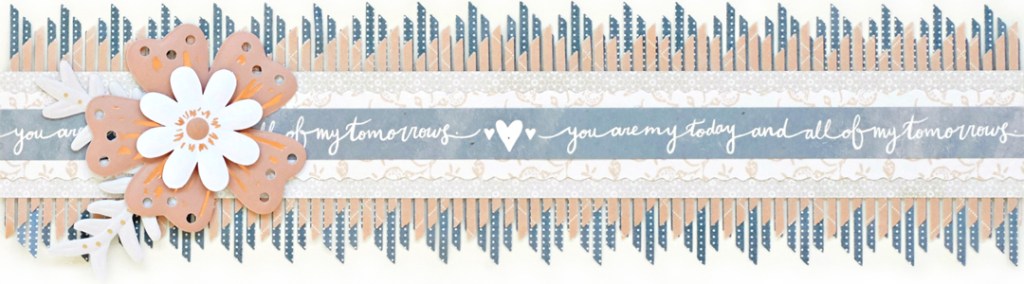
Step 1: Using the reverse side of the polka dot paper, punch a border using the Fringe Border Punch. Trim to measure 12″ x 3-1/4″ and punch the other long side. Flip it over to create the base. Punch a border using the Fringe Border Punch with blush pink diamonds paper. Trim to measure 12″ x 2-3/4″ and punch the other side. Mount this piece on top of the base.
Step 2: Cut a 12″ x 1-12″ strip of lace veil paper and mount on the border. Using the 12-inch Trimmer with the Victorian Blade, cut a 12″ x 1″ strip of white vintage florals paper. Adhere to the lace veil strip. Top with a “You are my today…” border sticker.
Step 3: Add foiled flower embellishments with Foam Squares.
Layered Fringe Border
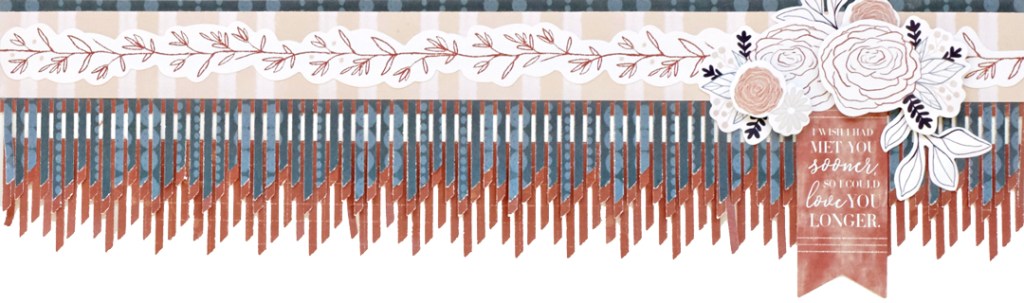
Step 1: Punch a border using the Fringe Border Punch with terracotta notebook paper. Trim to measure 12″ x 3″ to create the base. Punch another fringe border with terracotta notebook paper, but begin punching at a slightly different spot than before (about 1/16″). Trim to measure 12″ x 2-1/2″ and adhere on top of the base. Punch a third fringe border with navy ovals stripes paper. Trim to measure 12″ x 2-1/4″ and adhere on top.
Step 2: Cut a 12″ x 1″ strip of buttercream striped cake paper. Adhere to the border, above the fringe. Top with a border sticker.
Step 3: Add a banner sticker and floral stickers, popping some up with Foam Squares for added dimension if desired.
All My Love Card
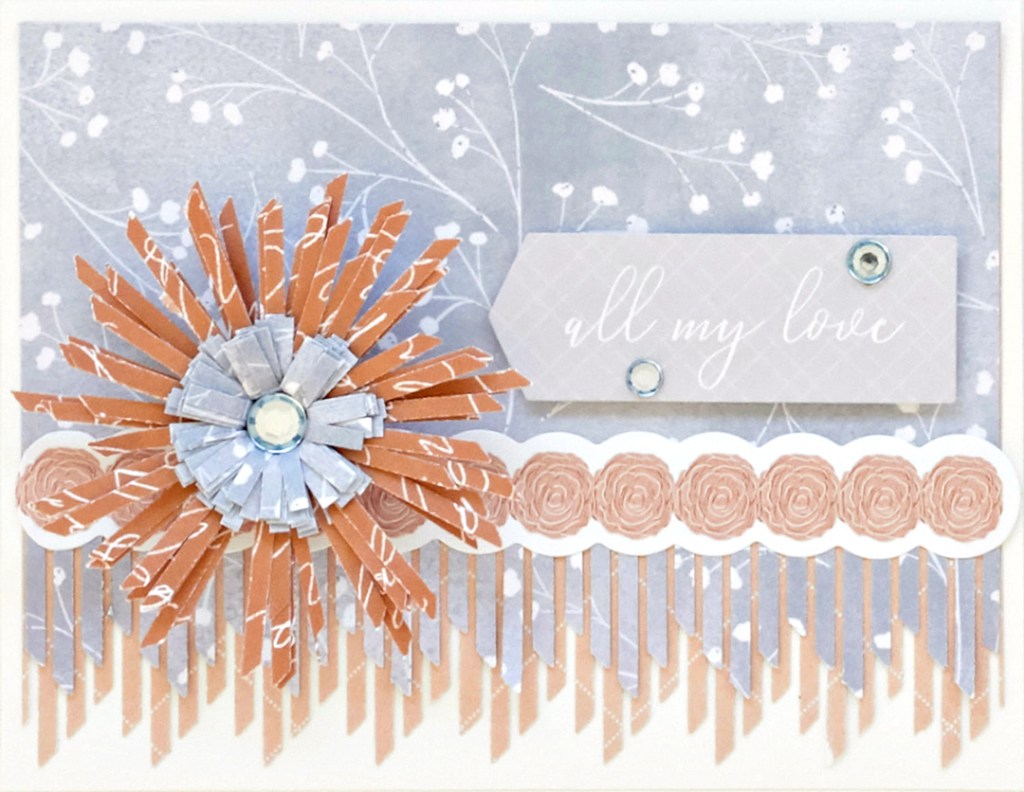
Step 1: Cut a 5-1/2″ x 8-1/2″ piece of White Solid Cardstock. With the 12-inch Trimmer and Scoring Blade, score and fold in half to create a card.
Step 2: Cut a 5-1/4: x 4″ piece of blush pink diamonds paper. Punch one long edge using the Fringe Border Punch. Adhere to the card.
Step 3: Cut a 5-1/4″ x 3-3/4″ piece of baby’s breath paper. Punch one long edge using the Fringe Border Punch and adhere on top of the blush pink diamonds piece.
Step 4: Cut a 5-1/4″ piece of roses border sticker and adhere along the fringe. Add the “All my love” sticker with Foam Squares and top with rhinestones.


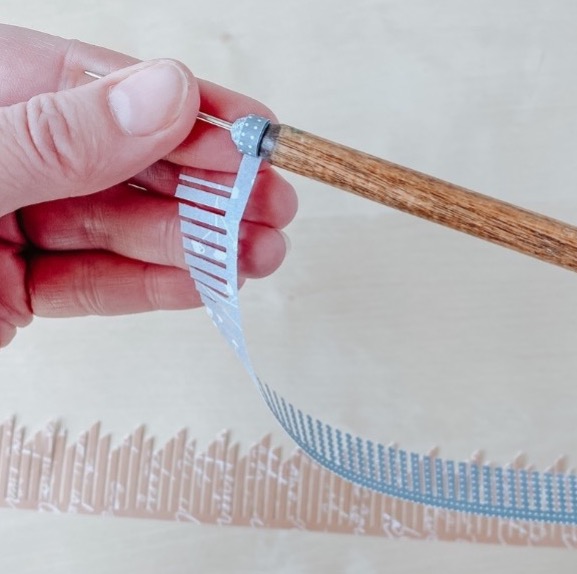

Step 5: Create a quilled flower:
- Punch a border using the Fringe Border Punch with terracotta red 1 Corinthians lettering. Trim to measure 12″ x 1-1/4″. Punch a border using the Fringe Border Punch with baby’s breath paper. Trim to measure 12″ x 1-1/4″ and then cut off all but 1/2″ of the fringe. Cut a 12″ x 1/8″ strip of baby’s breath paper.
- Line the strips up end to end with the terracotta red 1 Corinthians lettering border on the left, then the baby’s breath border and then narrow strip. Apply a dab of Precision Point Adhesive Pen to connect the three.
- Using an embroidery needle or a pointed tool, roll up the long strip you’ve created, beginning with the narrow strip, then the blue floral and finally the rust strip. Apply a dab from the Precision Point Adhesive to the end to secure the roll.
- Holding the middle of the roll between your fingers, press the fringe down and out to create petals.
Step 6: Mount the quilled flower to the card using a large Foam Square. Add a gemstone in the middle.
You Are My Everything Card

Step 1: Cut a 5-1/2″ x 8-1/2″ piece of White Solid Cardstock. With the 12-inch Trimmer and Scoring Blade, score and fold in half to create a card.
Step 2: Cut a 5-1/4″ x 1″ strip of blush pink diamonds paper. Adhere to the bottom edge of the card. Cut a 5-1/4″ x 4″ piece of terracotta red notebook paper. Punch one long edge with the Fringe Border Punch. Adhere to the card.
Step 3: Punch a border using the Fringe Border Punch with blush pink diamonds paper. Trim to measure 12″ x 1-1/2″. Cut apart four-fringed sections with a scissors. Apply the fringe sections to the back of the “You are my everything” sticker as shown and mount on the card.
Step 4: Trim a 5-1/2″ section of the “You are my today…” border sticker and adhere above the fringe as shown. Top with gemstones.
Do you enjoy these DIY cards and scrapbook borders? Will you partake in crafting with fringe with the exclusive Fringe Punch? Let us know in the comments! And remember to check out the landing pages (US | CA | AU) to learn more about this spend/get promo with the Fringe Punch and Fun in the Sun Texture Paper Pack!

Would love to see a video of how to make that quilled flower! Very cool idea.
Love these. Thank you for sharing.
These are gorgeous ???
When can I purchase the fringe border punch? I don’t see it yet in the shopping store.
Sheila, it is only being offered as a gift with purchase for a limited time. See the landing page for all the details.
Available as promo gift only. Limited time. Need to spend $125 or more to qualify.
For the floral fringe border, step 2 says – Cut a 12? x 1-12? strip – what is 1-12″ mean? Is it supposed to be 12 x 1.5″?
You make me feel waaay more talented than I really am Krislyn. The finished floral fringe border is stunning. Thank you! ?