June 18, 2021
DIY Father’s Day Card Ideas for the Man of the Hour

Dad. Grandpa. Pops. Papa. Father’s Day in North America is just around the corner! (Hint: It’s this Sunday!) Sure, buying a thoughtful gift is great, but you can also show the special man in your life how much you love and appreciate him with a thoughtful card. Whether you’re crafting a card for your father-in-law, your brother who is a first-time parent or a close father figure in your life — or even if you’re gathering the little ones together to make a card for their dad — here are four DIY Father’s Day card ideas that will surely make him smile from ear to ear. (P.S. These cards use the Must Have Laser Title Embellishments — great for all sorts of celebratory occasions, including Father’s Day!) Happy crafting!
To create these cards you will need:
- Homestead Paper Pack or (Shop Canada | Shop Australia)
- Homestead Laser Cut Embellishments or (Shop Canada | Shop Australia)
- Homestead Laser Cut Borders or (Shop Canada | Shop Australia)
- Homestead Stickers or (Shop Canada | Shop Australia)
- Homestead Variety Mat Pack or (Shop Canada | Shop Australia)
- Must Have Laser Title Embellishments or (Shop Canada | Shop Australia)
- (Psst, there’s also the Must Have Laser Title Embellishments – Pack 2 or (Shop Canada | Shop Australia)
- Light Gray Cardstock or (Shop Canada | Shop Australia)
- Blank Card Kit or (Shop Canada | Shop Australia)
- 12-inch Trimmer with Straight & Scoring Blades or (Shop Canada | Shop Australia)
- All-Purpose Scissors or (Shop Canada | Shop Australia)
- Foam Squares or (Shop Canada | Shop Australia)
- Tape Runner or (Shop Canada | Shop Australia)
- Repositionable Tape Runner or (Shop Canada | Shop Australia)
Take a look at all the Must Have Laser Title Embellishments below!
Celebrate Card
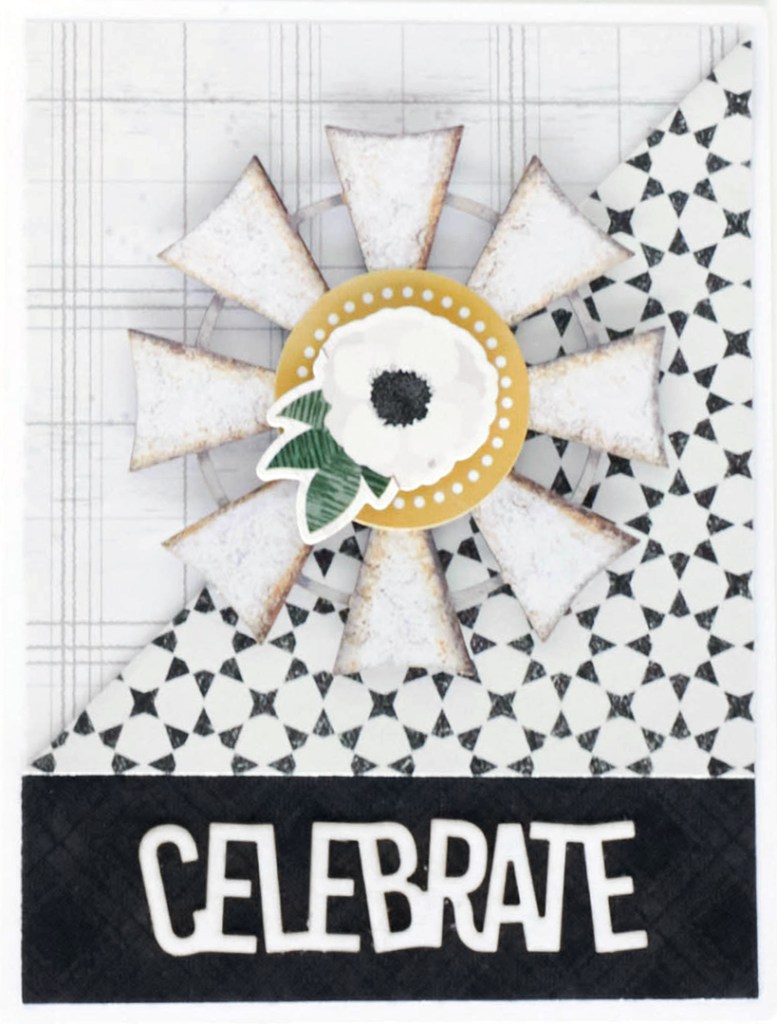
Step 1: Use a bank card for the base.
Step 2: Cut a piece of the light plaid paper to measure 4″ x 5-1/4″. Adhere to the front of the card.
Step 3: Cut a piece of the black plaid paper to measure 4″ x 5-1/4″. Fold the upper-left corner back to the line up with the side of the card. Adhere this piece to the top of the previous piece of paper.
Step 4: Adhere a Must Have Laser Title Embellishment to the top of the black portion of the paper.
Step 5: Adhere embellishments and stickers to the middle of the card, using Foam Squares on some for added dimension.
Best Day Ever Card

Step 1: Use a blank card for the base.
Step 2: Cut a piece of reclaimed wood paper to measure 4″ x 5-1/4″.
Step 3: Cut a piece of green leaves paper to measure 3-1/2″ x 3-1/2″.
Step 4: Using the 12-inch Trimmer, cut the inside from green leaves square, leaving a 1/2″ frame. Adhere to the reclaimed wood piece at an angle. Trim any of the green leaves paper using a scissors. Adhere the whole piece to the front of the card.
Step 5: Cut a piece of black plaid paper to measure 3-1/4″ x 3-1/4″. Adhere the previously cut-out inside square piece (from the previous step) to the black plaid paper. Adhere to the card using Foam Squares.
Step 6: Adhere a Must Have Laser Title Embellishment to the top of black plaid paper. Use your scissors to trim around the title. Adhere to the green paper.
Step 7: Adhere stickers and embellishments, using Foam Squares for added dimension.
Smile, Blessed, Grateful Card

Step 1: Use a blank card for the base.
Step 2: Cut a piece of green tiles paper to measure 4″ x 1″. Adhere to the bottom of the card.
Step 3: Cut a piece of black plaid paper to measure 4″ x 1″. Adhere to the top of the card.
Step 4: Cut a mat to measure 4″ x 3″.
Step 5: Cut a section of a laser-cut border to measure 4″. Adhere behind the top edge of the mat. Adhere to the card.
Step 6: Cut a strip of paper from the reclaimed wood paper to measure 4″ x 1/2″. Adhere below the mat.
Step 7: Cut a strip of black plaid paper to measure 4″ x 1/4″. Adhere below the previous reclaimed wood piece.
Step 8: Adhere the Must Have Laser Title Embellishments to the mat as shown.
Step 9: Adhere stickers to the card using Foam Squares.
Celebrate Card

Step 1: Cut a piece of Light Gray Solid Cardstock to measure 5-1/2″ x 8-1/2″. Score at 4-1/4″. Fold in half. Use this as the base of your card.
Step 2: Cut a piece of green tile paper to measure 5-1/4″ x 4″. Adhere to the front of the card.
Step 3: Cut a strip from the light plaid paper to measure 5-1/4″ x 1-1/2″. Adhere to the card.
Step 4: Cut a laser-cut border to the length of the card (5-1/4″). Adhere to the strip using Repositionable Tape Runner Adhesive.
Step 5: Cut a piece of black plaid paper to measure 3″ x 1″. Adhere the “Celebrate” Must Have Laser Title Embellishment on the black plaid paper. Adhere this piece of paper onto the laser-cut embellishment saying, “Today is a good day for a good day”.
Step 6: Cut a piece of brown leather paper to measure 3-3/4″ x 2-5/8″. Adhere embellishment to this piece. Adhere this whole piece to the card using Foam Squares.
Step 7: Adhere stickers and embellishments as desired, using Foam Squares on some for added dimension.
Which of these four DIY Father’s Day card ideas do you like the most? Who will you send these cards to for Father’s Day (or for ANY special occasion for that matter!)? Give a shout-out in the comments!

My favorite is the last one; love the way you added CELEBRATE and the layering of colors and embellishments and stickers.
Thank you for these ideas for Father’ Day cards. I used parts and pieces of your ideas to make cards for my dad, husband and son who is celebrating his first Father’s Day with the birth of his son last January.
________________________________
Cute. Great inspiration.