May 4, 2022
Tread New Terrain: Boot Print Borders And DIY Card For Scrapbooking

For some, a beachfront getaway or day at the lake is the perfect antidote for relaxation, but for others, the best way to kick back is to lace up the boots and seek a quiet trail shaded by a towering canopy of trees. If you’re hankering for hiking — and all the memories that come with it — then the Boot Prints Border Punch is a trailblazing tool you need to pack! Fill your sole with these scenic boot print borders and DIY card for scrapbooking below!
To create these borders and card, you will need:
- Leave Nothing Behind Paper Pack or (Shop Canada | Shop Australia)
- Leave Nothing Behind Stickers or (Shop Canada | Shop Australia)
- Leave Nothing Behind Wildlife Stickers or (Shop Canada | Shop Australia)
- Blank Card Kit or (Shop Canada | Shop Australia)
- 12-inch Trimmer with Straight & Deckle Blades or (Shop Canada | Shop Australia)
- 12-inch Decorative Trimmer or (Shop Canada | Shop Australia)
- Boot Prints Border Punch or (Shop Canada | Shop Australia)
- Tape Runner or (Shop Canada | Shop Australia)
- Repositionable Tape Runner or (Shop Canada | Shop Australia)
- Foam Squares or (Shop Canada | Shop Australia)
Check out the Boot Prints Border Punch in action in the video below!

Scenic Overlook Border
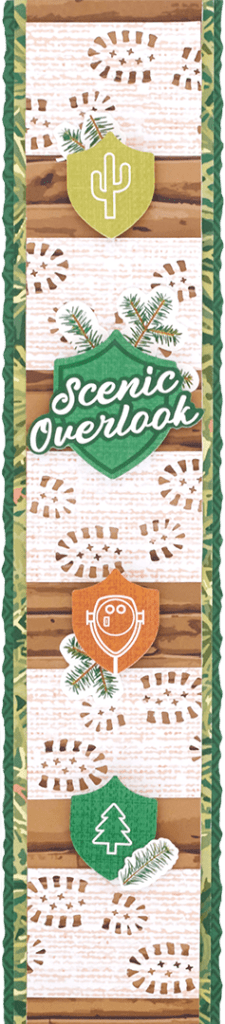
Step 1: Using the 12-inch Trimmer with the Deckle Blade, cut a 2-1/2″ x 12″ strip of hunter green geometric herringbone designer paper, a 2-1/4″ x 12″ strip of pine needles designer paper and a 2″ x 12″ strip of wood planks designer paper. Layer and adhere the three strips with the wood planks strip on top.
Step 2: Use the Boot Prints Border Punch to punch one edge of a piece of burlap designer paper. Trim to 1-1/2″ wide with the 12-inch Trimmer and the Straight Blade, then cut border into six 2″ pieces.
Step 3 Arrange five of the boot print pieces on top of wood planks strip, leaving a 1/4″ space at the top and bottom and spacing them equally down the base strip. Discard the sixth boot print piece.
Step 4: Adhere the “Scenic overlook” and pine bough stickers in between the second and third boot print pieces. Add one of the vector sign stickers and a small piece of pine bough sticker in between the other pieces.
Trailhead Border
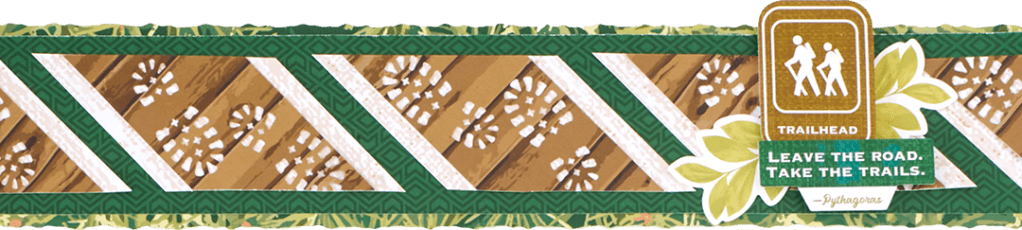
Step 1: Using the 12-inch Trimmer with the Deckle Blade, cut a 12″ x 2-1/4″ strip from the pine needles designer paper. Switch to the Straight Blade and cut a 12″ x 2″ strip from the hunter green geometric herringbone designer paper. Align and adhere hunter green geometric herringbone strip on top of the pine needles strip to form the base.
Step 2: Use the 12-inch Trimmer to cut a 12″ x 2″ strip of burlap designer paper. Use the Boot Prints Border Punch to punch one edge of a piece of the wood planks designer paper. Trim to 1-1/2″ wide and mount on top of burlap strip.
Step 3: Trim boot prints/burlap border into diagonal sections between each pair of boots by placing long edge of border on 45-degree line on base plate of 12-inch Trimmer.
Step 4: Mount three of the diagonal pieces on top of the hunter green geometric herringbone strip, leaving equal margins between each piece. Trim the end pieces into triangles and adhere at the outside edges of border strip.
Step 5: Create sticker cluster approximately 4″ from right-hand edge.
Find Me Where the Wild Things Are Border

Step 1: Use the Boot Prints Border Punch to punch one edge of a piece of burlap designer paper. Trim to 2″ wide with wavy blade of 12-inch Decorative Trimmer.
Step 2: Use the 12-inch Trimmer to cut a 1-3/4″ x 12″ piece of wood planks designer paper. Adhere boot prints strip on top using Repositionable Tape Runner adhesive, leaving about 1/2″ of wood planks paper showing below burlap designer paper.
Step 3: Use the wavy blade of the 12-inch Decorative Trimmer to trim one edge of a piece of pine needles designer paper. Trim to 3/4″ wide and adhere behind wavy edge of burlap designer paper.
Step 4: Use the 12-inch Trimmer to cut a 1″ x 12″ piece of hunter green geometric herringbone designer paper. Adhere behind pine needles designer paper, leaving about 1/2″ of hunter green geometric herringbone designer paper showing. Total border should measure approximately 12″ x 3″.
Step 5: Mount pine needles border sticker above boot prints with Foam Squares. Create a cluster of embellishments and stickers approximately 3″ from right-hand side.
Into the Forest I Go Card

Step 1: Cut a 4″ x 5-1/4″ rectangle of burlap designer paper and a 3-3/4″ x 5″ rectangle of hunter green geometric herringbone designer paper.
Step 2: Use the Boot Prints Border Punch to punch one long edge of the hunter green geometric herringbone rectangle. Turn paper and punch the other long edge of same rectangle. Layer the hunter green geometric herringbone rectangles onto the burlap rectangle.
Step 3: Cut a 3/4″ x 5-1/2″ strip of wood planks designer paper and a 1/2″ x 5-1/2″ strip of burlap designer paper. Mount the burlap strip on top of the wood planks strip and adhere on top of hunter green geometric herringbone rectangle in between the two rows of boot prints. Mount onto a card from the Black Card Kit.
Step 4: Embellish with trees, pine cone and “And into the forest I go…” stickers as shown with Foam Squares.
What do you think of these boot print borders and DIY card for scrapbooking? What outdoorsy memories would you showcase with these ideas? Share, share and share some more down below!

Can you tell me where I can buy the boot prints border punch?