July 18, 2022
Adore These Four: Take On The #2022JulyBONUS Challenge

Today is a big day — not only do we have a new spend/get promo going on, BUT we also have something brand-new for your picking pleasure! For any quantity of free gifts you earn during the You-Pick-It Promo, you can choose exactly which bundle(s) you would like to get free! For example, if you earn two free bundles, you could choose two of the same qualifying bundle or ANY combination of two bundles! (More on that in the links down below!) And the cherry on top is a #2022JulyBONUS challenge featuring these four bundles based around the themes of wine, beer, comforts of home and fishing! Cheers, y’all!
Get the inside scoop here: US | CA | AU
And keep scrolling for the challenge down below — we can’t wait to see which one (or ones!) you make!
EARN EXCLUSIVE GIFT BUNDLES FREE!

#2022JulyBONUS Challenge
This pop-up challenge has FOUR sketches with example completed layouts using products in the limited-time bundles!
How to Participate:
- Review the two sketches below in this post and/or in the Virtual Crop Facebook Group. (You can also refer to the step-by-step instructions below if you’d prefer to do it that way instead of following the sketch!)
- Create the layout(s) using whatever products you have on-hand; you do not need to use the promo bundles to be eligible to win. Complete as many challenges as you wish, but the more you complete, the more chances you have to win!
- Snap a picture of your finished project(s) and post it in the Virtual Crop Facebook Group by Sunday, Aug. 7, at 11:59pm CT (Australia: 8 Aug. at 2:59pm AET) with hashtag #2022JulyBONUS1, #2022JulyBONUS2, #2022JulyBONUS3 or #2022JulyBONUS4 for the chance to win a prize. We’ll have 8 lucky winners total — 1 winner per sketch, PLUS 4 bonus winners who complete the challenge using the limited-time bundles.
- Winners will be announced in the Virtual Crop Facebook Group on Thursday, Aug. 11, at noon CT.
And what can you win?

Winners will get to pick THEIR CHOICE of 1 Paper Pack + 1 Embellishments Pack + 1 Sticker Pack!
NOTE: The Prize Pack will be awarded to 1 participant for each sketch, PLUS 4 bonus winners who complete the challenge using the promo bundle(s). We will award the prizes randomly, but to win, it must be evident you used the sketch we provided as inspiration to create a project using predominantly Creative Memories products. Prize winners will be announced on Thursday, Aug. 11, at noon CT.
Sketch 1 — #2022JulyBONUS1


Promo product used: Vineyard Escape Bundle | CA | AU
Want step-by-step instructions for creating this layout? Scroll down to the bottom of this blog post!
Sketch 2 — #2022JulyBONUS2
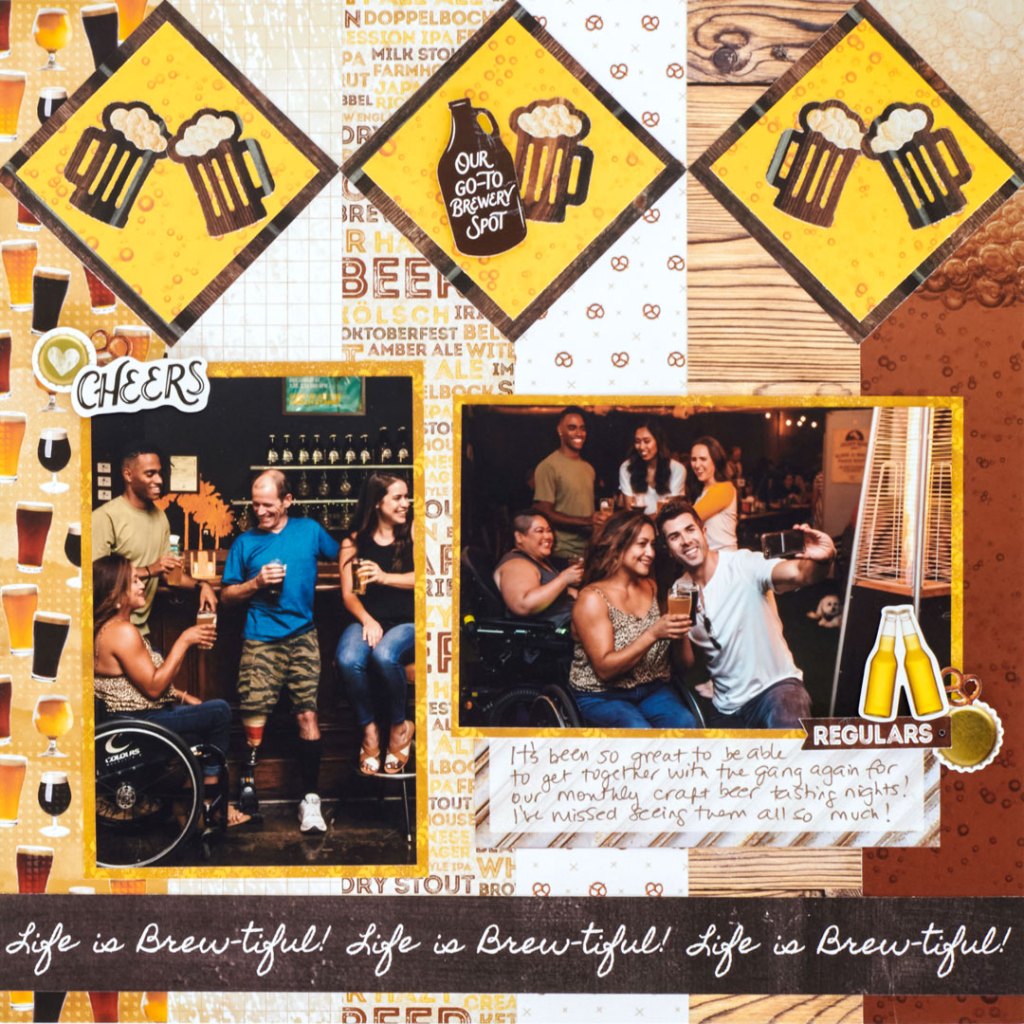
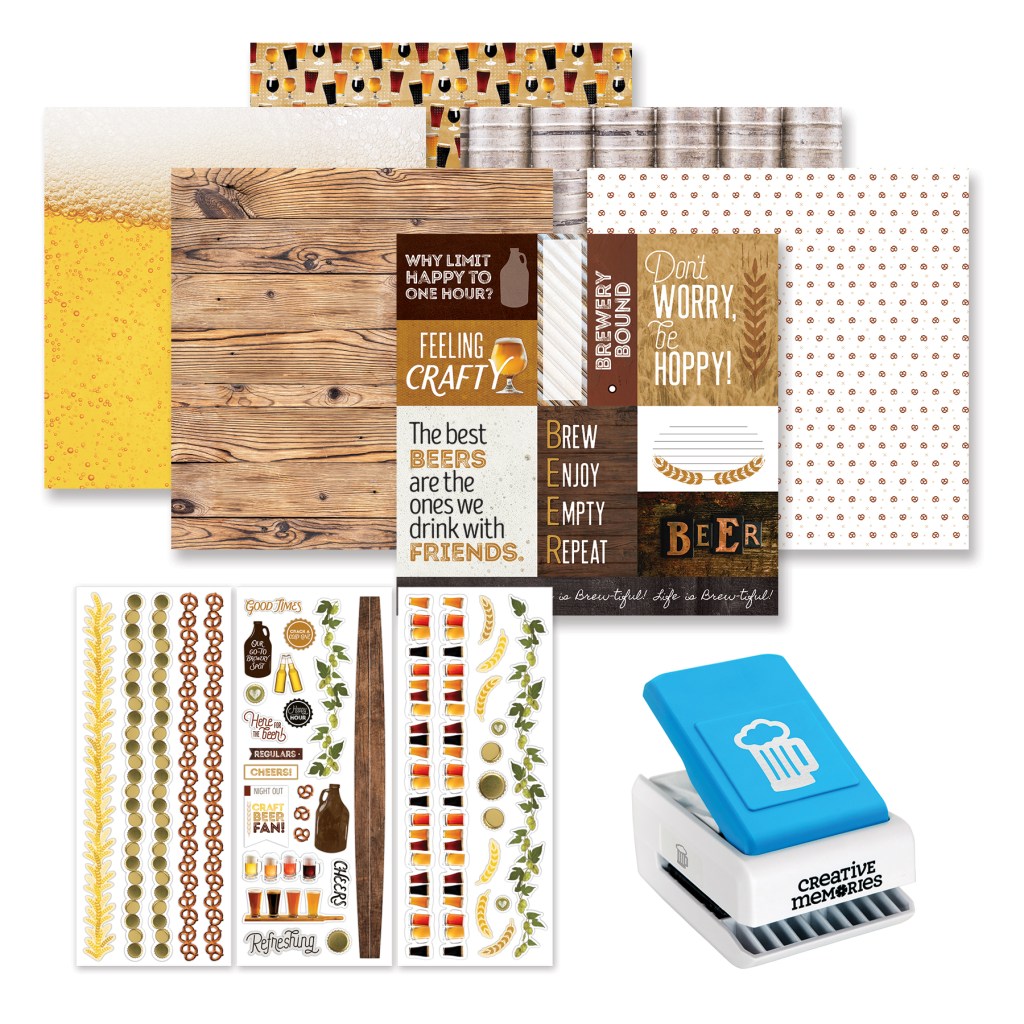
Promo product used: Brewery Bound Bundle | CA | AU
Want step-by-step instructions for creating this layout? Scroll down to the bottom of this blog post!
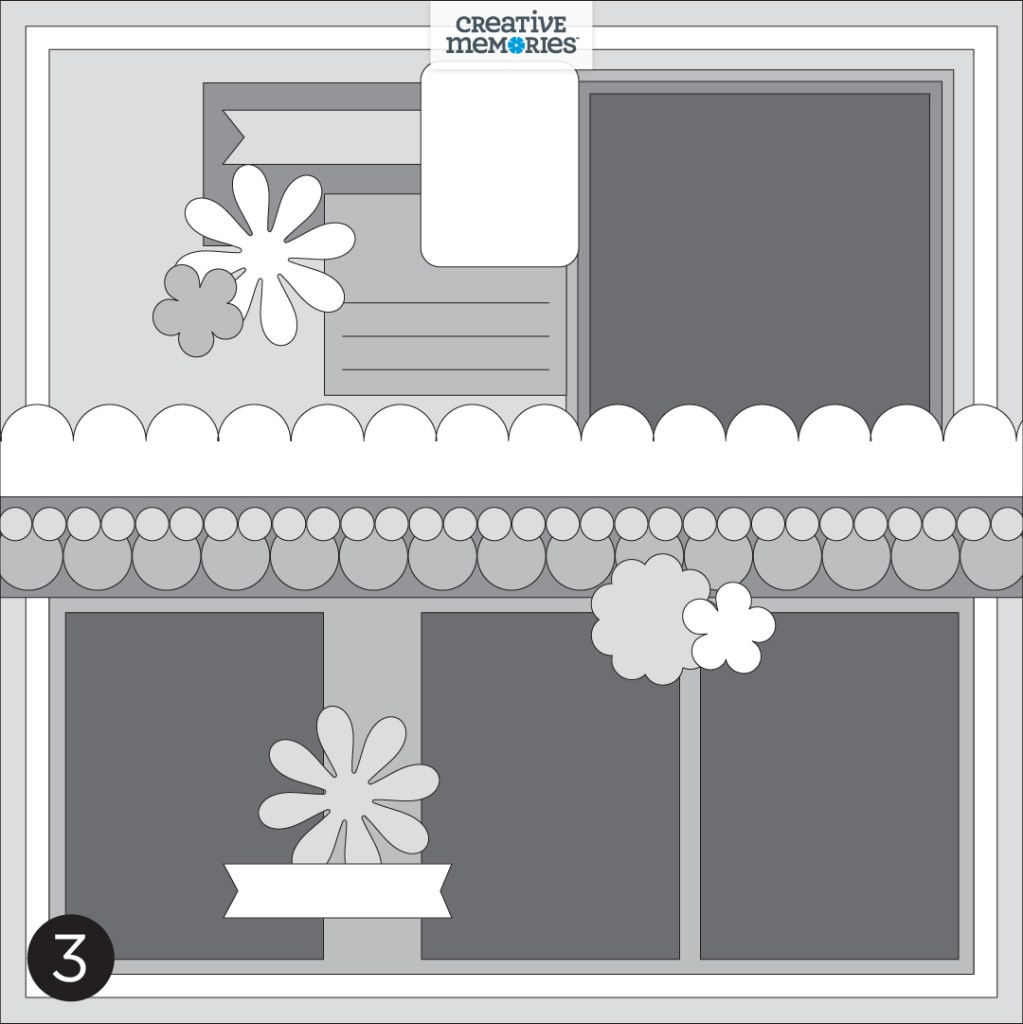
Sketch 3 — #2022JulyBONUS3
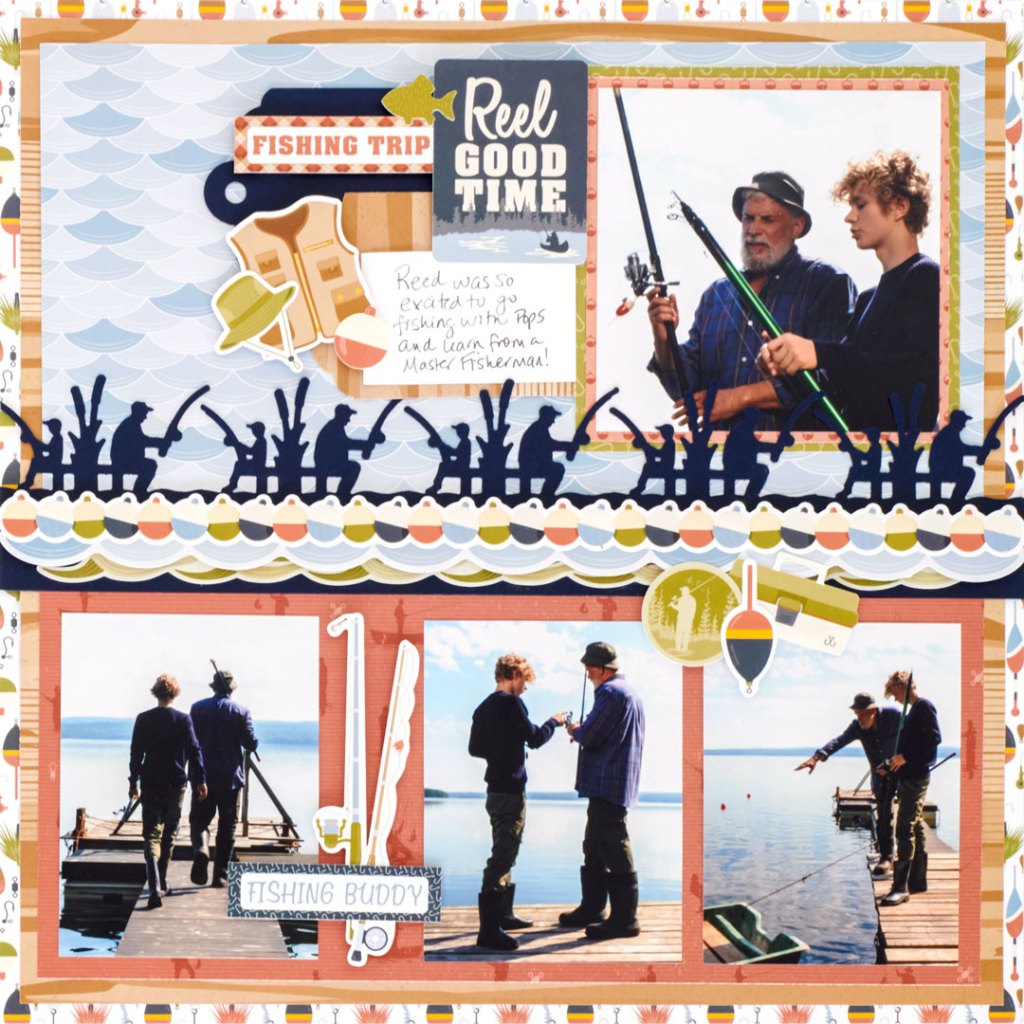
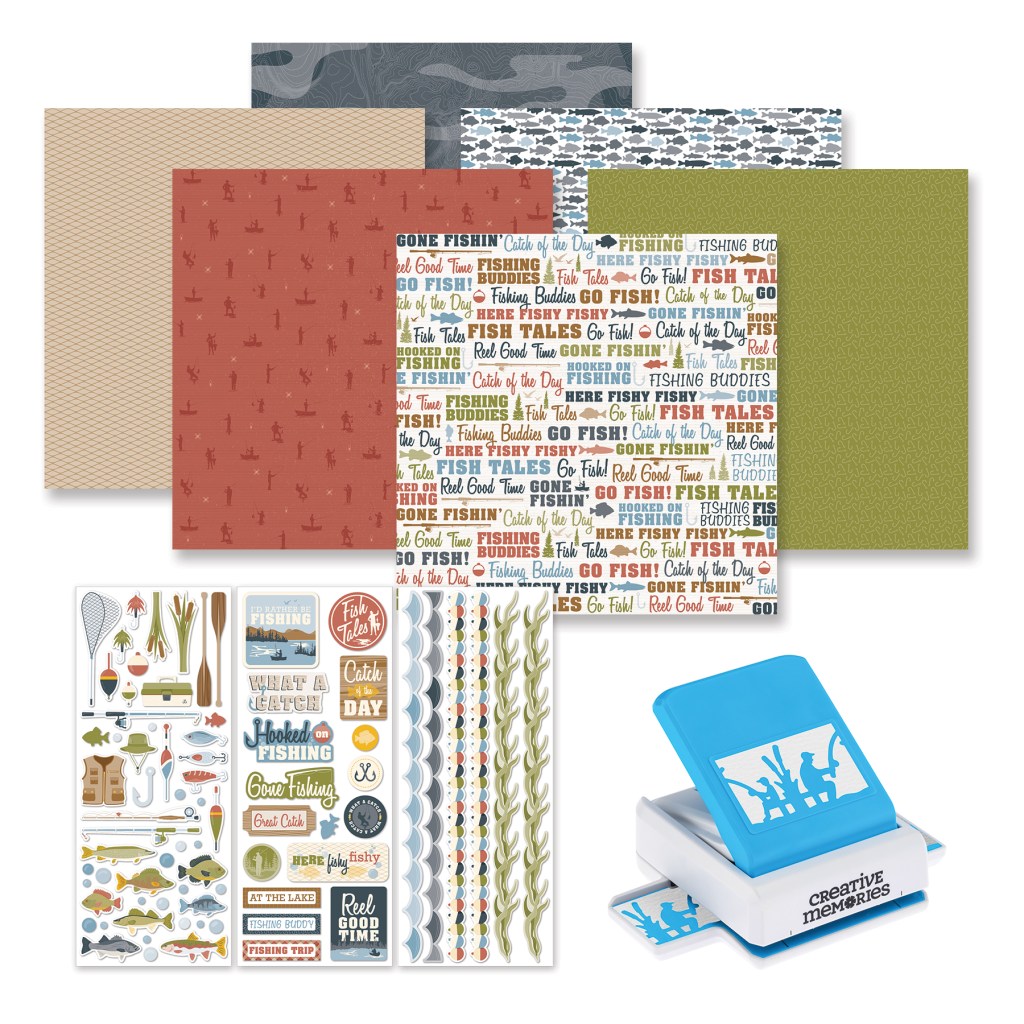
Promo product used: Reel Good Times Bundle | CA | AU
Want step-by-step instructions for creating this layout? Scroll down to the bottom of this blog post!
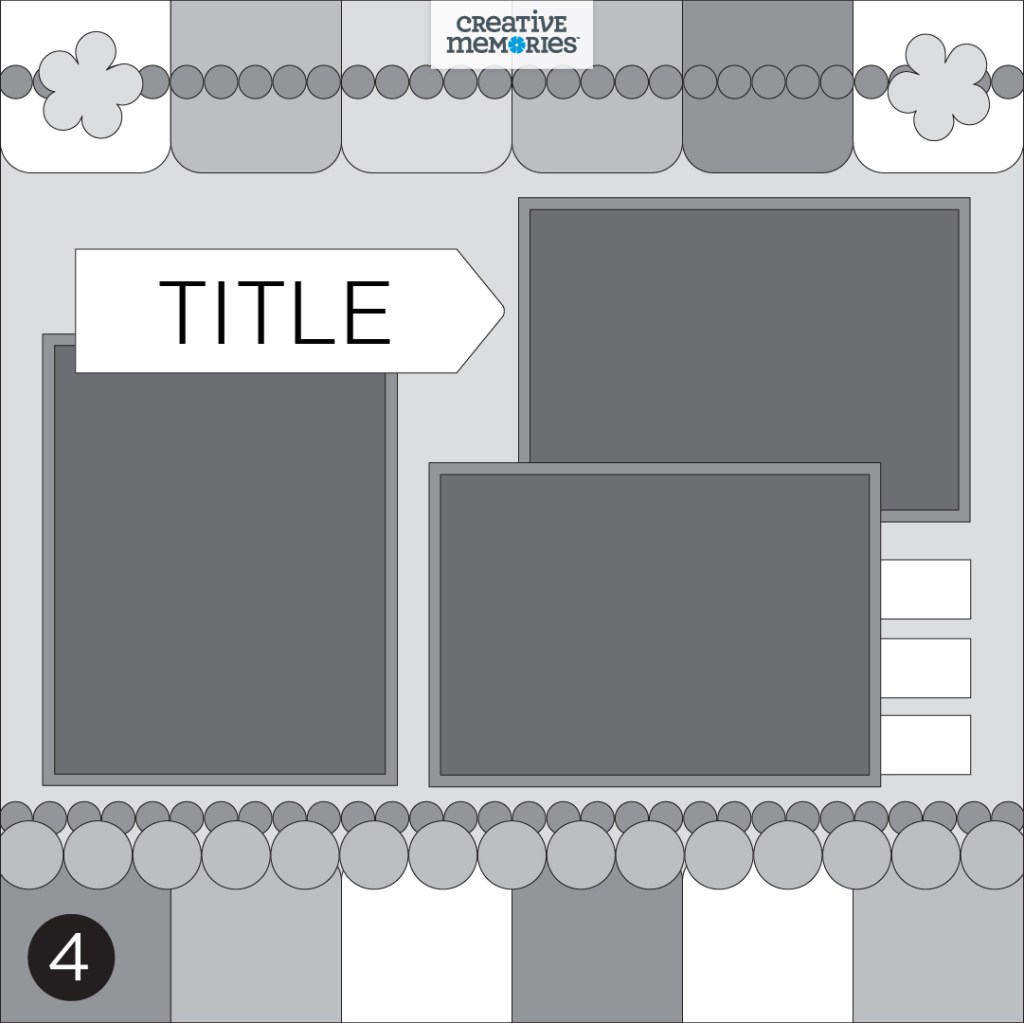
Sketch 4 — #2022JulyBONUS4
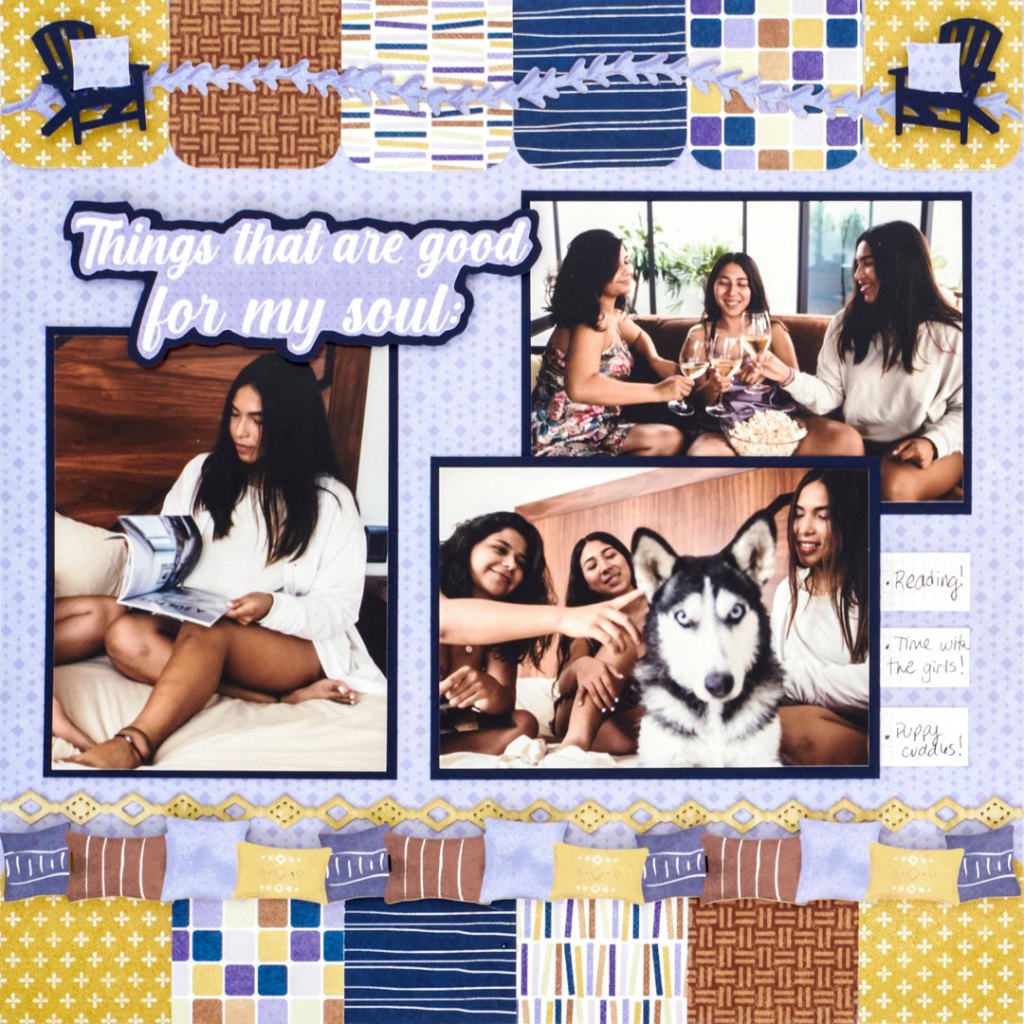
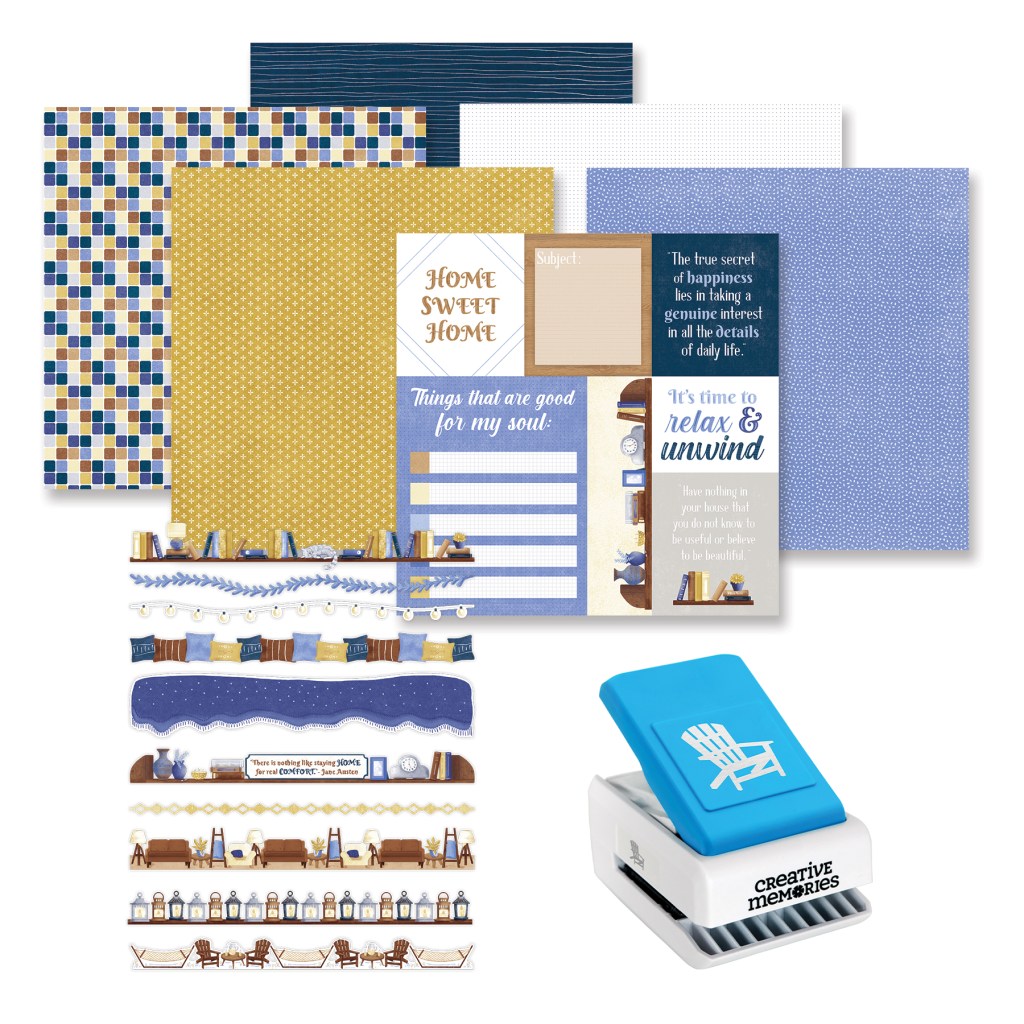
Promo product used: Relax & Unwind Bundle | CA | AU
Want step-by-step instructions for creating this layout? Scroll down to the bottom of this blog post!
Remember, you have until Sunday, Aug. 7, at 11:59pm CT (Australia: 8 Aug. at 2:59pm AET) to complete your layout(s) and post them in the Virtual Crop Facebook Group (with hashtag #2022JulyBONUS1, #2022JulyBONUS2, #2022JulyBONUS3 or #2022JulyBONUS4) to be eligible to be one of the lucky winners!
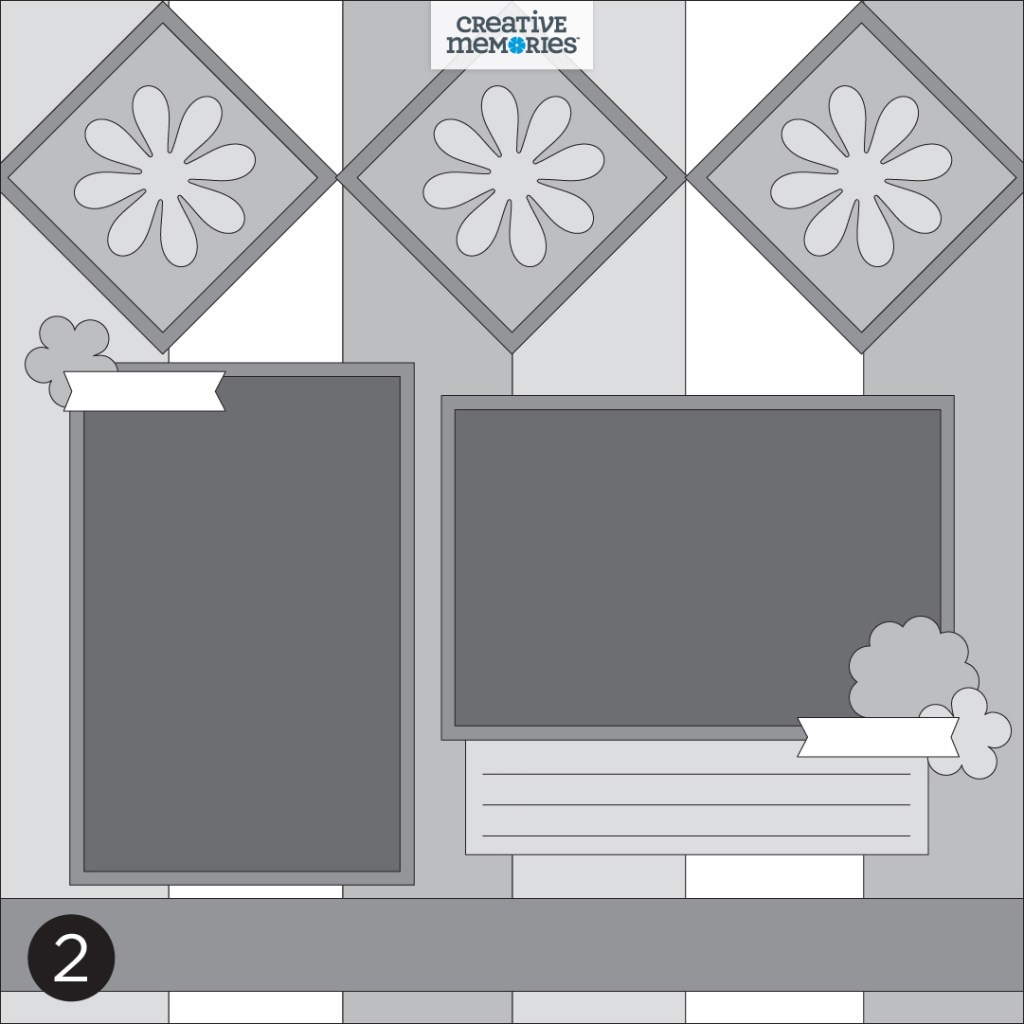
Instructions for #2022JulyBONUS1
To create this layout you will need:
- Vineyard Escape Bundle — Exclusive in the You-Pick-It Promotion
- Five Leaf Punch or (Shop Canada | Shop Australia)
- Custom Cutting System with Circle Patterns or (Shop Canada | Shop Australia)
- 12-inch Trimmer or (Shop Canada | Shop Australia)
- Personal Trimmer or (Shop Canada | Shop Australia)
- Tape Runner or (Shop Canada | Shop Australia)
- Repositionable Tape Runner or (Shop Canada | Shop Australia)
- Foam Squares or (Shop Canada | Shop Australia)
- Black Dual-Tip Pen or (Shop Canada | Shop Australia)

Step 1: Use the purple grapes paper for the layout base. Using the 12-inch Trimmer, cut a 10″ square hollow frame from the middle of the purple grapes paper to use for circles and grape bunch punches later.
Step 2: Cut two 1″ x 12″ strips from the corks paper and adhere them 1″ from the sides of the purple grapes base page.

Step 3: Cut a 1/2″ x 12″ strip of green ivy from the vine-covered cobblestone wall paper. Cut remaining paper to 10″ wide, then add the 1/2″ x 12″ green ivy strip to the left side of paper. Adhere paper on top of purple grapes base page.
Step 4: Using the Personal Trimmer, crop photos to 3-3/4″ x 5-3/4″. Cut two 4″ x 6″ photo mats from the corks paper with the 12-inch Trimmer. Adhere photos onto mats with a Tape Runner, then mount on layout as shown.
Step 5: Using the inside edge of the medium Custom Cutting System Circle Template, cut five 2-1/4″ circles from the sage texture paper. Using the inside edge of the medium Custom Cutting System Template and the Blue Blade, cut three 2″ circles from the cork texture paper and two 2″ circles from the spilled wine texture paper.

Step 6: Use the Grape Bunch Punch to punch three circles/grape bunches from the spilled wine texture paper and two from the cork texture paper. Adhere five sets of three circles together with the 2-1/4″ sage circles on the bottom and then alternating the cork and spilled wine circles and the spilled wine and cork grape bunch circles. Adhere the five layered circles vertically beside the photos, alternating the angle of the grape design as shown.
Step 7: Punch several leaves with the Five Leaf Punch from the leftover cobblestone/ivy paper. Arrange in a cluster between the photos and add the reserved grape bunches to the “vines.”
Step 8: Add tags, title, word art strips and wine glass embellishments as shown or desired and journal to complete the layout.

Instructions for #2022JulyBONUS2
To create this layout you will need:
- Brewery Bound Bundle — Exclusive in the You-Pick-It Promotion
- White Solid Cardstock or (Shop Canada | Shop Australia)
- 12-inch Trimmer or (Shop Canada | Shop Australia)
- Personal Trimmer or (Shop Canada | Shop Australia)
- All-Purpose Scissors or (Shop Canada | Shop Australia)
- Tape Runner or (Shop Canada | Shop Australia)
- Repositionable Tape Runner or (Shop Canada | Shop Australia)
- Foam Squares or (Shop Canada | Shop Australia)
- Brown Dual-Tip Pen or (Shop Canada | Shop Australia)
Step 1: Use a piece of White Solid Cardstock for the layout base.
Step 2: Using the 12-inch Trimmer, cut six 2″ x 12″ strips from six different designer papers. Adhere vertically onto the cardstock.
Step 3: Cut three 2-7/8″ squares from the dark woodgrain paper and three 2-1/2″ squares from the frothy light beer paper. Adhere smaller squares onto larger squares, then mount all three squares onto the base page on the diagonal so that the top corners of the squares align with the top edges of the base page.
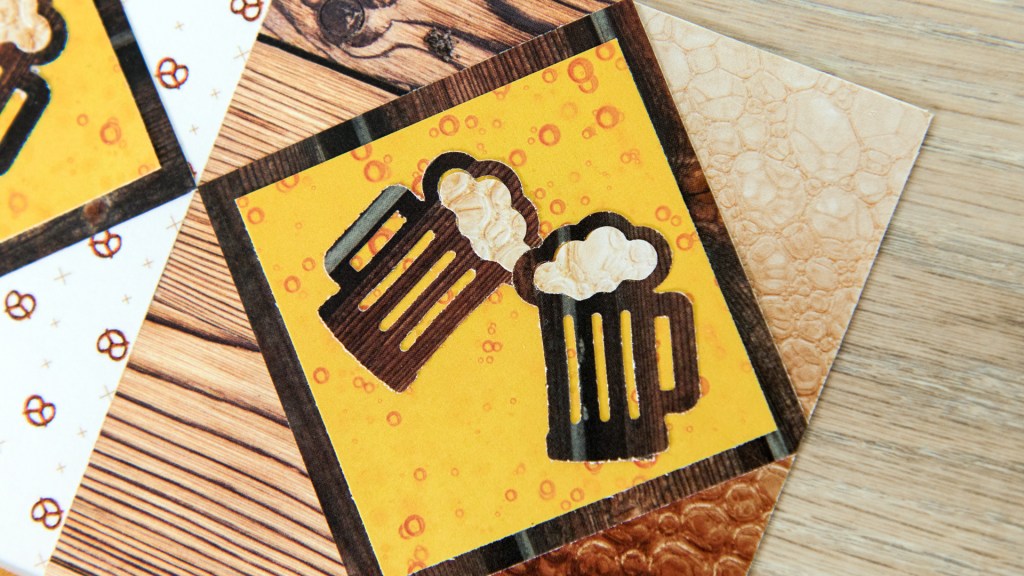
Step 4: Punch five beer mugs with the Beer Mug Punch with dark woodgrain paper. Adhere with Repositionable Tape Runner onto the IPA texture squares as shown. Punch five more beer mugs from the lighter foamy pattern of the IPA texture paper, then insert the frothy beer “heads” into the negative space on each beer mug cutout.
Step 5: Using the Personal Trimmer, crop photos to 5-3/4″ x 3-3/4″ and 3-3/4″ x 5-3/4″. Cut two 4″ x 6″ photo mats from the geometric wheat paper with the 12-inch Trimmer. Adhere photos onto mats with the Tape Runner and then mount on layout as shown.

Step 6: Using the 12-inch Trimmer, cut the “Life is brew-tiful” border strip and the striped journal box from the grid sheet. Adhere the border 1/2″ up from bottom edge of layout and the journal box underneath the horizontal photo.

Step 7: Add stickers as shown or desired and journal to complete the layout.
Instructions for #2022JulyBONUS3
To create this layout you will need:
- Reel Good Times Bundle — Exclusive in the You-Pick-It Promotion
- Navy & White Solid Cardstocks or (Shop Canada | Shop Australia)
- 3-in-1 Bevel Tag Punch or (Shop Canada | Shop Australia)
- 12-inch Trimmer or (Shop Canada | Shop Australia)
- All-Purpose Scissors or (Shop Canada | Shop Australia)
- Tape Runner or (Shop Canada | Shop Australia)
- Repositionable Tape Runner or (Shop Canada | Shop Australia)
- Foam Squares or (Shop Canada | Shop Australia)
- Black Dual-Tip Pen or (Shop Canada | Shop Australia)
Step 1: Use the hooks and tackles paper for the layout base. Cut an 8″ square hollow frame from the middle of the olive green hooks paper to use as photo mats later.
Step 2: Using the 12-inch Trimmer, cut an 11-1/2″ square from the light woodgrain paper. Cut a 10″ square hollow frame from the middle of the light woodgrain paper to use as photo mats and tag later. Align and adhere the light woodgrain paper frame on top of hooks and tackles paper.
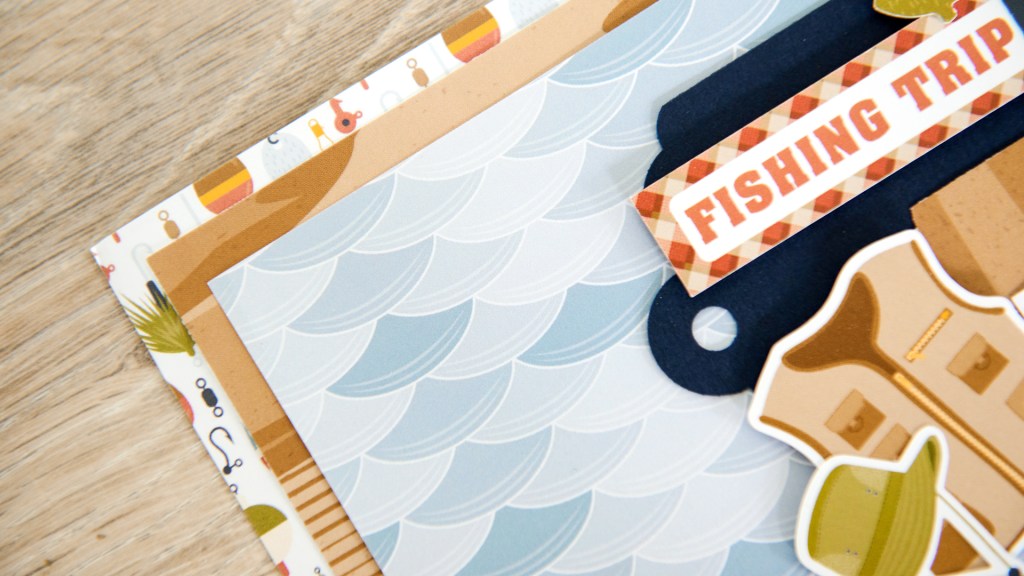
Step 3: Cut an 11″ x 6″ piece of the fish scales paper and an 11″ x 5″ piece of the fishermen paper. Adhere piece on top of the light woodgrain paper with equal margins all around.
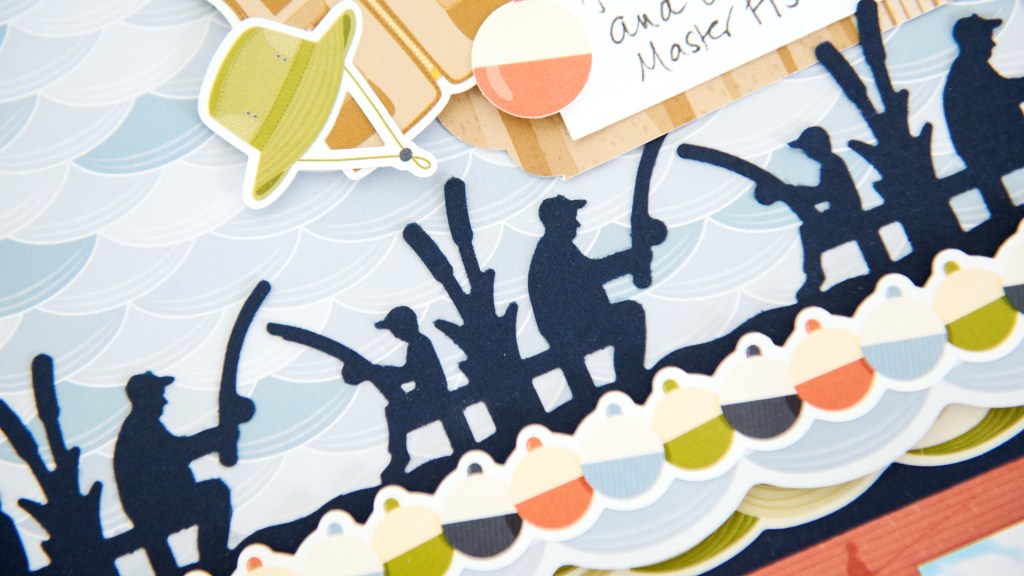
Step 4: Punch a border strip with the Gone Fishing Border Punch from Navy Solid Cardstock. Trim border strip to measure 2-1/2″ wide.
Step 5: Layer the three different border sticker strips underneath the decorative punched area as shown, then adhere entire border strip across seam between fish scales and fishermen papers.
Step 6: Using the 12-inch Trimmer, cut a 4-1/2″ square from the reserved olive green hooks paper and a 4-1/4″ square from bobbers paper. Adhere squares together for a double photo mat and mount a 4″ square photo on top. Adhere photo on top of fish scales paper as shown.
Step 7: Use the 3-in-1 Bevel Tag Punch to punch one 2-1/2″ wide tag from reserved light woodgrain paper and trim tag to 3″ long. Cut a scrap of White Solid Cardstock to 2″ x 2-1/2″ and adhere on top of light woodgrain tag. Punch another 2-1/2″ wide tag from Navy Solid Cardstock and trim tag to 4″ long. Layer tags as shown adhere beside double-matted photo on top of the fish scales paper.
Step 8: Mount three 3″ x 4″ photos on fishermen paper, leaving a space between two of them for the vertical fishing rod stickers. Add stickers and word art using Foam Squares.

Step 9: Add sticker clusters as shown or desired and journal on the tag to complete the layout.
Instructions for #2022JulyBONUS4
To create this layout you will need:
- Relax & Unwind Bundle — Exclusive in the You-Pick-It Promotion
- Navy Solid Cardstock or (Shop Canada | Shop Australia)
- 2-Way Corner Rounder or (Shop Canada | Shop Australia)
- 12-inch Trimmer or (Shop Canada | Shop Australia)
- Personal Trimmer or (Shop Canada | Shop Australia)
- All-Purpose Scissors or (Shop Canada | Shop Australia)
- Tape Runner or (Shop Canada | Shop Australia)
- Repositionable Tape Runner or (Shop Canada | Shop Australia)
- Foam Squares or (Shop Canada | Shop Australia)
- Black Dual-Tip Pen or (Shop Canada | Shop Australia)
Step 1: Use lavender diamonds paper for layout base.
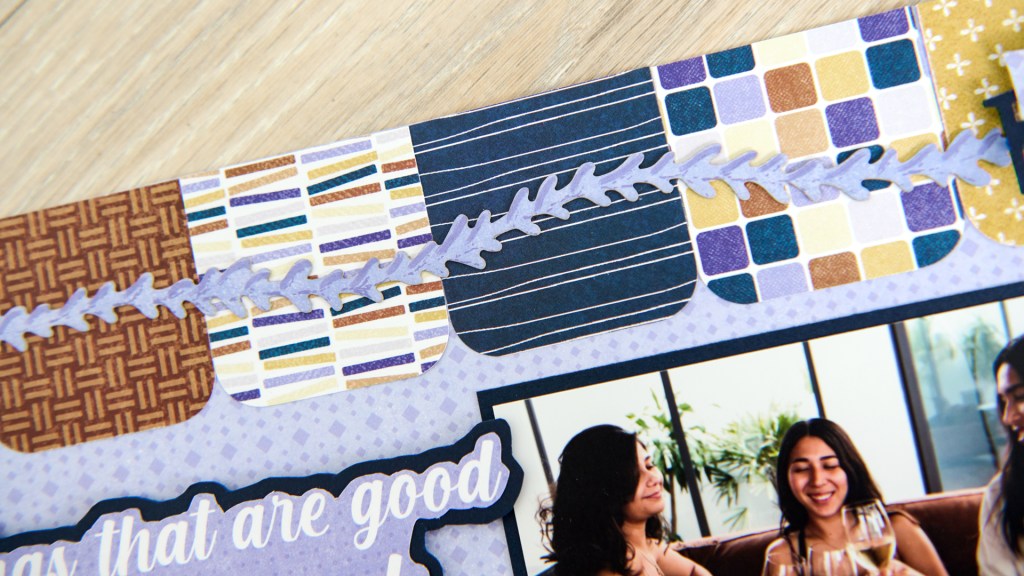
Step 2: Using the 12-inch Trimmer, cut twelve 2″ squares from six various papers. Round two corners of each square with the 2-Way Corner Rounder.
Step 3: Align straight edge of squares along top and bottom edges of base page to form borders as shown. Adhere with a Tape Runner.
Step 4: Using the Personal Trimmer, crop photos to 5″ x 3″. Cut three 5-1/4″ x 3-1/4″ photo mats from Navy Solid Cardstock with the 12-inch Trimmer. Adhere photos onto mats with a Tape Runner, then mount on layout as shown.
Step 5: Trim the title block from the grid paper, then fussy-cut around the words with the All-Purpose Scissors. Mount title onto Navy Solid Cardstock and fussy-cut again to leave a navy border all around. Mount the title as shown with Foam Squares for added dimension. Trim three of the grid journal strips from same title card in half and tuck them behind lower photo.
Step 6: With the Adirondack Chair Punch, punch two chairs from Navy Solid Cardstock and adhere with Repositionable tape Runner to top outer squares. Cut two 3/4″ squares from lavender diamonds paper, then use All-Purpose Scissors to make shallow rounded cuts into each side of the square to mimic the shape of the pillow in the laser-cut border. Add “pillows” to each Adirondack chair, securing with Repositionable Tape Runner.

Step 7: Adhere lavender vine, warm yellow diamonds and pillows laser-cut border strips as shown on top of squares borders, using Repositionable Tape Runner to adhere the smaller, detailed strips and Foam Squares for added dimension.
Step 8: Journal on the grid journal strips with a Dual-Tip Pen.
And if you want all the details on the promotion, visit: US | CA | AU. And enjoy this challenge!

Outstanding examples with the new paper and embellishments! Thanks Noreen!