July 22, 2022
These Water And Ocean Themed Scrapbook Cards Are A Creative Fanta-Sea

To some, all it takes to recenter oneself, refresh the mind and feel at ease is a day (or week… who are we to limit you?!) near a body of tranquil, crystal-clear water, whether that would be an ocean, sea, bay, gulf or lake! That same relaxing sentiment can go for crafting! Well, if you’re looking for easy-breezy water and ocean themed scrapbook cards to make after those happy, hydrating times, then take a peek at these carefree cards!


To create these cards, you will need:
- Serene Waters Paper Pack or (Shop Canada | Shop Australia)
- Serene Waters Tone-on-Tone Paper Pack or (Shop Canada | Shop Australia)
- Serene Waters Embellishments or (Shop Canada | Shop Australia)
- Serene Waters Stickers or (Shop Canada | Shop Australia)
- Navy & White Solid Cardstocks or (Shop Canada | Shop Australia)
- Navy Micro-Tip Pen or (Shop Canada | Shop Australia)
- Blue Chalking Pen or (Shop Canada | Shop Australia)
- White Chalking Pen or (Shop Canada | Shop Australia)
- Original Border Maker System with Rolling Sails Cartridge or (Shop Canada | Shop Australia)
- 12-inch Trimmer with Straight & Scallop Blades or (Shop Canada | Shop Australia)
- CM Zero-Centering Ruler or (Shop Canada | Shop Australia)
- Tape Runner or (Shop Canada | Shop Australia)
- Repositionable Tape Runner or (Shop Canada | Shop Australia)
- Foam Squares or (Shop Canada | Shop Australia)
Roam Far & Wander Wide Card

Step 1: Create the card base. Cut an 8-1/2″ x 5-1/2″ piece of White Solid Cardstock. Using the 12-inch Trimmer and the Scoring Blade, score along the long edge at 4-1/4″ and fold in half.
Step 2: Cut a 4-1/4″ x 5-1/2″ piece of painterly sunrise designer paper and adhere to the front of the card.
Step 3: Cut a 4-1/4″ x 5-1/2″ piece of Navy Solid Cardstock. Align a short end of the cardstock in the middle of the Border Maker Guide and punch twice using the Rolling Sails Border Maker Cartridge. Trim the piece to 1-1/4″. Repeat twice. Adhere pieces on the card as shown.
Step 4: Using the Blue Chalking Pen, doodle on the sails, make a few waves and add some seagulls.
Step 5: Adhere a sticker with Foam Squares for added dimension.
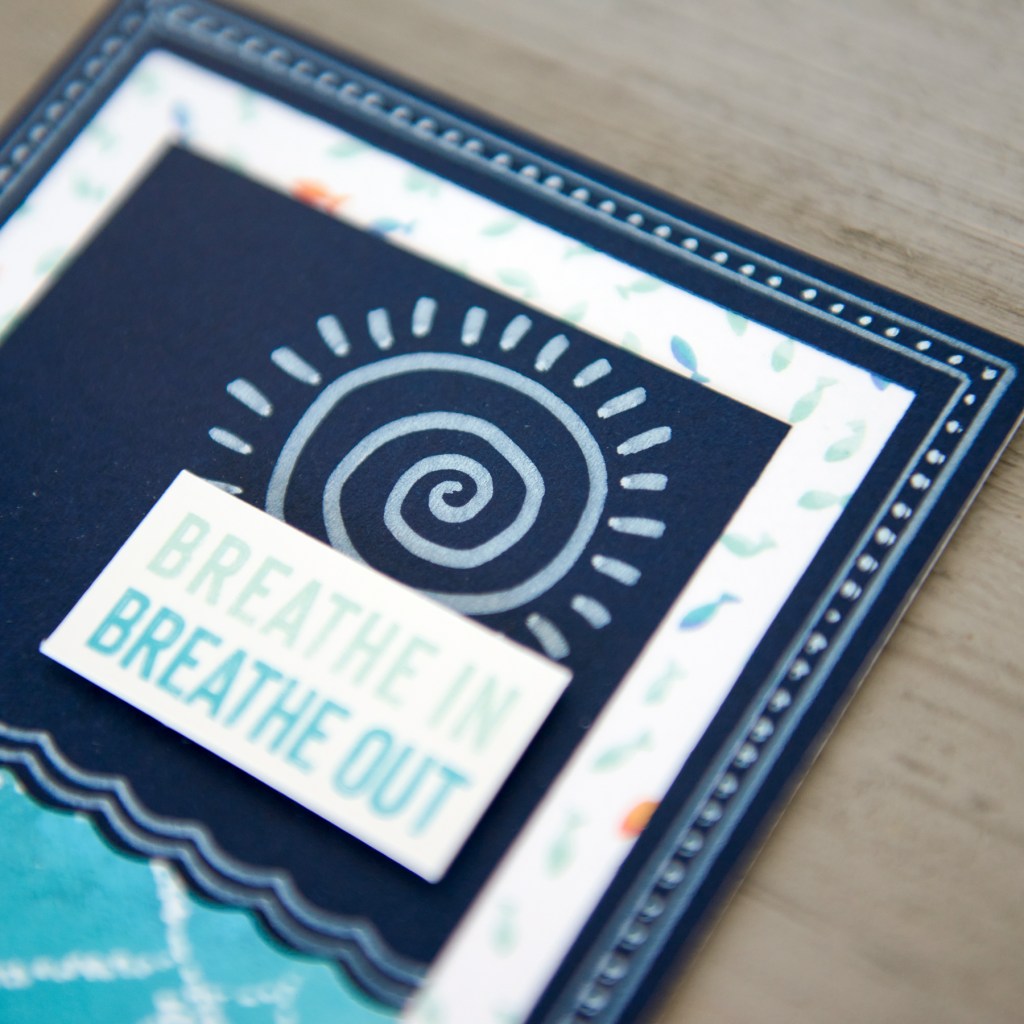
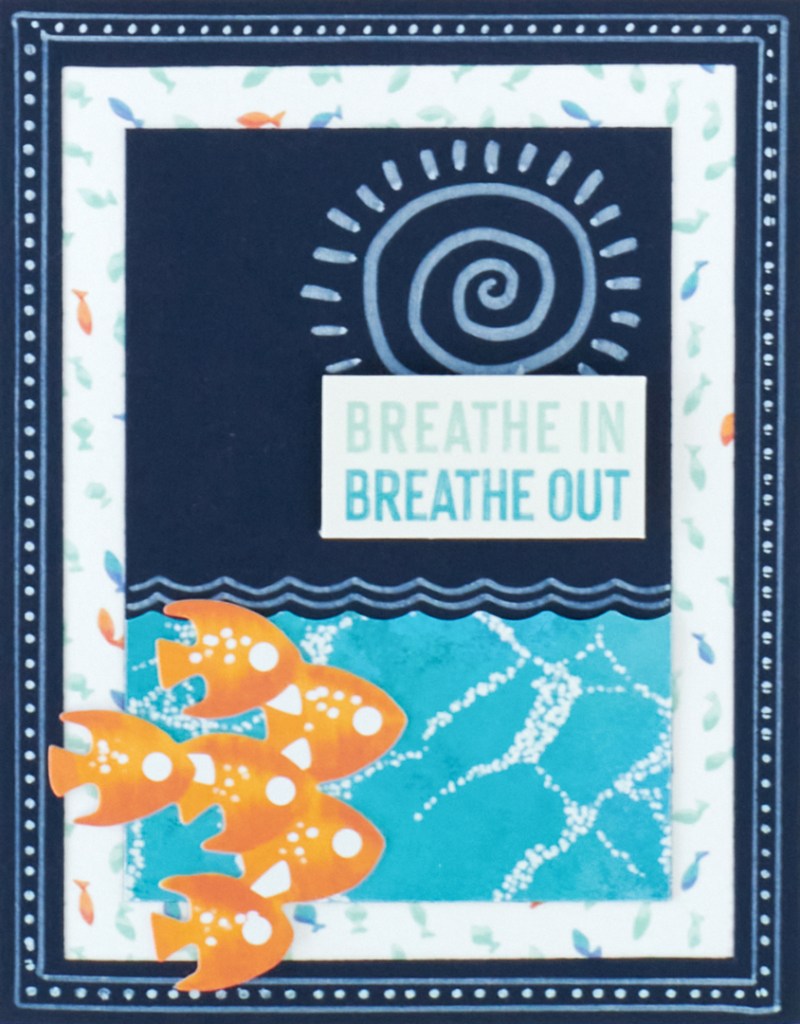
Breathe In Breathe Out Card
Step 1: Create the card base. Cut an 8-1/2″ x 5-1/2″ piece of White Solid Cardstock. Using the 12-inch Trimmer and the Scoring Blade, score along the long edge at 4-1/4″ and fold in half.
Step 2: Cut a 4-1/4″ x 5-1/2″ piece of circling schools of fish designer paper and adhere on the front of the card.
Step 3: Cut a 4-1/4″ x 5-1/2″ piece of Navy Solid Cardstock. Cut out a 3/8″ frame from the inside of the piece. Cut the inside piece to 2-7/8″ x 4-3/8″ and save for Step 4. Adhere the frame on the card. Using the White Chalking Pen and a ruler, draw two lines around the outside. Then fill in with dots.
Step 4: Cut a 3″ x 1-1/2″ piece of glistening ripples designer paper, using the 12-inch Trimmer and the Scallop Blade to cut the top edge. Adhere on the set-aside navy piece. Trace two rows of waves on the navy piece with the White Chalking Pen as shown.
Step 5: Doodle a sun and top with sticker using Foam Squares for added dimension.
Hello Card
Step 1: Create the card base. Cut an 8-1/2″ x 5-1/2″ piece of White Solid Cardstock. Using the 12-inch Trimmer and the Scoring Blade, score along the long edge at 4-1/4″ and fold in half.
Step 2: Cut a 4-1/4″ x 5-1/2″ piece of cool stripes designer paper and adhere on the front of the card.
Step 3: Cut a 3-3/4″ x 5″ piece of aqua fishes tonal paper and adhere on the card. Using a ruler and the Navy Micro-Tip Pen, draw a line around the aqua fishes piece, leaving space to write a message at the bottom. Doodle some seaweed in the left-hand corner.
Step 4: Adhere fish, popping one up with Foam Squares for added dimension. Doodle some bubbles for the fish.
Which of these water and ocean themed scrapbook cards catches your sails of creativity? Who would you send them to?
