September 15, 2022
Go Batty For These Halloween Scrapbook Borders and DIY Card
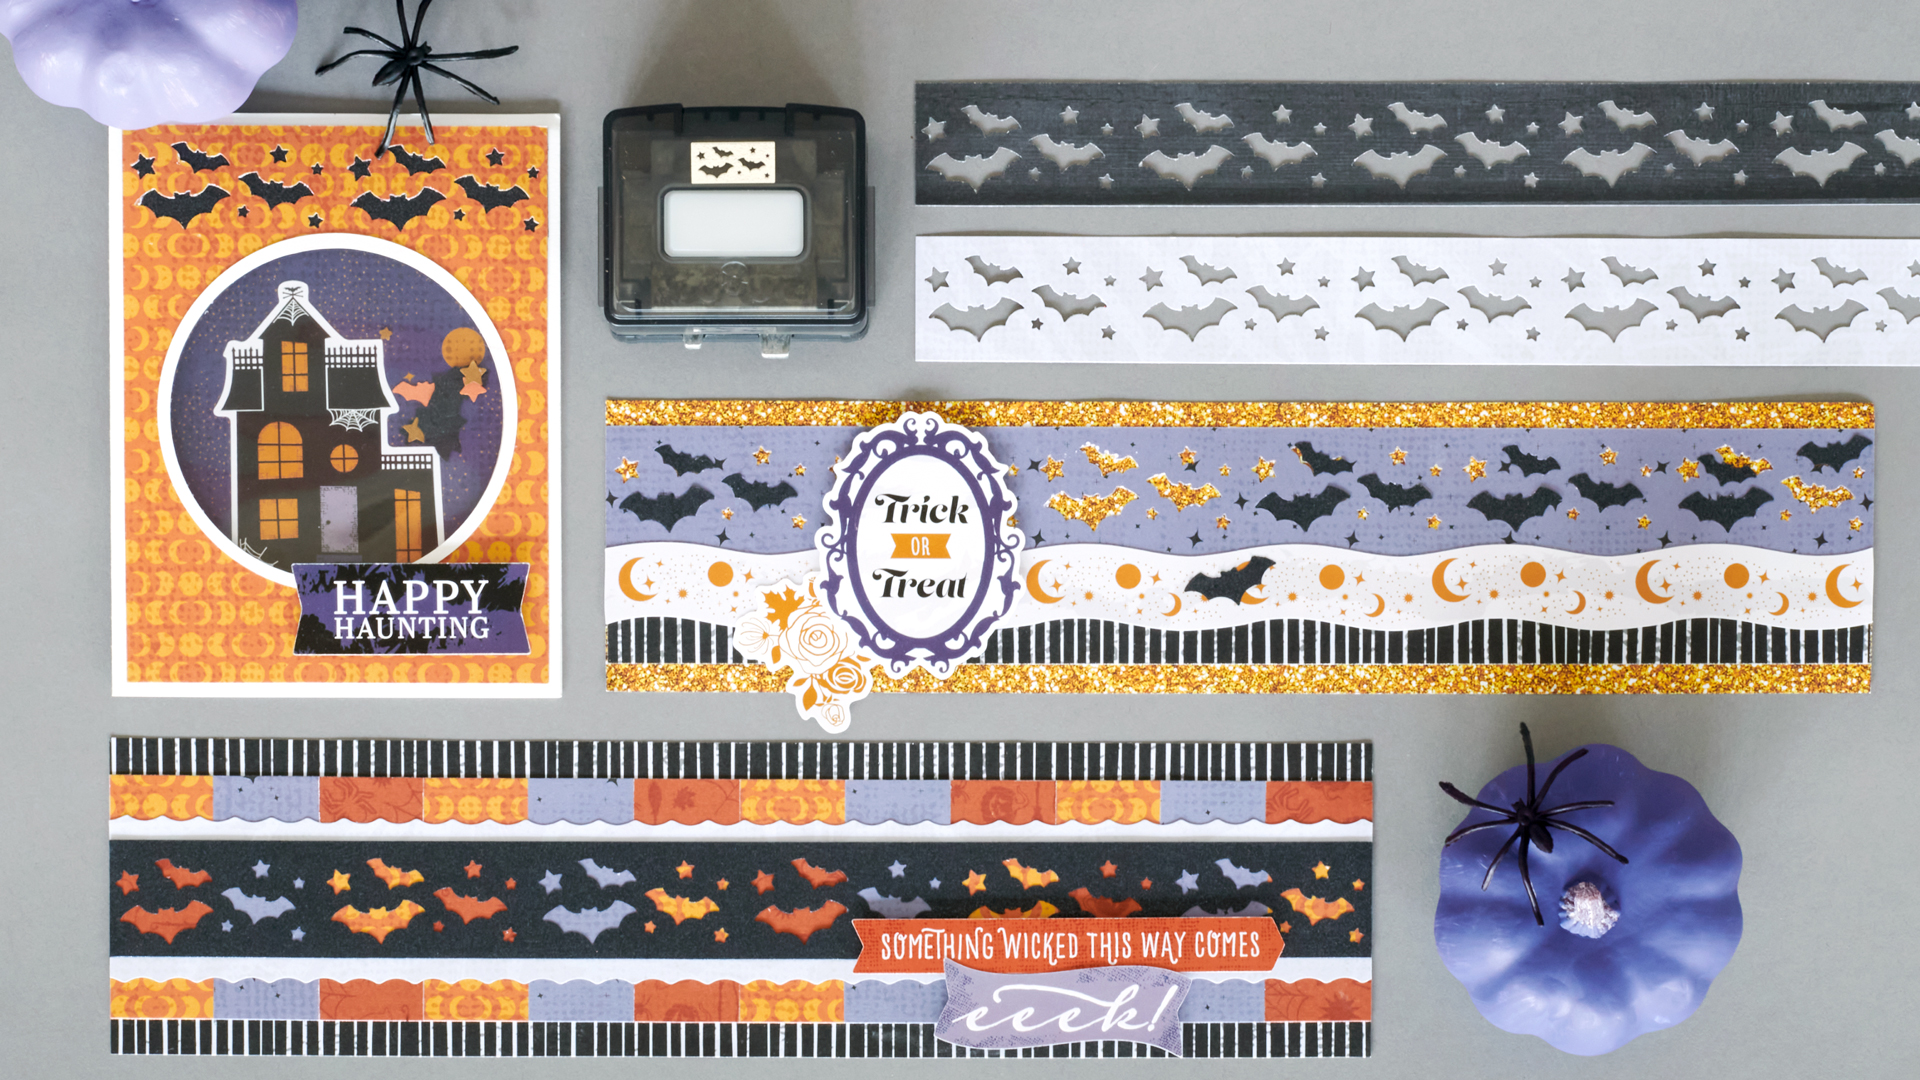
Witches and black cats and jack-o’-lanterns, oh my! There are many iconic symbols associated with Halloween. Another notably nocturnal icon is the bat! Whether you think they are spooky or absolutely adorable (did you know that bats play an essential role in pest control, pollinating plants and dispersing seeds!?), bats and Halloween go together like tricks and treats. Well, let your creativity take flight with these Halloween scrapbook borders and DIY card! You’ll go batty for them!
To create these borders and card, you will need:
- Happy Hauntings Paper Pack or (Shop Canada | Shop Australia)
- Happy Hauntings Laser Cut Embellishments or (Shop Canada | Shop Australia)
- Happy Hauntings Stickers or (Shop Canada | Shop Australia)
- Black Shimmer, Bronze Shimmer, Orange Shimmer & White Solid Cardstocks or (Shop Canada | Shop Australia)
- 4×6 Peekaboo Pockets™ or (Shop Canada | Shop Australia)
- Original Border Maker System with Bats & Stars Cartridge or (Shop Canada | Shop Australia)
- Custom Cutting System with Circle Patterns or (Shop Canada | Shop Australia)
- 12-inch Trimmer with Straight, Scallop & Scoring Blades or (Shop Canada | Shop Australia)
- Micro-Tip Scissors or (Shop Canada | Shop Australia)
- Tape Runner or (Shop Canada | Shop Australia)
- Repositionable Tape Runner or (Shop Canada | Shop Australia)
- Foam Squares or (Shop Canada | Shop Australia)
- Photo Tape or (Shop Canada | Shop Australia)
Check out the Bats & Stars Border Maker Cartridge in action in the video below!

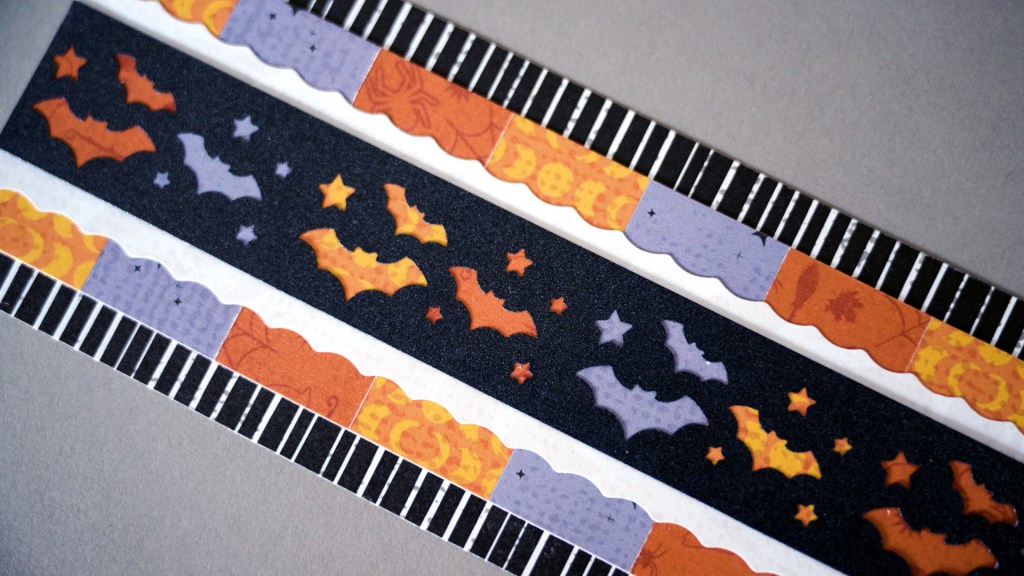
Something Wicked Border
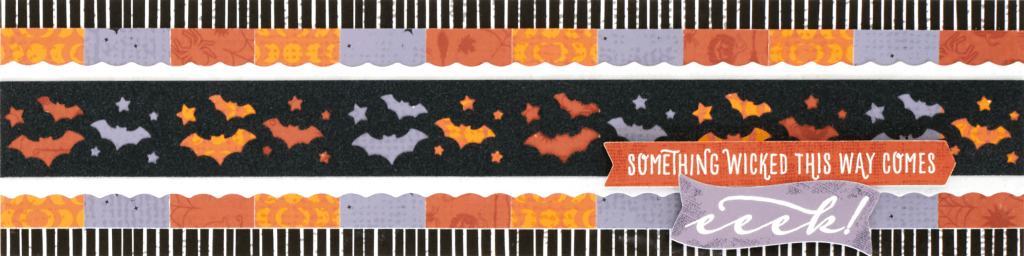
Step 1: Cut a 12″ x 3″ strip of black-and-white stripes paper for the base.
Step 2: Cut a 12″ x 2″ piece of cardstock. Cut 12 1″ x 2″ pieces with various papers. Adhere on the cardstock strip, alternating hues. Cut the strip into two 12″ x 1/2″ strips and one 12″ x 1″ strip. Adhere the two 12″ x 1/2″ strips on the base, about 5/16″ from the top and bottom edges.
Step 3: Using the 12-inch Trimmer and the Scallop Blade, cut a 12″ x 1-1/2″ scallop strip with light distressed paper. Adhere to the middle of the border. Adhere the 12″ x 1″ wide on top.
Step 4: Using the Bats & Stars Border Maker Cartridge, punch a border with Black Shimmer Solid Cardstock (saving the punched-out bats for the “Trick-or-Treat Border”). Trim out to 12″ x 1-1/8″ and adhere on top of the multi-hued 12″ x 1″ as shown.
Step 5: Add stickers, popping them up with Foam Squares for added dimension.
Trick-or-Treat Border
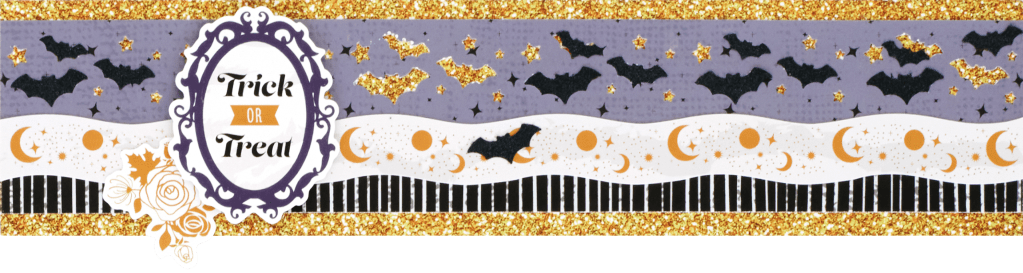
Step 1: Cut a 12″ x 2-3/4″ strip of gold glitter paper for the base.
Step 2: Using the Bats & Stars Border Maker Cartridge, punch a border with purple stardust paper. Trim to 12″ x 1-3/4″ and adhere on the border, about 1/4″ from the top edge. Adhere the leftover black shimmer bats (from “Something Wicked Border”) to the border.
Step 3: Cut a 12″ x 1/2″ strip of black-and-white stripes paper and adhere it on the base, about 1/4″ from the bottom edge. Apply a moons and stars border sticker along the seam.
Step 4: Add stickers, popping some up with Foam Squares for added dimension.
Happy Haunting Shaker Card
Step 1: Create the card base. Cut an 8-1/2″ x 5-1/2″ piece of White Solid Cardstock. Using the 12-inch Trimmer and the Scoring Blade, score along the long edge at 4-1/4″ and fold in half. Cut a 4″ x 1″ strip of Black Shimmer Solid Cardstock and adhere on the front of the card, about 1/8″ from the top edge.
Step 2: Cut a 4″ x 5-1/4″ piece of orange moons paper. Using the Bats & Stars Border Maker Cartridge, punch the top edge of this piece. Adhere on the card.
Step 3: Using the inside edge of the largest Custom Cutting System Circle Pattern and the Green Blade, cut a circle out of the front of the card (unfold the card first), just below the bats. Using the Green Blade, cut a circle with White Solid Cardstock. Without moving the pattern, switch to the Red Blade and cut out a ring. Adhere the ring on the card as shown.
Step 4: Make the shaker pocket. Cut a 4″ x 5″ piece of dark purple moondance paper. Adhere the haunted house sticker on it, checking it behind the opening in the card for proper placement. Decorate the other side of the paper now, if desired. Insert the piece into a Peekaboo Pocket™. Trim 1/2″ off one long side to make it 4″ x 5-1/2″ and score at 5″. Trim off excess plastic as needed. Fill the inside of the pocket with leftover bats and stars punched from Black, Orange and Bronze Shimmer Solid Cardstocks. Apply Photo Tape to seal the pocket. Adhere to the inside of the front of the card.
What do you think of these fang-tastic Halloween scrapbook borders and DIY card? Share, share, share!

love these Halloween borders / card ideas. IF ONLY SHIPPING TO HAWAII was more reasonable!!