September 19, 2022
#2022SeptemberBONUS Challenge: 3 Shades of the Seasons Layouts
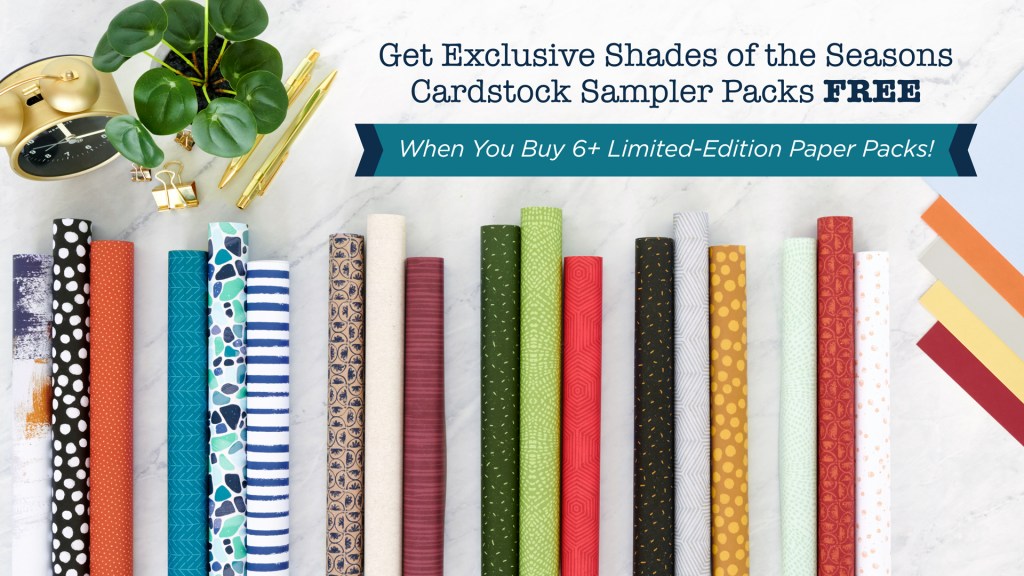
Do you know what time it is? By the look on our watch, it’s Paper Buffet time! For a limited time only, you will be able to purchase limited-edition 12×12 Shades of the Seasons Paper Packs (12/pk) AND have the opportunity to earn exclusive Shades of the Seasons Cardstock Sampler Packs (10/pk) FREE during the Paper Buffet!
Not only do we have this exclusive promo to share with you today, but we also have a #2022SeptemberBONUS challenge that you can take on in the Virtual Crop Facebook Group featuring THREE sketches! All of the example layouts for the sketches show how you can use products from the qualifying paper packs you can get during this limited-time promo… check it out!
Paper Buffet Promo Details
#2022SeptemberBONUS Challenge
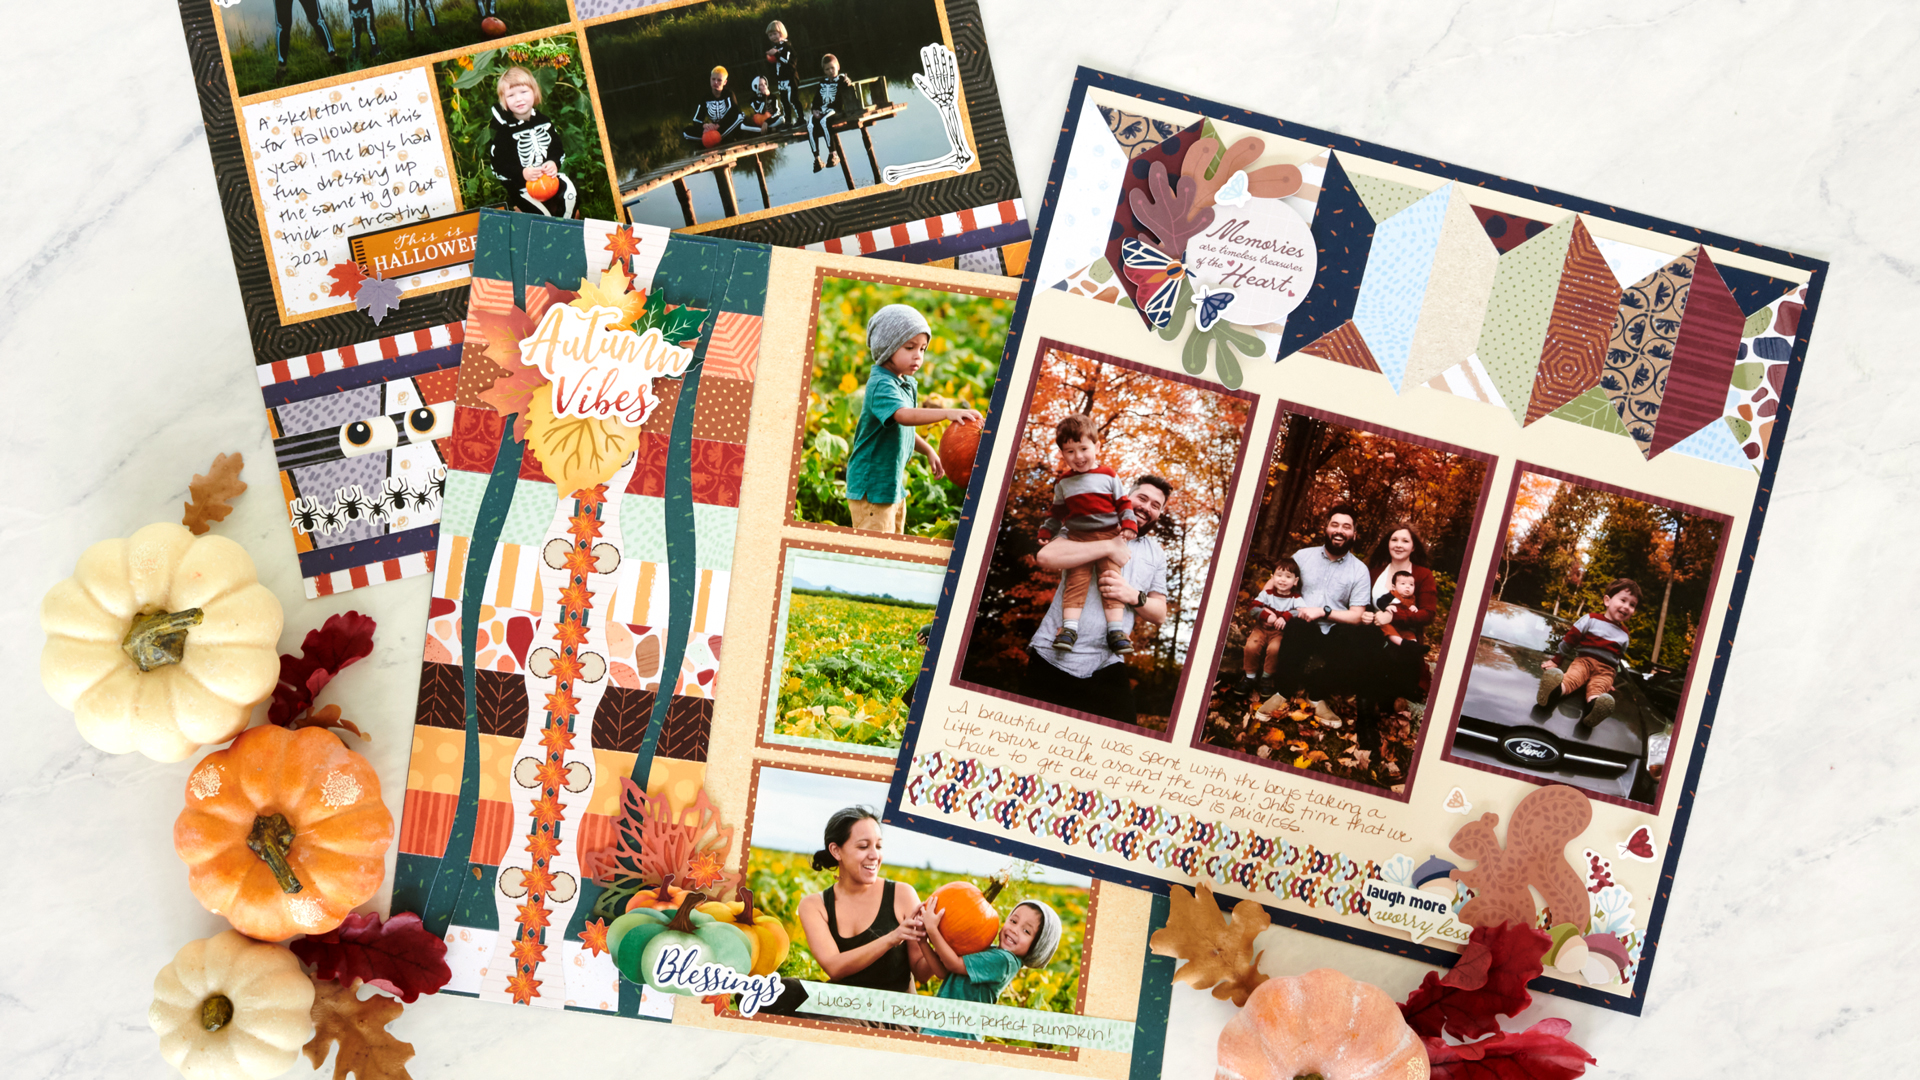
This pop-up challenge has THREE sketches with example completed layouts using the Shades of the Seasons Paper Packs that qualify toward the Paper Buffet!
How to Participate:
- Review the sketch below in this post and/or in the Virtual Crop Facebook Group. (You can also refer to the step-by-step instructions below if you’d prefer to do it that way instead of following the sketch!)
- Create the layout using whatever products you have on-hand; you do not need to use the Shades of the Seasons products to be eligible to win.
- Snap a picture of your finished project(s) and post it in the Virtual Crop Facebook Group by Sunday, Oct. 9, at 11:59pm CT (Australia: 10 Oct. at 3:59pm AEDT) with hashtag #2022SeptemberBONUS1, #2022SeptemberBONUS2 or #2022SeptemberBONUS3 for the chance to win a prize. We’ll have 6 lucky winners total — 1 winner per sketch, PLUS 3 bonus winners who complete the challenge using the Shades of the Seasons products.
- Winners will be announced in the Virtual Crop Facebook Group on Thursday, Oct. 13, at noon CT.
And what can you win?
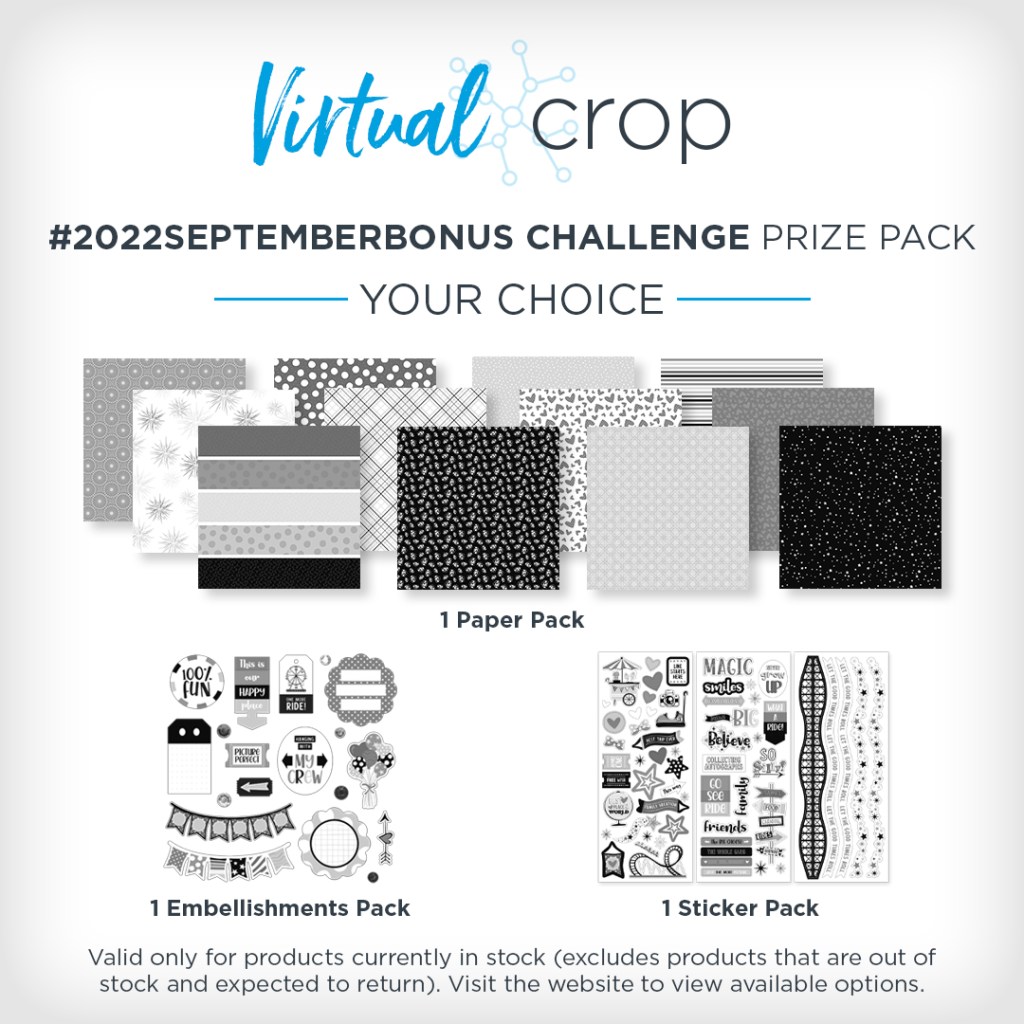
Winners will get to pick THEIR CHOICE of 1 Paper Pack + 1 Embellishments Pack + 1 Sticker Pack!
NOTE: The Prize Pack will be awarded to 1 participant for each sketch, PLUS 3 bonus winners who complete the challenge using the Shades of the Seasons products. We will award the prizes randomly, but to win, it must be evident you used the sketch we provided as inspiration to create a project using predominantly Creative Memories products. Prize winners will be announced on Thursday, Oct. 13, at noon CT.
Sketch 1 — #2022SeptemberBONUS1

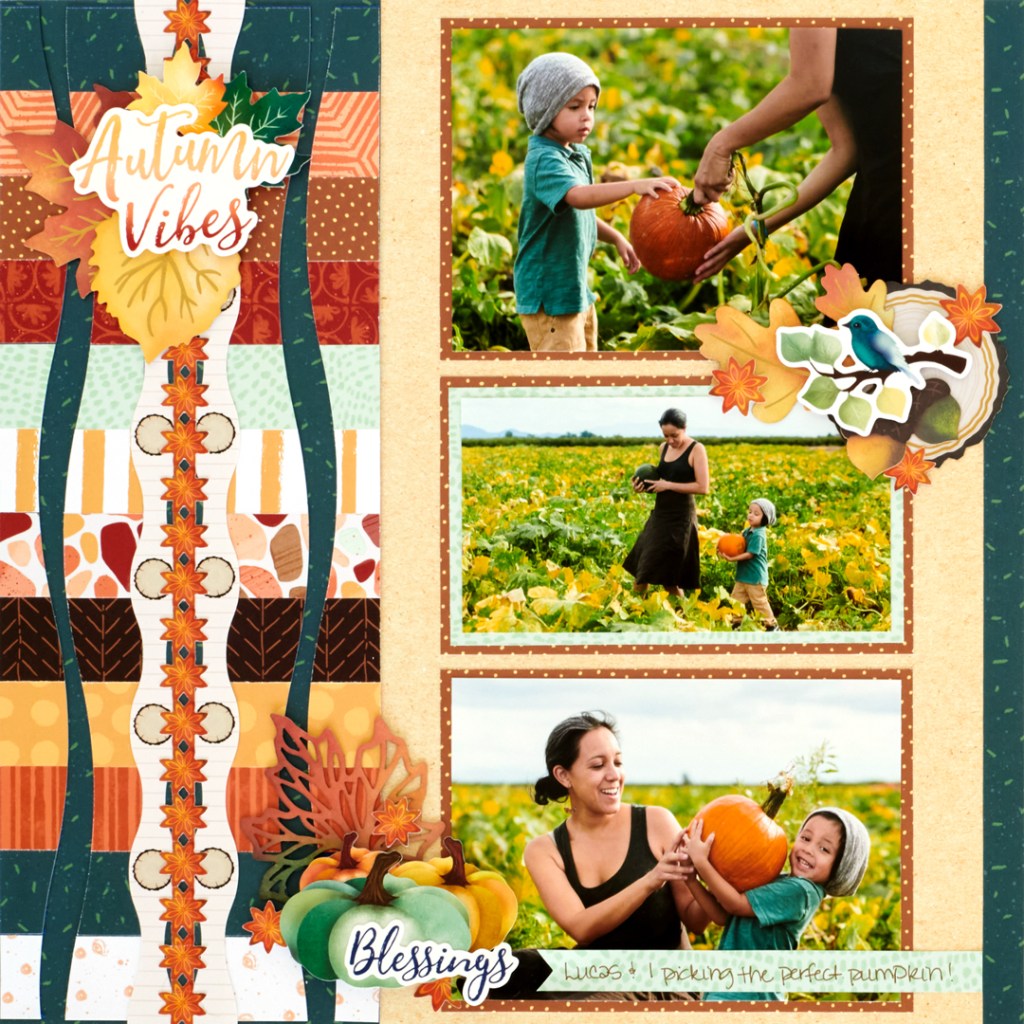
Promo product used: Shades of Golden Harvest | CA | AU
Want step-by-step instructions for creating this layout? Scroll down to the bottom of this blog post!
Sketch 2 — #2022SeptemberBONUS2

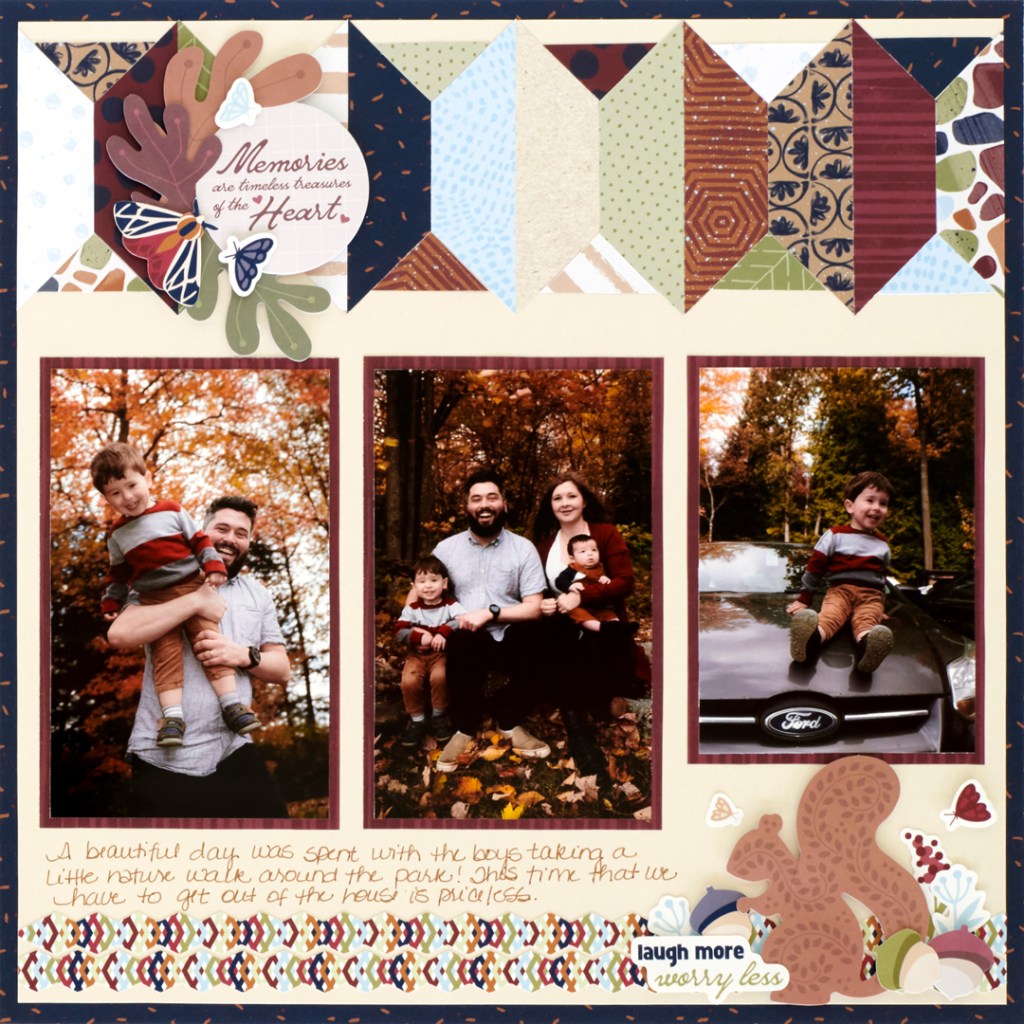
Promo product used: Shades of Croptoberfest | CA | AU
Want step-by-step instructions for creating this layout? Scroll down to the bottom of this blog post!
Sketch 3 — #2022SeptemberBONUS3

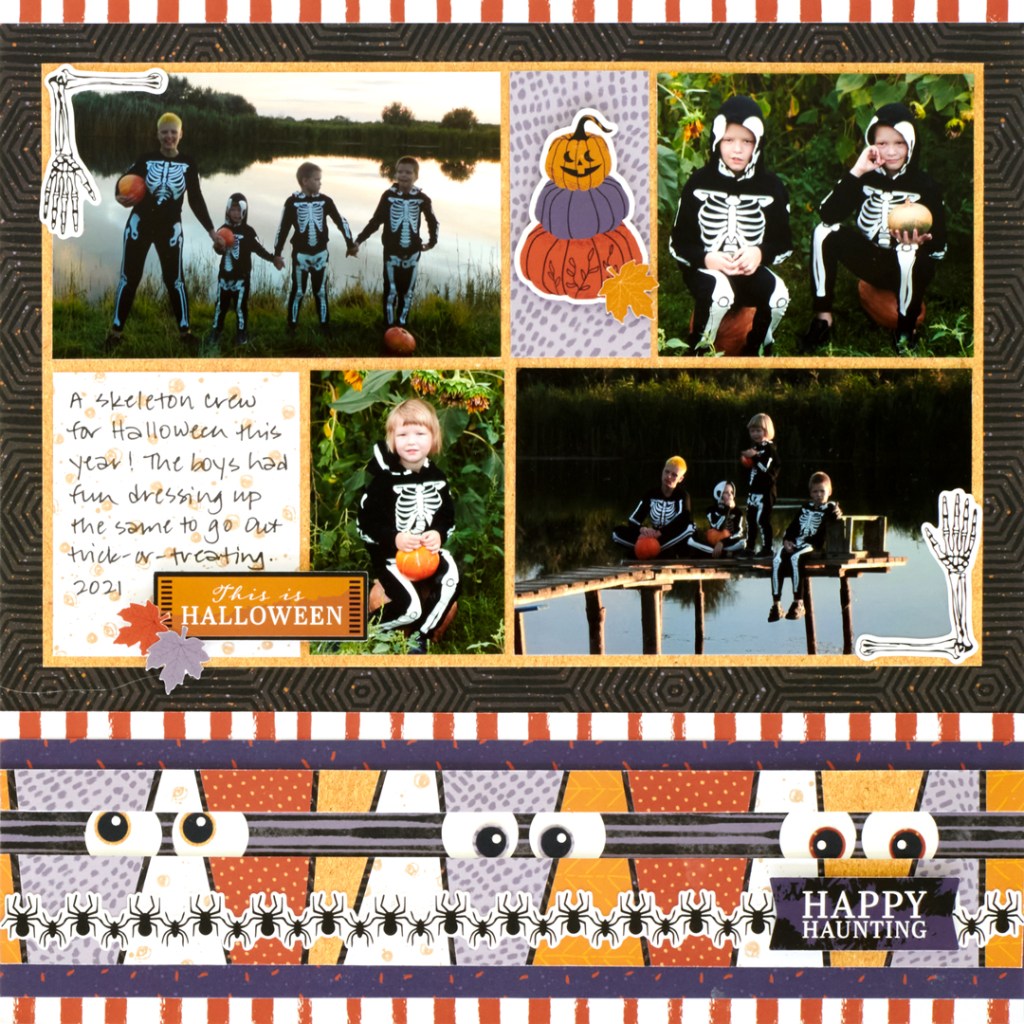
Promo product used: Shades of Happy Hauntings | CA | AU
Want step-by-step instructions for creating this layout? Scroll down to the bottom of this blog post!
Remember, you have until Sunday, Oct. 9, at 11:59pm CT (Australia: 10 Oct. at 3:59pm AEDT) to complete your layout(s) and post them in the Virtual Crop Facebook Group (with hashtag #2022SeptemberBONUS1, #2022SeptemberBONUS2, #2022SeptemberBONUS3 to be eligible to be one of the lucky winners!
Instructions for #2022SeptemberBONUS1
To create this layout you will need:
- Shades of Golden Harvest Paper Pack or (Shop Canada | Shop Australia)
- Golden Harvest Foiled Embellishments or (Shop Canada | Shop Australia)
- Golden Harvest Stickers or (Shop Canada | Shop Australia)
- 12-inch Decorative Trimmer or (Shop Canada | Shop Australia)
- 12-inch Trimmer or (Shop Canada | Shop Australia)
- Tape Runner or (Shop Canada | Shop Australia)
- Repositionable Tape Runner or (Shop Canada | Shop Australia)
- Foam Squares or (Shop Canada | Shop Australia)
- Brown Dual-Tip Pen or (Shop Canada | Shop Australia)

Step 1: Use light tan paper as the base of the layout.
Step 2: Cut a piece of dark green paper to measure 4-1/2” x 12”. Adhere along the left edge of the layout.
Step 3: Cut a piece of dark green paper to measure 1/2” x 12”. Adhere along the right edge of the layout.
Step 4: Cut a piece of any cardstock to measure 4-1/2″ x 12″.
Step 5: Cut 12 pieces of various papers to measure 4-1/2” x 1”. Adhere to the cardstock.
Step 6: Using the 12-inch Decorative Trimmer, make a wave cut a half an inch from the edges of each side of the cardstock. Then flip the cardstock over, so the strips are face down and cut 1/2” waves. Repeat this along the other edge as well. Leave the wave strips out. Adhere the remaining pieces on the dark green paper as shown.
Step 7: Cut brown paper to measure — (2) 5-1/2” x 4”, (1) 5-1/2” x 3-1/4”. Adhere to the layout.
Step 8: Cut a piece of light green paper to measure 5-1/4” x 3”. Adhere to middle brown paper.
Step 9: Adhere stickers and embellishments, using Foam Squares on some for added dimension.
Instructions for #2022SeptemberBONUS2
To create this layout you will need:
- Shades of Croptoberfest Paper Pack or (Shop Canada | Shop Australia)
- Stickers from the Croptoberfest 2022 Project Recipe™ Kit or (Shop Canada | Shop Australia)
- Croptoberfest 2022 Mini Pack Embellishments or (Shop Canada | Shop Australia)
- Croptoberfest 2022 Cardstock Sampler Pack or (Shop Canada | Shop Australia)
- 12-inch Trimmer or (Shop Canada | Shop Australia)
- Tape Runner or (Shop Canada | Shop Australia)
- Repositionable Tape Runner or (Shop Canada | Shop Australia)
- Foam Squares or (Shop Canada | Shop Australia)
- Brown Dual-Tip Pen or (Shop Canada | Shop Australia)
Step 1: Use a piece of navy paper as the base of the layout.
Step 2: Cut a piece of cardstock to measure 11-1/2″ x 11-1/2″. Adhere to the layout.
Step 3: Cut 12 pieces of various papers to measure 1″ x 3-1/2″. Cut each edge of the strips along the 45-degree line on the trimmer. (Save the triangle pieces you cut off from each end.)
Step 4: Adhere papers to the layout, so that the papers “fit” together on each side along the top of the layout.
Step 5: Using the small triangle pieces, adhere those into the “V’s” of the previous pieces.
Step 6: Cut two photo mats to measure 3-1/2″ x 5-1/2″ and one to measure 3-1/2″ x 4-3/4″. Adhere to the layout. Adhere photos that measure 3-1/4″ x 5-1/4″ and 3 1/4″ x 4-1/2″.
Step 7: Adhere stickers and embellishments, using Foam Squares on some for added dimension.
Step 8: Journal as desired.
Instructions for #2022SeptemberBONUS3
To create this layout you will need:
- Shades of Happy Hauntings Paper Pack or (Shop Canada | Shop Australia)
- Happy Hauntings Stickers or (Shop Canada | Shop Australia)
- White & Black Solid Cardstocks or (Shop Canada | Shop Australia)
- Custom Cutting System with Circle Patterns or (Shop Canada | Shop Australia)
- 12-inch Trimmer or (Shop Canada | Shop Australia)
- Micro-Tip Scissors or (Shop Canada | Shop Australia)
- Tape Runner or (Shop Canada | Shop Australia)
- Repositionable Tape Runner or (Shop Canada | Shop Australia)
- Precision Point Adhesive Pen or (Shop Canada | Shop Australia)
- Foam Squares or (Shop Canada | Shop Australia)
- Black Dual-Tip Pen or (Shop Canada | Shop Australia)
- Optional: Original Border Maker System with Photography Chain BMC or Apple Chain BMC or (Shop Canada | Shop Australia)
Step 1: Use a piece of black hexagons designer paper as the base for this layout. Cut a 12″ x 5/16″ strip of striped paper and adhere on the top of the layout.
Step 2: Cut an 11″ x 7″ piece of kraft designer paper and adhere on the layout as shown. Crop two photos to 5-1/4″ x 3-1/4″, one photo to 3-3/4″ x 3-1/4″ and one photo to 2-1/4″ x 3-1/4″. Cut a 1-5/8″ x 3-1/4″ piece of purple organic paper and a 2-7/8″ x 3-1/4″ piece of white speckled paper. Adhere all on the kraft piece as shown.
Step 3: Create the border. Cut a 12″ x 3-5/8″ strip of stripes paper for the base. Cut a 12″ x 3″ strip of purple organic paper and adhere on the base. Cut a 12″ x 1″ strip of purple and black stripes paper. Adhere about 1″ from the top of the border.
Step 4: Using the inside edge of the smallest Custom Cutting Circle Pattern and the Blue Blade, cut six circles with White Solid Cardstock. Create eyeballs using the optional border maker cartridges listed (or other). Adhere on the purple and black stripes strip as shown.
Step 5: Cut a 12″ x 2″ strip of black hexagon paper. Cut several strips with various papers and at various angles. Adhere in a mosaic pattern, as shown. Trim 1/4″ off the top and bottom of the strip to give a clean edge. Then cut 1/2″ off the remaining strip. Adhere the 1/2″ strip overlapping the eyeballs on top and the 1-1/4” strip overlapping the eyeballs on the bottom, as shown.
Step 6: Add stickers, popping some up with Foam Squares for added dimension.
Step 7: Journal as desired.
Enjoy the challenges, and if you want all the details on the promotion, visit: US | CA | AU.

The colors in these sketches and paper packs are beautiful. Can’t wait to receive my order!
They all have some interesting elements.and the are all too messy.
I’m going to leave out some, and change the background to a soft overall print.
Diana, I agree. It is just too busy to enjoy the layout design and focus on the photos. I would leave off some or change it up a bit too.
Agreed. I often leave out stuff. Sometimes add pictures.
I’m trying to follow the instructions but they don’t make sense. On sketch #1 it has you cutting cardstock to go ??? And the dark paper on the left side is for what, or is it covered by the cards took? Why do you need the cardstock?
The strips are adhered to the cardstock, then the entire piece is cut on the decorative trimmer. The resulting “strips” are then are adhered to the dark green decorative paper. That is what you can see through the “waves” that have been cut in the strips
The waves are separate pieces cut from the paper. According to the instructions you would have the base paper, then the dark paper, then the cardstock covered by the individual strips. My question is why so many layers?
Oh! I reread the instructions after your explanation and finally got it! Thank you Maureen. It wasn’t computing, now I get it.