March 9, 2023
Wave Hello To The Season With This Spring Scrapbook Layout
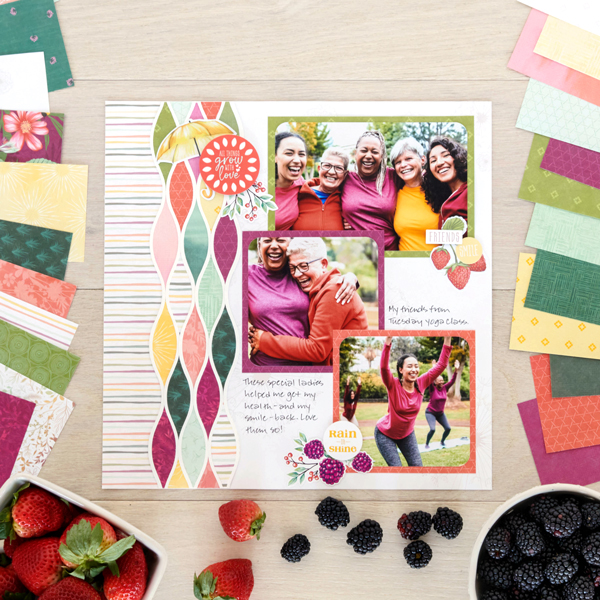
Wave hello to spring — literally — for today’s blog features a wavy, warming and wonderful design that is as soft and sweeping as an easy-going breeze on a springtime day. What are some sensations you like to do during this time of year? Enjoying walks or yoga in the park? Jumping in rain puddles with the kiddos or grandkids? Visiting farmers’ markets for fresh veggies, fruits, flowers and herbs? Taking a stroll through a rose garden? The budding memories and nature’s hue-tiful canvas of pastel possibilities are endless — just like this spring scrapbook layout!

To create this layout you will need:
- Painted Garden Paper Pack or (Shop Canada | Shop Australia)
- Painted Garden Tone-on-Tone Paper Pack or (Shop Canada | Shop Australia)
- Painted Garden Embellishments or (Shop Canada | Shop Australia)
- Painted Garden Stickers or (Shop Canada | Shop Australia)
- White Solid Cardstock or (Shop Canada | Shop Australia)
- Custom Cutting System with Circle Patterns or (Shop Canada | Shop Australia)
- 2-Way Corner Rounder or (Shop Canada | Shop Australia)
- 12-inch Trimmer or (Shop Canada | Shop Australia)
- 12-inch Decorative Trimmer or (Shop Canada | Shop Australia)
- Micro-Tip Scissors or (Shop Canada | Shop Australia)
- Tape Runner or (Shop Canada | Shop Australia)
- Repositionable Tape Runner or (Shop Canada | Shop Australia)
- Foam Squares or (Shop Canada | Shop Australia)
- Black Dual-Tip Pen or (Shop Canada | Shop Australia)

Step 1: Use a piece of white dandelions designer paper as the base for this layout. Cut a 2″ x 12″ strip with stripes designer paper and adhere on the left edge of the layout.

Step 2: Using the wavy edge of the 12-inch Decorative Trimmer, cut six 12″ x 1/8″ strips with White Solid Cardstock. Choose several designer and tonal papers. With each, cut a wavy edge, then rotate it to the opposite side, align the low edge of the wave at the 1-1/2″ mark and cut again so that the strip has wide spots and narrow spots. Cut apart the “swells” and adhere one row of various hued pieces along the striped piece. Adhere a white strip over both sides. Continue filling in the spots until you have five columns as shown.
Step 3: Cut a 6-1/2″ x 4-1/2″ piece with olive green diamonds tonal paper. With the 2-Way Corner Rounder, round the corners of a 6″ x 4″ photo and mount on top. Cut a 4-1/2″ x 4-1/2″ piece with each violet basketweave and coral basketweave tonal papers. Crop two photos to 4″ x 4″, round the corners with the 2-Way Corner Rounder and mount on the squares. Adhere all on the layout as shown.
Step 4: Using the inside of the medium Circle Custom Cutting System Pattern and the Blue Blade, cut a circle with White Solid Cardstock. Mount the “All things grow with love” sticker on top. Adhere, along with other stickers and embellishments, popping some up with Foam Squares for added dimension.
Step 5: Journal as desired.
Do you like the wavy detail on this spring scrapbook layout? What springtime memories would you shower upon it?
P.S. Are YOU a member of the Virtual Crop Facebook Group? It’s your go-to place for MONTHLY Virtual Crops, MONTHLY Completed Album Challenges, WEEKLY LIVE STREAMING of Fast & Fun Projects with Noreen, LIVE QUARTERLY Secret Box Openings with project tutorials and so much more! We hope you’ll join our community of more than 30,000 fellow memory-keeping enthusiasts — you’ll feel right at home!

Love it !! have made several versions of this from Krislyn’s YouTube last week!!