May 31, 2023
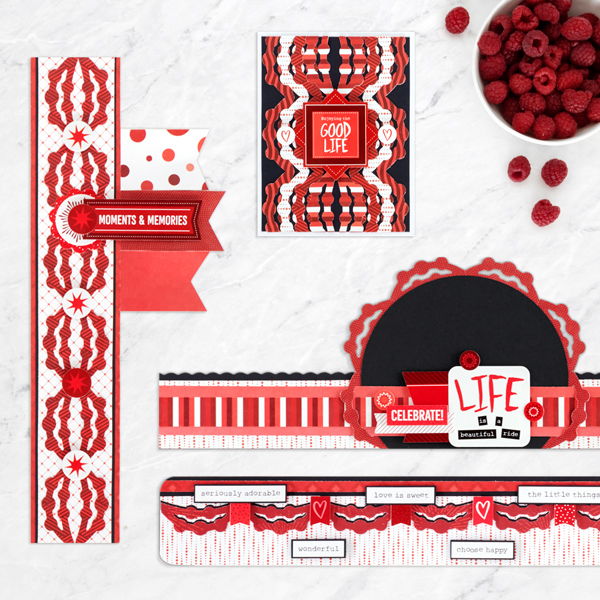
Link Your Memories Together With These Tonal Scrapbook Borders And DIY Card
Did you know for a limited time, you can earn the exclusive Dotted Banner Chain Border Maker Cartridge or Mosaic Diamond Chain Border Maker Cartridge FREE when you reach a qualifying purchase amount — up to 6 free BMCs per order!? Talk about a bevy of border-making fun!
For more details, visit: US | CA | AU
Well, if you want to get the scoop on swoops (literally!), then this blog post regarding the Dotted Banner Chain BMC is it for you, for this cartridge creates a double-banner design with two dots swooping across the top row and three dots swooping across the bottom row. And when you pair it with some tonally awesome products, you’re in for a dazzling, delightful treat! Or rather, make that three tonal scrapbook borders and DIY card!
To create these borders you will need:
- Original Border Maker System with the Dotted Banner Chain Border Maker Cartridge — Earn this BMC FREE during the current Spend/Get Promo!
- Totally Tonal Red Paper Pack (Shop Canada | Shop Australia)
- Totally Tonal Red Stickers or (Shop Canada | Shop Australia)
- Black Solid Cardstock or (Shop Canada | Shop Australia)
- Blank Card Kit or (Shop Canada | Shop Australia)
- 12-inch Trimmer or (Shop Canada | Shop Australia)
- Custom Cutting System with Circle Patterns or (Shop Canada | Shop Australia)
- Tape Runner or (Shop Canada | Shop Australia)
- Repositionable Tape Runner or (Shop Canada | Shop Australia)
- Foam Squares or (Shop Canada | Shop Australia)
- Micro-Tip Scissors or (Shop Canada | Shop Australia)

Choose Happy Border

Step 1: Cut a piece of Black Solid Cardstock to measure 12” x 2-1/4”. Use this as the base of the border.
Step 2: Cut a piece of white cascading dots paper to measure 12” x 1-3/4”. Adhere along the bottom edge of the border.
Step 3: Cut a strip of plaid paper to measure 12” x 1/4”. Align and adhere on the black cardstock piece along the top as shown.
Step 4: Using the Original Border Maker System, punch one border from Black Solid Cardstock and one using bursts paper from the Dotted Banner Chain Border Maker Cartridge. Adhere to the top edge of the white paper, offsetting slightly.
Step 5: Cut a piece of Black Solid Cardstock to measure 12” x 1/2”. Adhere the phrase stickers to the cardstock, cutting in between using scissors. Adhere to the border.
Step 6: Adhere the remaining stickers using Foam Squares.
Moments And Memories Border
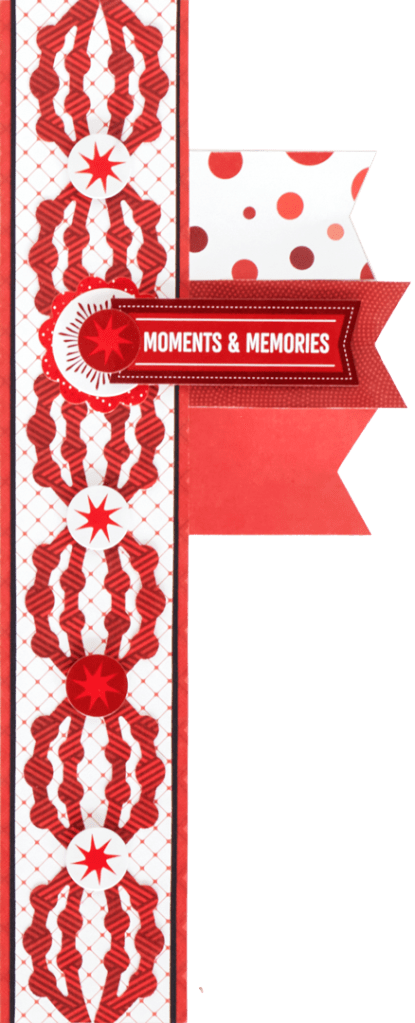
Step 1: Cut a piece of plaid paper to measure 2-1/4” x 12”. Use this as the base for the border.
Step 2: Cut a piece of Black Solid Cardstock to measure 2” x 12”. Adhere to the border.
Step 3: Cut a piece of white crosshatch paper to measure 1-7/8” x 12”. Adhere to the border.
Step 4: Using the Original Border Maker System and the Dotted Banner Chain Border Maker Cartridge, punch two borders from the chevron paper. Adhere mirrored to each other on the border as shown.
Step 5: Cut three pieces of various papers to measure 3-1/2” x 1-1/2”. Gently fold the ends and cut with scissors at an angle to create the banner effect. Adhere to the back side of the border.
Step 6: Adhere stickers to the border, using Foam Squares on some for added dimension.
Life Is A Beautiful Ride Border

Step 1: Cut a piece of Black Solid Cardstock to measure 12” x 2” using the 12-inch Trimmer and the Scallop Blade for one edge.
Step 2: Cut a piece of white cascading dots paper to measure 12” x 1-3/4”. Adhere to the cardstock.
Step 3: Using the outside edge of the medium Circle Custom Cutting System Pattern and the Green Blade, cut a circle.
Step 4: Using a 12-inch Trimmer, cut 1” from the circle.
Step 5: Using the Original Border Maker System with the Dotted Banner Chain Border Maker Cartridge, punch a border from dotted scallops paper. Cut the border into 2” segments. Adhere each segment along the back edge of the circle. Adhere to the border.
Step 6: Cut a piece of ombré paper to measure 12” x 1-1/4”.
Step 7: Cut a piece of striped paper to measure 12” x 1”. Adhere to the previous piece.
Step 8: Weave the layered pieces of paper through the dotted banner pieces on the circle as shown.
Step 9: Adhere stickers to the border using Foam Squares for dimension.
Good Life Card
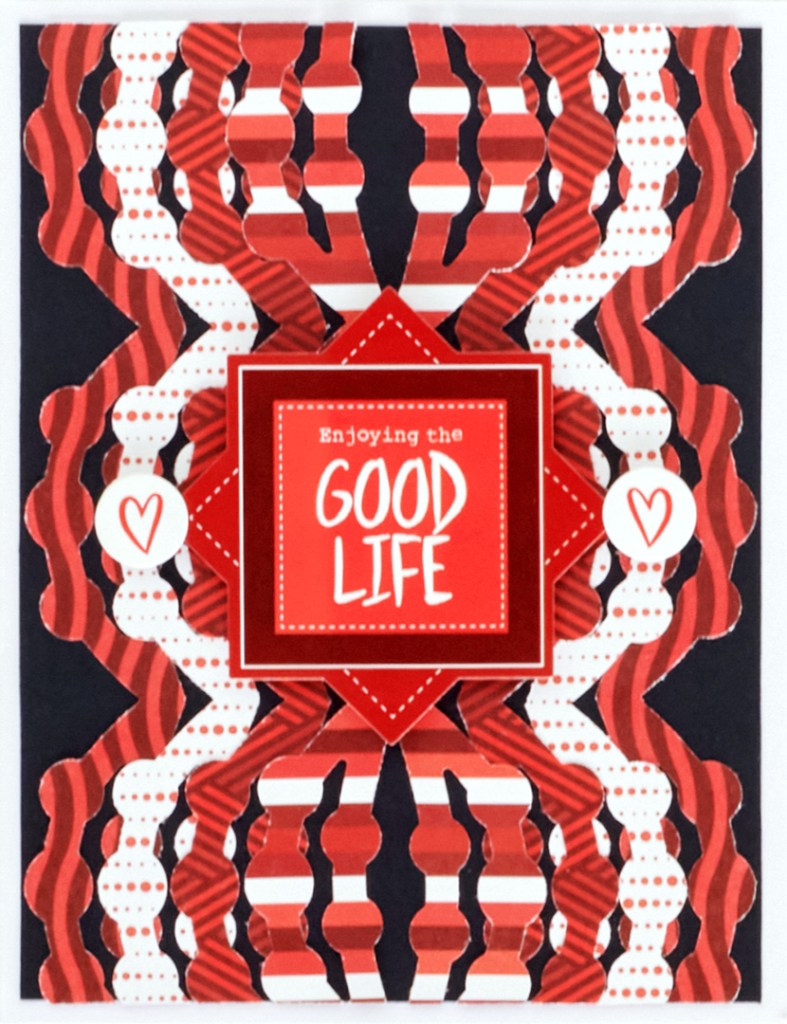
Step 1: Use a blank card from the Blank Card Kit for the base.
Step 2: Cut a piece of Black Solid Cardstock to measure 4” x 5-1/4”.
Step 3: Using the Original Border Maker System and Dotted Banner Chain Border Maker Cartridge, punch three borders from different papers. Cut each border into two 6″ segments. Align along the outer edges of the cardstock with the first pattern of paper, then the second and then meet in the middle with the third. Trim excess from the edges of the cardstock with scissors. Adhere to the front of the card.
Step 4: Adhere the sticker to the card using Foam Squares.
Do you like the cohesive and eye-catching designs of these tonal scrapbook borders and DIY card? What themed projects would you make with this BMC?
P.S. Are YOU a member of the Virtual Crop Facebook Group? It’s your go-to place for MONTHLY Virtual Crops, MONTHLY Completed Album Challenges, WEEKLY LIVE STREAMING of Fast & Fun Projects with Noreen, LIVE QUARTERLY Secret Box Openings with project tutorials and so much more! We hope you’ll join our community of more than 33,000 fellow memory-keeping enthusiasts — you’ll feel right at home!
