June 1, 2023
Get The Party Started With These Birthday And Celebration Scrapbook Borders

Here’s a sweet treat — for a limited time, you can purchase the bestselling Original Border Maker System in a special-edition and striking combo of navy and light blue AND you’ll get the limited-edition Frosted Cupcake Chain Border Maker Cartridge, PLUS Celebration Laser Cut Borders (5/pk) BONUS! Now that’s a packed parcel and extra-special present!
So, to put these items to good (and beautiful) use, get your crafting station ready for a project party with these birthday and celebration scrapbook borders that will be the perfect finishing touch (like the bow on top of a gift!) to your layouts!
To create these borders you will need:
- Special-Edition Original Border Maker System + BONUS Celebration Laser Cut Borders or (Shop Canada | Shop Australia)
- Includes a BONUS Frosted Cupcake Chain BMC
- Party Time! Bright Paper Pack or (Shop Canada | Shop Australia)
- Red, Blue, Purple Ice & White Solid Cardstocks or (Shop Canada | Shop Australia)
- 12-inch Trimmer with Straight & Wave Blades or (Shop Canada | Shop Australia)
- 12-inch Decorative Trimmer or (Shop Canada | Shop Australia)
- Custom Cutting System with Circle Patterns or (Shop Canada | Shop Australia)
- Micro-Tip Scissors (Shop Canada | Shop Australia)
- Repositionable Tape Runner or (Shop Canada | Shop Australia)
- Foam Squares or (Shop Canada | Shop Australia)
- Pencil

Happy Birthday Border

Step 1: Cut Blue Solid Cardstock to 12” x 3-1/2”.
Step 2: Cut purple dotted stars paper to 12” x 3-1/4” and adhere to the middle of the blue strip.
Step 3: Cut a 12” x 1” strip from yellow chevron paper.
Step 4: Place the “Happy Birthday” banner laser-cut border on the yellow strip. With a pencil, trace along the curved edge. Cut out with Micro-Tip Scissors and adhere the curved yellow piece to the top of the border as shown.
Step 5: Adhere the “Happy Birthday” banner laser-cut border with Foam Squares underneath the yellow piece for added dimension.
Step 6: Using the Original Border Maker System with the Frosted Cupcake Chain Border Maker Cartridge, punch a border from White Solid Cardstock.
Step 7: Using the inside edge of the smallest Circle Custom Cutting System Pattern and Blue Blade, cut (6) circles from Blue Solid Cardstock, (4) circles from green triangles paper, (4) circles from yellow chevron paper and (4) circles from bright red party icons paper.
Step 8: Adhere the circles underneath the frosted cupcake border as shown.
Step 9: Adhere the cupcake/circles piece to the border using Foam Squares for added dimension.
Birthday Cake Border

Step 1: Use the 12-inch Trimmer with the Wave Blade to cut a 12” x 2-1/2” strip from Red Solid Cardstock.
Step 2: Cut a 12” x 2-1/4” strip from blue Happy Birthday wishes paper and adhere to the middle of the red strip.
Step 3: Using the inside edge of the medium Circle Custom Cutting System Pattern and the Green Blade, cut (5) circles from Red Solid Cardstock. Cut (5) circles from white confetti paper using the Blue Blade on the inside edge. Adhere the white circles to the red circles.
Step 4: Using the Original Border Maker System with the Frosted Cupcake Chain Border Maker Cartridge, punch a border from Red Solid Cardstock.
Step 5: Adhere a segment of the border to one of the circle pieces with the Repositionable Tape Runner and trim to fit with Micro-Tip Scissors. Repeat a second time.
Step 6: Cut apart three cakes from the cakes laser-cut border. Adhere to three of the circles.
Step 7: Use the 12-inch Trimmer with the Wave Blade to cut a 1/2” x 12” strip.
Step 8: Fold the strip over onto itself in small sections to create a folded ruffle.
Step 9: Run Repositionable Tape Runner around the back edge of the circle with the largest cake and adhere the ruffle. Trim to fit. Place large Foam Squares on the seam. Adhere to the middle of the border.
Step 10: Adhere the other circles to the border as shown.
Birthday Present Border
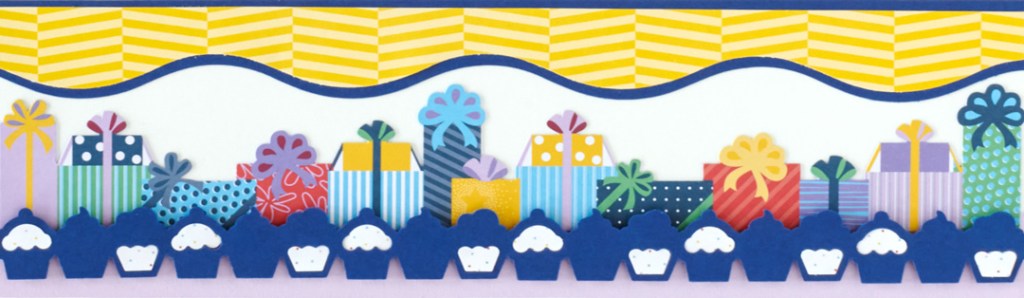
Step 1: Cut White Solid Cardstock to 12” x 3-1/2”.
Step 2: Cut Purple Ice Solid Cardstock to 12” x 3/4” and adhere to the bottom of the white strip.
Step 3: Use the 12-inch Decorative Trimmer to cut a wavy 12” x 1-1/4” strip from Blue Solid Cardstock.
Step 4: Use the 12-inch Decorative Trimmer to cut a wavy 12” x 1” strip from yellow chevron paper and adhere to the blue wavy strip.
Step 5: Adhere the layered strip to the top of the border.
Step 6: Adhere the presents laser-cut border on top of the purple ice strip.
Step 7: Using the Original Border Maker System with the Frosted Cupcake Chain Border Maker Cartridge, punch a border from Blue Solid Cardstock. Adhere to the border as shown using Foam Squares.
Step 8: Using the Original Border Maker System with the Frosted Cupcake Chain Border Maker Cartridge, punch a border from white confetti paper.
Step 9: Place small Foam Squares into the open spaces of the cupcakes laser-cut border and place the white confetti debris pieces onto the Foam Squares.
Do you have any birthdays or celebrations that could use some party-worthy borders? Which of these celebration scrapbook borders will be your go-to crafting treat?
P.S. Are YOU a member of the Virtual Crop Facebook Group? It’s your go-to place for MONTHLY Virtual Crops, MONTHLY Completed Album Challenges, WEEKLY LIVE STREAMING of Fast & Fun Projects with Noreen, LIVE QUARTERLY Secret Box Openings with project tutorials and so much more! We hope you’ll join our community of more than 33,000 fellow memory-keeping enthusiasts — you’ll feel right at home!

These are great. Would love some of the birthday BMC cartridges to make a reappearance. Thanks would be awesome.