August 21, 2023
Keep Tabs On School Stories With These Notebook Edge Borders For Scrapbooking
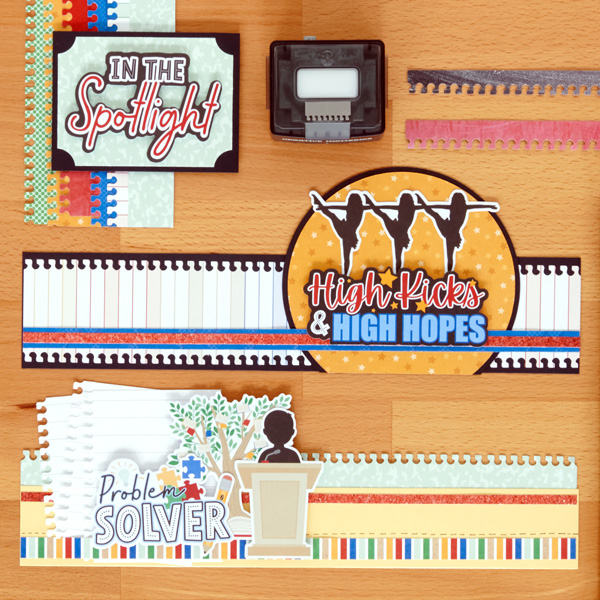
In this digital age where technology has become a fundamental facet of our lives, is there still room for the physical, lined-and-ready-to-write paper notebook? Of course! From essays to homework assignments, to-do lists and to journal your thoughts, writing things down using a pen or pencil and paper helps to engrave info, insight and ideas into our memories (and can help increase productivity and creativity, too!). Be border-bound (whether you’re a student or chronicling school day memories, or even if you just want to document day-to-day routines and moments) with these notebook edge borders!
To create these borders you will need:
- Back To School Paper Pack or (Shop Canada | Shop Australia)
- Back To School Texture Paper Pack or (Shop Canada | Shop Australia)
- 12×12 White Lined Designer Paper Pack or (Shop Canada | Shop Australia)
- School Spirit Embellishments or (Shop Canada | Shop Australia)
- Knowledge is Power Embellishments or (Shop Canada | Shop Australia)
- Make Your Mark Embellishments or (Shop Canada | Shop Australia)
- Canary & Black Solid Cardstocks or (Shop Canada | Shop Australia)
- 12-inch Trimmer or (Shop Canada | Shop Australia)
- Original Border Maker System with Notebook Edge Border Maker Cartridge or (Shop Canada | Shop Australia)
- Custom Cutting System with Circle Patterns or (Shop Canada | Shop Australia)
- 2-Way Corner Rounder or (Shop Canada | Shop Australia)
- Tape Runner or (Shop Canada | Shop Australia)
- Repositionable Tape Runner or (Shop Canada | Shop Australia)
- Foam Squares Variety Pack or (Shop Canada | Shop Australia)
- Black Dual-Tip Pen or (Shop Canada | Shop Australia)

Problem Solver Border
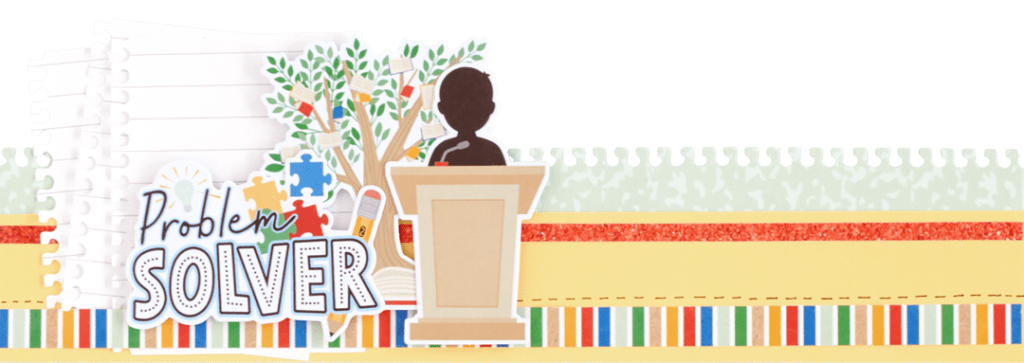
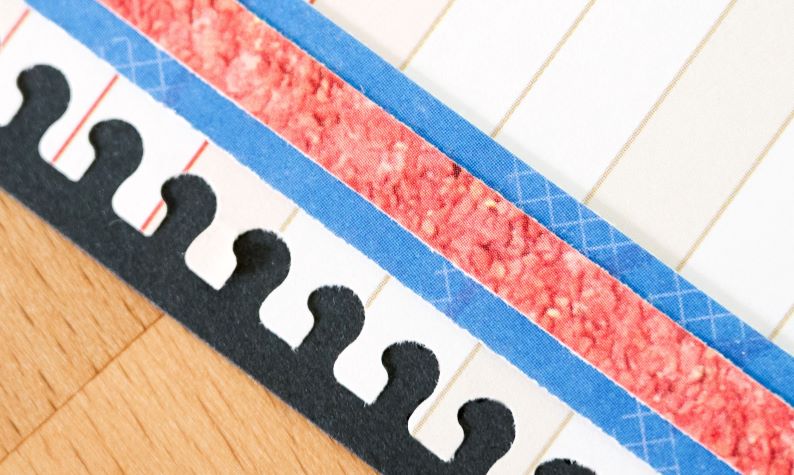
Step 1: Cut a piece of mint composition notebook paper to measure 12” x 2-1/2”. Punch one edge with the Notebook Edge Border Maker Cartridge in the Original Border Maker System. Use as the base.
Step 2: Cut a piece of Canary Solid Cardstock to measure 12” x 1-3/4”. Adhere to the lower edge of the mint paper.
Step 3: Cut a piece of red running surface texture paper to measure 12” x 1/4”. Adhere 1/4” from the top edge of the cardstock.
Step 4: Using white lined designer paper, cut three pieces to measure 3” x 3-1/2”. Using the Notebook Edge Border Maker Cartridge with the Original Border Maker System, punch along the 3-1/2” edge of the papers. Adhere on top of each other, angled. Adhere to the top-left side of the border.
Step 5: Cut a piece of multi-hued stripes paper to measure 12” x 1/2”. Adhere over the bottom edge of the notebook papers.
Step 6: Adhere the embellishments to the border using Foam Squares for added dimension.
In The Spotlight Border
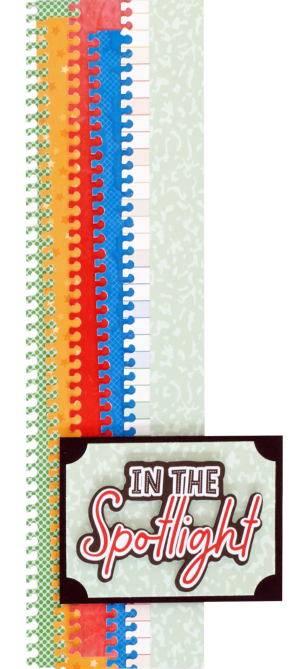
Step 1: Punch the edge of the Kelly green dots paper using the Notebook Edge Border Maker Cartridge in the Original Border Maker System. Cut at 3-1/4”.
Step 2: Punch the edge of the gold stars paper using the Notebook Edge Border Maker Cartridge in the Original Border Maker System. Cut to 2-3/4”. Adhere to the top of the previous piece at a slight angle.
Step 3: Punch the edge of the red gym mat texture paper using the Notebook Edge Border Maker Cartridge in the Original Border Maker System. Cut to 2-1/2”. Adhere to the top of the gold stars piece at a slight angle.
Step 4: Punch the edge of the blue thought bubbles paper using the Notebook Edge Border Maker Cartridge in the Original Border Maker System. Cut to 2”. Adhere to the top of the red gym mat texture paper at a slight angle.
Step 5: Punch the edge of the multi-hued notebook lined paper using the Notebook Edge Border Maker Cartridge in the Original Border Maker System. Cut to 1-1/2”. Adhere to the top of the blue thought bubbles paper at a slight angle.
Step 6: Using the 12-inch Trimmer, cut a straight edge at 3-1/4” through all the layers.
Step 7: Cut a piece of the mint composition notebook paper to measure 1” x 12”. Adhere to the right edge of the border.
Step 8: Cut a piece of Black Solid Cardstock to measure 4” x 3”.
Step 9: Cut a piece of mint composition notebook paper to measure 3-3/4” x 2-3/4”. Use the reverse corner on the 2-Way Corner Rounder. Adhere to the cardstock. Adhere to the lower-right side of the border using Foam Squares.
Step 10: Adhere the embellishments title to the top of the mint composition notebook paper, using Foam Squares for added dimension.
High Kicks & High Hopes Border

Step 1: Cut a piece of Black Solid Cardstock to measure 12” x 2-1/2”.
Step 2: Cut a piece of multi-hued notebook lined paper to measure 12” x 2-1/2”. Punch both long edges using the Notebook Edge Border Maker Cartridge in the Original Border Maker System. Adhere to the cardstock.
Step 3: Using the outside edge of the medium Circle Custom Cutting System Pattern and the Green Blade, cut a circle from Black Solid Cardstock.
Step 4: Using the outside edge of the medium Circle Custom Cutting System Pattern and the Red Blade, cut a circle from gold stars paper. Adhere to the cardstock. Adhere to the right side of the border. Cut off the lower portion of the circle using a scissors.
Step 5: Cut a strip of blue thought bubbles paper to measure 12” x 1/2”. Adhere over the bottom of the border as shown.
Step 6: Cut a strip of red running surface texture paper to measure 12” x 1/4”. Adhere over the blue strip.
Step 7: Adhere embellishments, using Foam Squares on the title piece for added dimension.
Learn about the Sticker Buffet by watching the video below!
As a reminder: For a limited time until Aug. 25 at noon CT or while supplies last, when you purchase 8+ of any ABC/123 Letter Stickers packs (3/pk), you’ll earn the exclusive Sticker File Mate FREE! Get a closer look at the exclusive Sticker File Mate you can earn FREE during the Sticker Buffet in the video above!
For more info, click: US | CA | AU
Have you taken notes of these school scrapbook borders and notebook edge borders? Which one will you make first?
P.S. Are YOU a member of the Virtual Crop Facebook Group? It’s your go-to place for MONTHLY Virtual Crops, MONTHLY Completed Album Challenges, WEEKLY LIVE STREAMING of Fast & Fun Projects with Noreen, LIVE QUARTERLY Secret Box Openings with project tutorials and so much more! We hope you’ll join our community of more than 35,000 fellow memory-keeping enthusiasts— you’ll feel right at home!
