October 20, 2023
Say “Hay There” To This Fall Scrapbook Layout With A Scarecrow Design

Since early agricultural times, scarecrows were set up to ward off crows, blackbirds, raccoons, deer and other hungry mouths and tricky creatures off crops. Nowadays, people create scarecrows to embrace the autumnal season and are a welcome sign to fall-bulous pleasures such as apple picking, corn mazes, pumpkin carving, hayrides or trick-or-treating. Blog contributor Sachiyo Omitsu is saying a welcoming “Hey there!” (or rather, “Hay there!”) to the timing of a brisk breeze and autumn leaves with this fall scrapbook layout and the cutest scarecrow design you’ve ever seen!

To create this layout you will need:
- Sunflower Fields Paper Pack or (Shop Canada | Shop Australia)
- Sunflower Fields Variety Mat Pack or (Shop Canada | Shop Australia)
- Sunflower Fields Stickers or (Shop Canada | Shop Australia)
- Sunflower Fields Layered Embellishments or (Shop Canada | Shop Australia)
- White, Soft Pink & Gold Shimmer Solid Cardstocks or (Shop Canada | Shop Australia)
- Custom Cutting System with Circle & Oval Patterns or (Shop Canada | Shop Australia)
- 12-inch Trimmer or (Shop Canada | Shop Australia)
- Multi-Purpose Tool or (Shop Canada | Shop Australia)
- All-Purpose Scissors or (Shop Canada | Shop Australia)
- Tape Runner or (Shop Canada | Shop Australia)
- Repositionable Tape Runner or (Shop Canada | Shop Australia)
- Foam Squares Variety Pack or (Shop Canada | Shop Australia)
- Black Dual-Tip Pen or (Shop Canada | Shop Australia)
- Brown Dual-Tip Pen or (Shop Canada | Shop Australia)


Step 1: Use the green plaid paper as the base of this layout. Cut the sunflower collage paper to measure 11-3/4” x 5-3/4”. Cut the sunflower and leaves patterned paper to measure 11-3/4” x 6”. Add to the base.
Step 2: Cut the following segments to create the scarecrow.
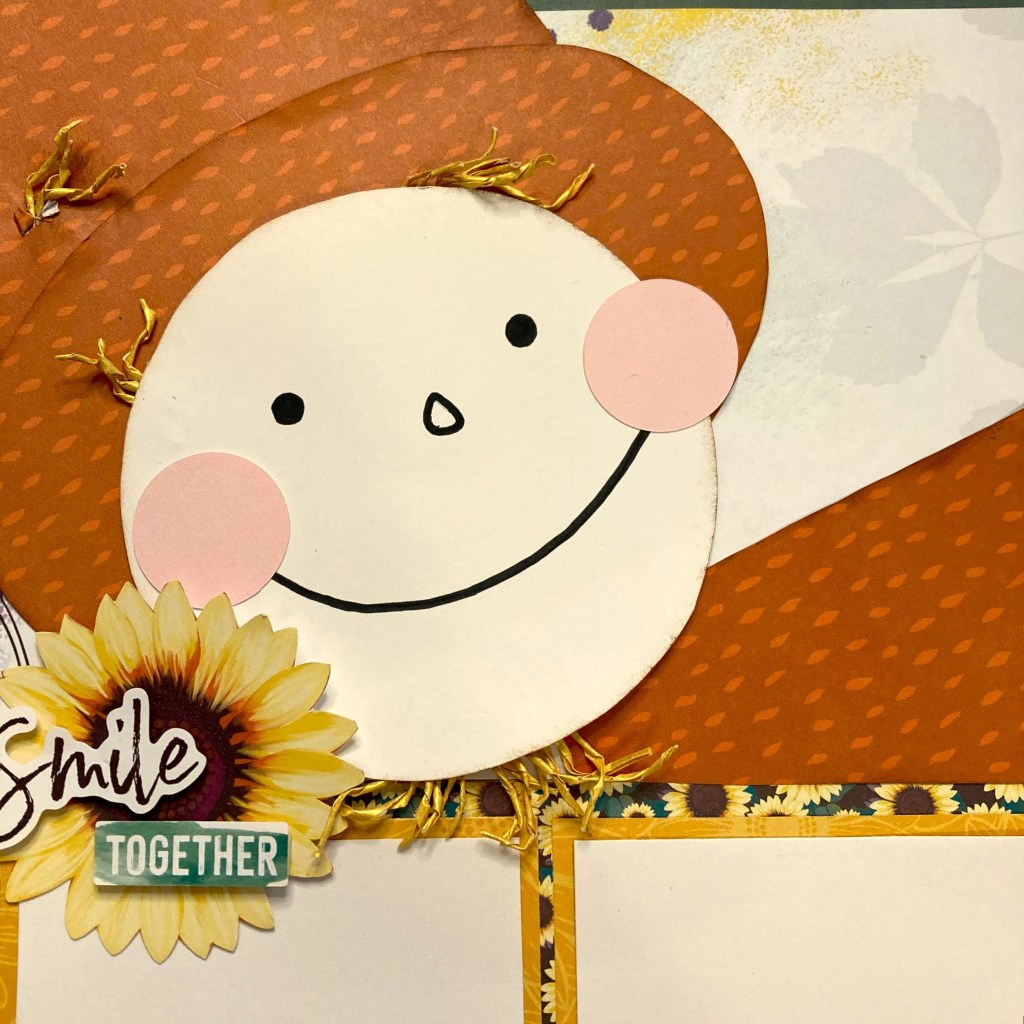
- Face: Cut a circle using the outside edge of the smallest Circle Custom Cutting System Pattern and the Blue Blade from White Solid Cardstock. Using scissors, carefully trim the edge of the circle and ink with a Brown Dual-Tip Pen. Draw his face with a Black Dual-Tip Pen.
- Cheeks: Cut two circles using the inside edge of the smallest Circle Custom Cutting System Pattern and the Green Blade from Soft Pink Solid Cardstock.
- Hat: Cut an oval using the outside edge of the second-largest Oval Custom Cutting System Pattern and the Blue Blade from the orange petals paper. Cut a piece of the orange petals paper to measure 5” x 5”. Using scissors, carefully trim the edge of the circle and square piece to make it look like a hat. Ink the edge with the Brown Dual-Tip Pen.
- Sleeve: Once you adhere the hat to the page, trim the excess. Use the cut-out piece as the sleeve. See the picture in Step 4.
- Hand: Cut the brown chevron paper to measure 1” x 2”. Using scissors, trim the longer sides to make it gradually narrower toward one end.
Step 3: Cut eight 1/8” strips from a piece of Golden Shimmer Solid Cardstock. Twist each strip to make strands. Tear or cut into small pieces so that they look like straw.

Step 4: Assemble your scarecrow, adding straw pieces as you go. Make a hole from the backside of the hat using the Multi-Purpose Tool and insert some straw pieces.

Step 5: Adhere the scarecrow to the top-left corner of the page. Trim the excess with scissors. Cut the excess piece as shown to use as the sleeve.
Step 6: Cut three mats to measure 3-3/4” x 5-1/2” from the yellow sunflowers line art paper. Cut three mats to measure 3-1/2” x 5-1/4” from White Solid Cardstock. Add to the page.
Step 7: Cut out the sunflower and “Happy moments” from variety mats.
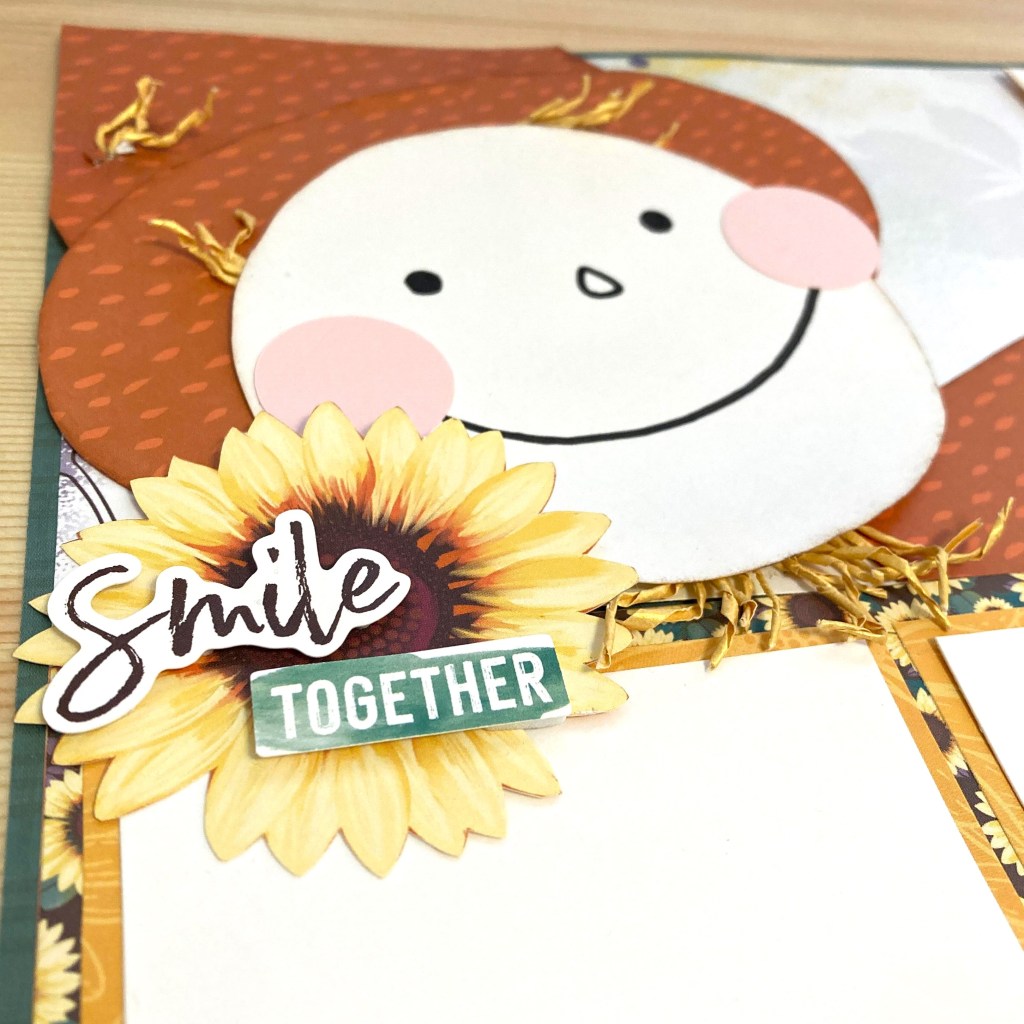

Step 8: Adhere the stickers and embellishments, using Foam Squares on some for added dimension
What do you think of the fun scarecrow design from Sachiyo? Will you be making this fall scrapbook layout that is surely outstanding in its field?
P.S. Are YOU a member of the Virtual Crop Facebook Group? It’s your go-to place for MONTHLY Virtual Crops, MONTHLY Completed Album Challenges, WEEKLY LIVE STREAMING of Fast & Fun Projects with Noreen, LIVE QUARTERLY Secret Box Openings with project tutorials and so much more! We hope you’ll join our community of more than 36,000 fellow memory-keeping enthusiasts — you’ll feel right at home!

So adorable! Now I need to take pictures with a scarecrow.
Super cute Sachiyo! I guessed it was your design even before I scrolled to read your name!
Love it!
Absolutely adorable! I’ll be making this soon!